Snorkel Manual
What is Snorkel?
Snorkel is a VST3/AU synthesizer plugin for Windows, macOS, and iPad that puts musical exploration at the heart of your workflow. Rather than starting from a blank patch or scrolling through presets, Snorkel uses deep randomization to generate musically meaningful starting points — complete ideas with rhythm, melody, harmony, and sound design that you can shape into something uniquely yours.
At its core, Snorkel combines six powerful modules:
- Patterns — a grid-based 16-step sequencer for fast idea generation
- Arpeggiator — a reimagined arpeggiator with controls that go far beyond traditional arps
- Chords — a chord generator with a built-in gater effect
- Synth — a full-featured engine with three oscillators and dual filters
- Drums — a dedicated drum machine for generating percussive patterns and grooves
- Sequencer — ties everything together into complete musical ideas
Every parameter that the randomizer touches is fully editable. You stay in control at all times — Snorkel suggests, you decide. Whether you want to move fast or go deep into sound design, Snorkel is designed to keep things moving.
Key Concepts
- Global Scale and Root — The Root and Scale settings in the main menu bar apply globally to every module in Snorkel. The Patterns grid, Arpeggiator, Chords engine, and all randomization operations work within the same key at all times. Changing the Root or Scale mid-session instantly transposes the entire patch.
- Randomize and Mutate — Every module has two flavors of randomization. Randomize generates something entirely new — new notes, new rhythms, new parameter values — useful for quickly finding a starting point or taking an idea in an unexpected direction. Mutate makes small, incremental changes to what is already there, nudging a pattern slightly without discarding it.
- 16-Step Grids — Patterns, Arpeggiator, Chords, and Drums each use a 16-step grid as their core building block. Each module assigns its own meaning to the steps — notes in Patterns, gate events in Arp and Chords, drum hits in Drums.
- The Step Modulator — Patterns, Arpeggiator, Chords, and the Synth each have a dedicated Modulator tab with a 16-step grid. The steps allow you to define a continuously cycling modulation shape routed to synth parameters like filter cutoff, resonance, and drive.
- Scenes and the Sequencer — Every generator module can store up to 16 independent scenes, each a complete snapshot of that module's pattern and settings. The Sequencer tab ties them together into a 16-step arrangement matrix where each module can switch to a different scene on each step. This is how Snorkel moves beyond a single looping idea into longer, evolving structures.
- The Synth — Snorkel includes a capable built-in synthesizer that is deeply woven into every other feature. There is a separate engine for each generator module — Patterns, Arpeggiator, and Chords each have their own independent synth with three oscillators, dual filters, four LFOs, four envelopes, an FX chain, and a Step Modulator. All synth parameters can be randomized and mutated just like everything else.
Patterns
The Patterns module is a grid-based 16-step sequencer designed for rapid melodic idea generation. Each step can be toggled on or off and assigned a pitch, letting you sketch out musical phrases quickly. Combined with Snorkel's randomization, Patterns becomes a powerful tool for discovering unexpected melodies and rhythmic motifs.
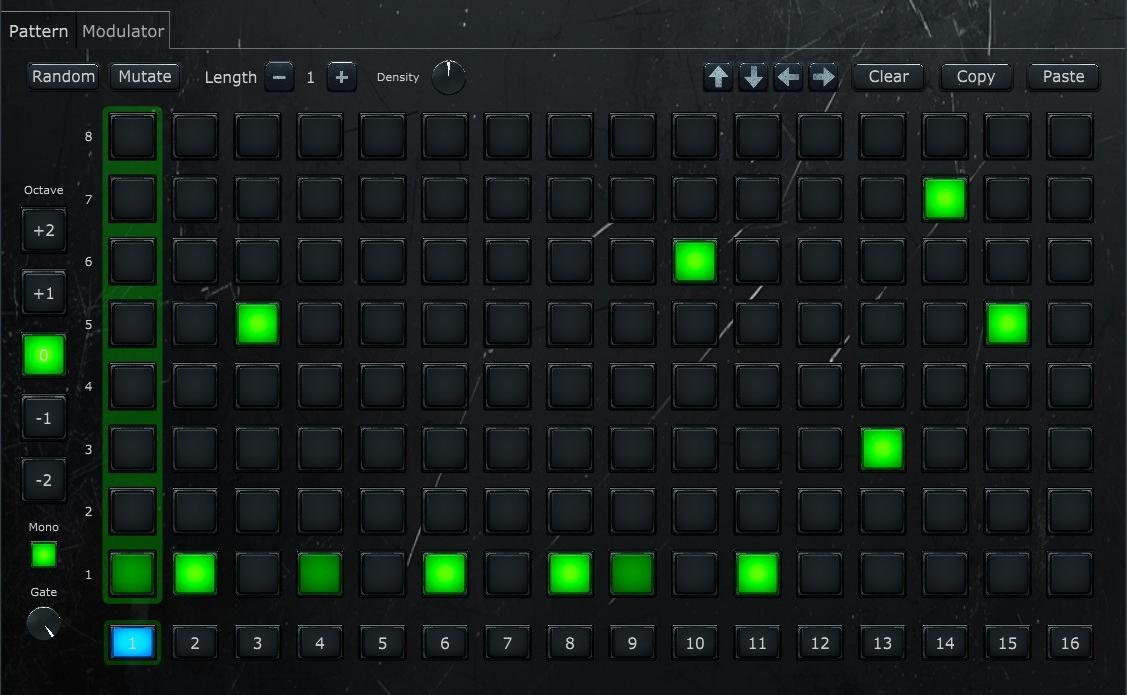
Patterns — Grid
The Grid tab is where you compose melodic patterns on a 16-step grid. Each step can hold one or more notes from the current scale. Up to 16 sequences can be created and chained together using the Playback selector or the Sequencer module.
See Tab Menu Bar and Sub-Tab Menu Bar for the general menus.
Note Grid
A 16-column by 8-row grid. Each column represents a step; each row represents a scale degree (1 through 8, bottom to top). Click a cell to toggle a note on or off for that step.
Side Controls
Located to the right of the grid:
- Octave buttons (−2 to +2) — Select which octave layer you are editing. Notes placed at different octaves are shown with varying brightness on the grid. This lets you create patterns that span multiple octaves.
- Mono — When enabled, each step can only hold a single note. Clicking a new cell in a step automatically clears any existing note in that step. Enabled by default.
- Gate — Controls the note length as a fraction of the step duration. Lower values produce short, staccato notes; higher values produce longer, legato notes.
Sequence Selector
A row of 16 numbered buttons at the bottom of the tab. Each button selects a sequence to edit. All controls on the Grid tab reflect the currently selected sequence. Sequences are independent — each has its own note data across all octave layers.
Patterns — Modulator
A 16-step modulation grid modulating the Patterns synth engine. See Step Modulator for the full reference.
Arpeggiator
Snorkel's Arpeggiator goes far beyond traditional arp designs. With deep and detailed controls over note order, rhythm, velocity, and range, it transforms simple chord input into complex, evolving patterns. The randomization engine can generate entirely new arpeggio configurations, giving you a constantly fresh source of rhythmic and melodic movement.
The following video demonstrates the Arpeggiator in action:
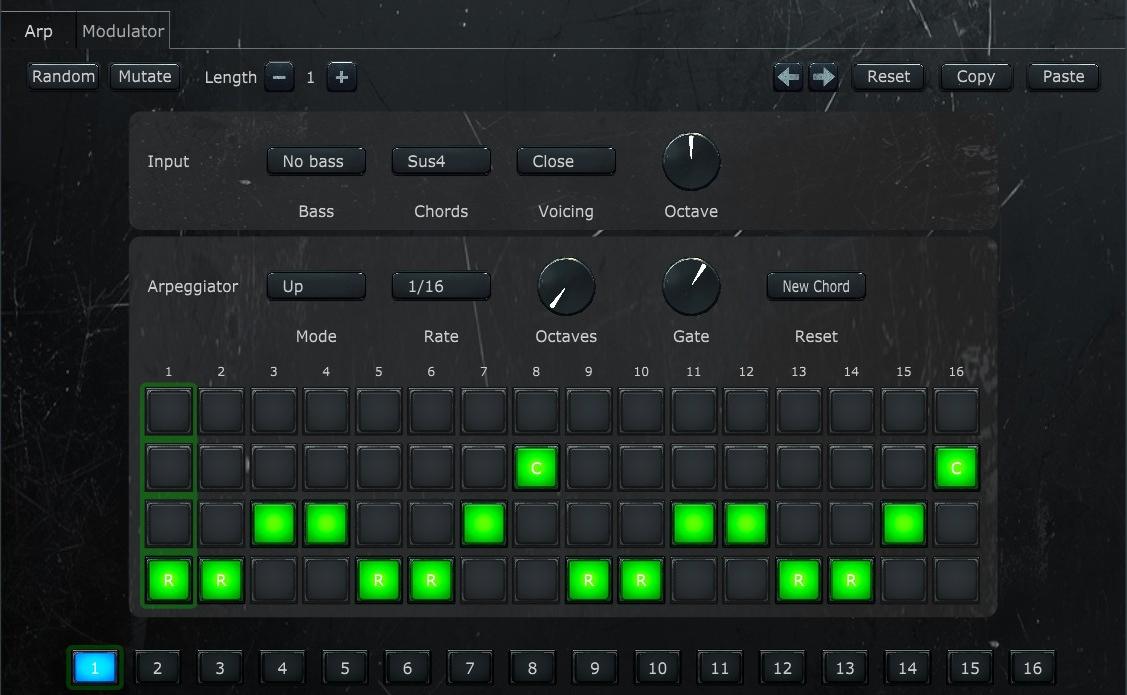
Arpeggiator — Arp
The Arp tab is where you design individual arpeggiator scenes. Each scene defines its own chord input, arpeggiator behavior, and 16-step gate pattern. Up to 16 scenes can be created and sequenced together using the Playback selector or the Sequencer module.
See Tab Menu Bar and Sub-Tab Menu Bar for the general menus.
Input Section
Defines the chord that the arpeggiator will play.
- Input Enabled — When running as a plugin in a DAW, this checkbox controls whether the scene's built-in chord input is used. When disabled, the arpeggiator uses incoming MIDI notes instead. (Only visible in plugin mode.)
- Voicing — Controls how chord notes are spread across octaves. Options: Close (compact, within one octave), Open (spread middle notes up), Drop 1/2/3 (drop the 1st/2nd/3rd highest note down an octave), Wide (maximum spread), Auto (automatic voice leading between chords), Bass only (plays only the bass note).
- Bass — Adds low bass notes below the chord. Options: No bass, Add bass note (one octave below root), Two bass notes, Fifth below, Root + Fifth, Pedal bass (bass note stays on the scale root regardless of chord changes).
- Chords — Selects the chord type built from the current scale degree. Options: Off, Root (single note), Octave (root + octave), Power (root + fifth), Triad, Seventh, Sus4, Sus2, 9th, 11th.
- Octave — Shifts the chord up or down by up to 2 octaves (range: −2 to +2).
Arpeggiator Section
Controls how the arpeggiator steps through the chord notes.
- Arp On — Enables or disables the arpeggiator for this scene. When off, the chord plays as a sustained block chord.
- Mode — The note order pattern. Options: Up, Down, Up-Down, Down-Up, Converge, Diverge, Thirds, Skip, Pedal, Thumb, Spiral, Add One, Double, Stutter, Random, As Played.
- Rate — How fast the arpeggiator advances through notes. Synced to the host tempo. Options range from 1/32 (fastest) through dotted and triplet divisions up to 1/1 (whole note).
- Octaves — How many octaves the arpeggiator spans (1–4). At 1, notes play in a single octave. Higher values repeat the pattern across additional octaves.
- Gate — Controls the note length as a fraction of the step duration (10%–100%). Lower values produce short, staccato notes; higher values produce longer, legato notes.
- Reset — When the arpeggiator resets to the beginning of its pattern. Options: New Chord (resets when the input chord changes), Bar, 2 Bars, 4 Bars, Never.
Gate Pattern
A 16-step grid that controls what happens on each arpeggiator step. The grid has four rows (top to bottom):
- Note row (top) — Plays a specific note from the chord (Note 1–6). Click repeatedly to cycle through available chord notes. The number of available notes depends on the chord type (e.g., a triad has 3). Notes that exceed the chord size are shown in yellow as a warning.
- Chord row — Marked with "C". Plays all chord notes simultaneously on this step.
- Normal row — The default arpeggiator behavior. Advances to the next note in the pattern according to the selected Mode.
- Root row (bottom) — Marked with "R". Plays only the root note on this step, useful for anchoring the pattern on downbeats.
Each step can be in only one state at a time. Clicking a row button for a step toggles it on (turning off whatever was active before). Steps with no row active are silent (off).
Scene Selector
A row of 16 numbered buttons at the bottom of the tab. Each button selects a scene to edit. All controls on the Arp tab reflect the currently selected scene. Scenes are independent — each has its own input settings, arp parameters, and gate pattern.
Arpeggiator — Modulator
A 16-step modulation grid modulating the Arpeggiator's synth engine. See Step Modulator for the full reference.
Chords
The Chords module is a chord generator with a built-in gater effect, making it easy to combine harmonic and rhythmic ideas in one place. Select chord types and voicings, then apply rhythmic gating patterns to create everything from lush pads to choppy stabs. Randomization can generate new chord progressions and gating patterns simultaneously.
The following video demonstrates the Chords module in action:
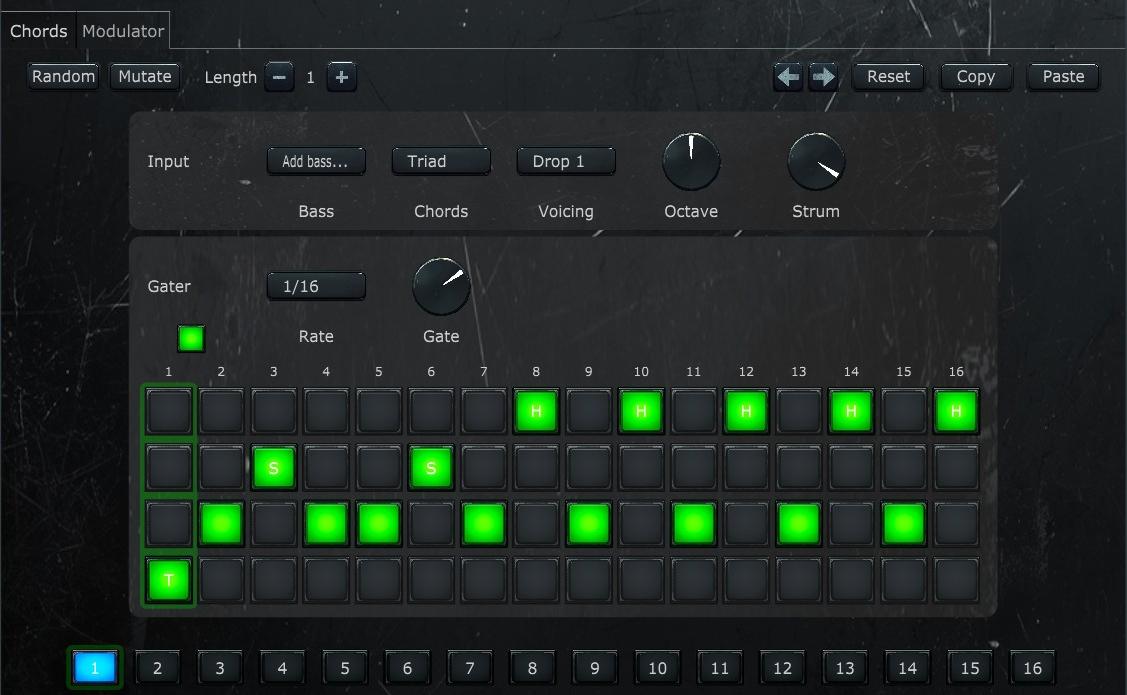
Chords — Chords
The Chords tab is where you design individual chord scenes. Each scene defines its own chord voicing and a 16-step gater pattern that rhythmically chops the chord. Up to 16 scenes can be created and sequenced together using the Playback selector or the Sequencer module.
See Tab Menu Bar and Sub-Tab Menu Bar for the general menus.
Input Section
Defines the chord that will be played.
- Input Enabled — When running as a plugin in a DAW, this checkbox controls whether the scene's built-in chord input is used. When disabled, the module uses incoming MIDI notes instead. (Only visible in plugin mode.)
- Voicing — Controls how chord notes are spread across octaves. Options: Close (compact, within one octave), Open (spread middle notes up), Drop 1/2/3 (drop the 1st/2nd/3rd highest note down an octave), Wide (maximum spread), Auto (automatic voice leading between chords), Bass only (plays only the bass note).
- Bass — Adds low bass notes below the chord. Options: No bass, Add bass note (one octave below root), Two bass notes, Fifth below, Root + Fifth, Pedal bass (bass note stays on the scale root regardless of chord changes).
- Chords — Selects the chord type built from the current scale degree. Options: Off, Root (single note), Octave (root + octave), Power (root + fifth), Triad, Seventh, Sus4, Sus2, 9th, 11th.
- Octave — Shifts the chord up or down by up to 2 octaves (range: −2 to +2).
- Strum — Adds a time offset between chord notes to simulate a strumming effect (0%–100%). At 0% all notes strike simultaneously; higher values spread them out over time.
Gater Section
A trance-gate effect that rhythmically chops the sustained chord.
- Gater On — Enables or disables the gater for this scene. When off, the chord sustains continuously.
- Rate — How fast the gater steps advance. Synced to the host tempo. Options range from 1/32 (fastest) through dotted and triplet divisions up to 1/1 (whole note).
- Gate — Controls the open time of each gate step as a fraction of the step duration (10%–100%). Lower values produce short, choppy slices; higher values let more sound through.
Gate Pattern
A 16-step grid that controls the gater behavior on each step. The grid has four rows (top to bottom):
- Hold row (top) — Marked with "H". Keeps the gate open, sustaining the chord through this step without re-triggering.
- Short row — Marked with "S". Opens the gate for a very brief time, producing a short staccato hit.
- On row — The standard gate behavior. Opens the gate for the duration set by the Gate dial.
- Trigger row (bottom) — Marked with "T". Re-triggers the chord on this step, restarting the note envelopes. Useful for creating rhythmic emphasis on downbeats.
Each step can be in only one state at a time. Clicking a row button for a step toggles it on (turning off whatever was active before). Steps with no row active are silent (gate closed).
Scene Selector
A row of 16 numbered buttons at the bottom of the tab. Each button selects a scene to edit. All controls on the Chords tab reflect the currently selected scene. Scenes are independent — each has its own input settings, gater parameters, and gate pattern.
Chords — Modulator
A 16-step modulation grid modulating the Chords synth engine. See Step Modulator for the full reference.
Synth
The Synth engine is the sound source at the heart of Snorkel. It features three oscillators plus a noise oscillator, analog simulation, dual filters, four LFOs, four envelopes, and a dedicated FX section. Every parameter is included in the randomizer for fast sonic exploration.
The Synth tab has a separate synth engine for each generator module (Patterns, Arpeggiator, Chords). Use the Engine selector in the tab menu bar to switch between them. Each engine has its own independent set of tabs with identical controls.
Synth — Tab Menu Bar
- Engine — Selects which synth engine to edit: Patterns, Arpeggiator, or Chords. Each engine has fully independent sound settings.
- Randomize — Randomizes all synth parameters for the current engine (oscillators, filters, FX, LFOs, envelopes).
- Mutate — Makes small random tweaks to the current engine's parameters.
- Preset — Selects a synth preset for the current engine.
- Save — Saves the current synth configuration as a user preset.
Synth — Oscillators
The Oscillators tab contains three main oscillators, a noise oscillator, the amplitude envelope, analog character controls, and global settings. It uses tabs to organize the three oscillators (Osc 1, Osc 2, Osc 3) and the Noise oscillator into separate panels.
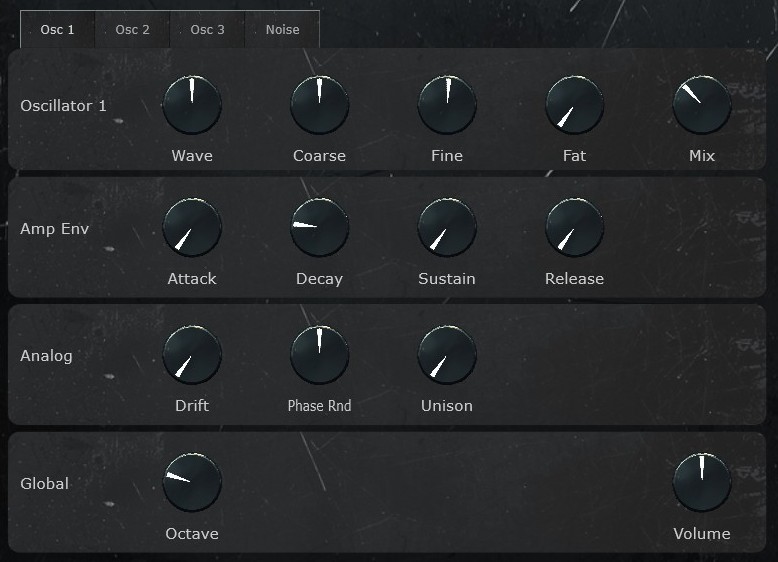
Oscillators 1–3
Each oscillator has the same set of controls:
- Wave — A continuous dial that morphs between Sine (left), Saw (center), and Square (right). Intermediate positions blend between waveforms smoothly.
- Coarse — Pitch tuning in semitones. Use this to set intervals between oscillators (e.g., +7 for a fifth, +12 for an octave).
- Fine — Fine pitch tuning in cents. Small detuning between oscillators creates a thicker, richer sound.
- Fat — Adds a detuned copy of the oscillator for a wider, fatter sound.
- Mix — Volume level of this oscillator in the overall mix.
Noise Oscillator
- Type — Noise color: White (bright, full spectrum), Pink (warmer, less high-frequency energy), or Focused (narrow band).
- Attack — How quickly the noise fades in.
- Decay — How quickly the noise fades out after the attack.
- Filter — Highpass filter on the noise signal. Higher values remove low frequencies, making the noise thinner and brighter.
- Mix — Volume level of the noise in the overall mix. Set to 0 to disable noise.
Amp Envelope (ADSR)
Controls the overall volume shape of each note:
- Attack — Time for the volume to rise from silence to full level.
- Decay — Time for the volume to fall from the peak to the sustain level.
- Sustain — Volume level held while the note is held down.
- Release — Time for the volume to fade to silence after the note is released.
Analog Section
Adds imperfections that simulate analog hardware:
- Drift — Random pitch drift over time, simulating unstable analog oscillators.
- Phase Random — Randomizes the starting phase of oscillators on each note, preventing the identical attack transient that digital oscillators produce.
- Unison — Global unison detune amount applied across all oscillators.
Global Section
- Volume — Overall volume feeding into the FX chain.
- Octave — Global octave shift applied to all oscillators.
The Oscillators tab has Randomize and Mutate buttons that affect both oscillator and filter parameters together.
Synth — Filters
Snorkel provides dual filters with flexible routing. Each filter has its own set of controls and a dedicated modulation envelope.
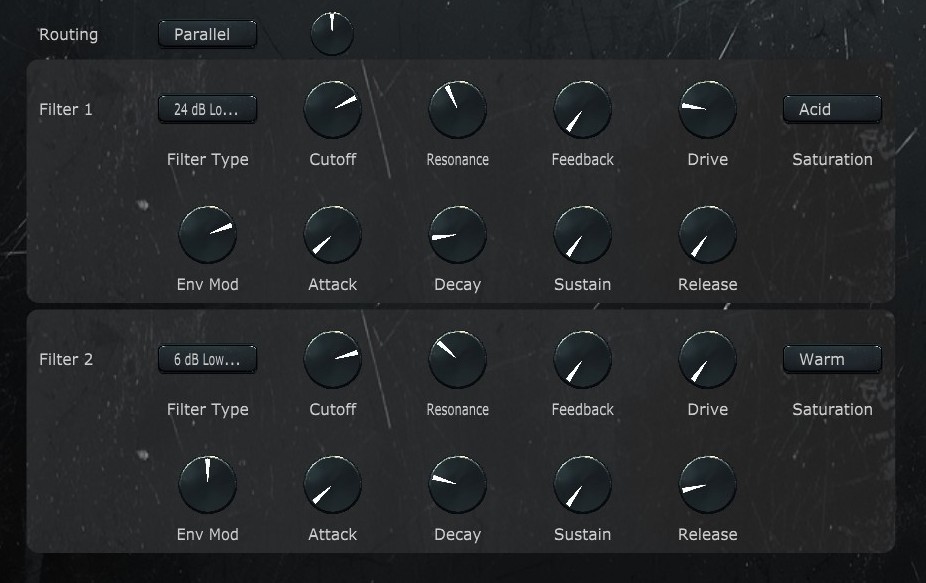
Routing
- Routing — How the two filters are connected. Options: Filter 1 only, Filter 2 only, Parallel (signal splits to both, mixed via the Mix control), Serial (signal flows through Filter 1 then Filter 2), Off.
- Mix — In Parallel routing mode, controls the balance between Filter 1 and Filter 2.
Filter 1 / Filter 2
Each filter has identical controls:
- Type — The filter shape. Options: 6 dB Lowpass, 12 dB Lowpass, 24 dB Lowpass, 36 dB Lowpass, Bandpass, Highpass, Notch, Comb.
- Cutoff — The filter cutoff frequency. For lowpass filters, frequencies above this are attenuated.
- Resonance — Emphasis at the cutoff frequency. High resonance creates a sharp peak that can self-oscillate.
- Env Mod — How much the filter's own ADSR envelope modulates the cutoff frequency. Positive values sweep the cutoff up during the attack phase.
- Feedback — Routes the filter output back to its input for more aggressive tonal character.
- Drive — Pre-filter gain that pushes the signal into the saturation stage.
- Saturation — The type of distortion applied. Options: Clean (no distortion), Warm (soft saturation), Tube (tube amp emulation), Hard (hard clipping), Acid (aggressive, TB-303-style distortion).
Filter Envelope (ADSR)
Each filter has its own dedicated envelope:
- Attack — Time for the envelope to rise to its peak.
- Decay — Time to fall from the peak to the sustain level.
- Sustain — Level held while the note is sustained.
- Release — Time to return to zero after the note is released.
Synth — FX
The FX tab contains the post-filter effects chain. The signal flows through: Modulation → Delay → Grit → Reverb → Output. Each effect can be independently enabled or disabled.
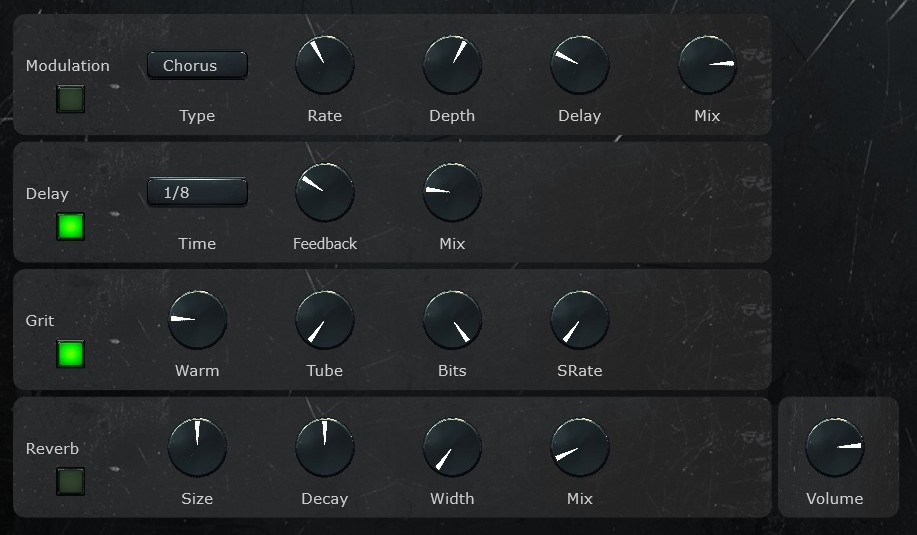
Modulation
- Enabled — Turns the modulation effect on or off.
- Type — The modulation effect type: Chorus, Flanger, or Phaser.
- Rate — Speed of the modulation sweep.
- Depth — Intensity of the modulation effect.
- Feedback — Routes output back to the input for more pronounced sweeps.
- Delay — Base delay time for the modulation effect.
- Mix — Dry/wet balance.
Delay
- Enabled — Turns the delay on or off.
- Time — Delay time, synced to the host tempo. Options range from 1/16 through dotted and triplet divisions up to 1/1.
- Feedback — Amount of the delayed signal fed back, controlling the number of repeats.
- Mix — Dry/wet balance.
Grit
Lo-fi effects for adding character and edge.
- Enabled — Turns the grit section on or off.
- Warm — Subtle warm saturation.
- Tube — Tube amplifier-style overdrive.
- Bit Depth — Bit depth reduction for digital distortion. Lower values produce crunchier, more lo-fi sound.
- Sample Rate — Sample rate reduction. Lower values create aliasing artifacts for a retro digital character.
Reverb
- Enabled — Turns the reverb on or off.
- Size — Room size, from small intimate spaces to large halls.
- Decay — How long the reverb tail lasts.
- Width — Stereo width of the reverb signal.
- Mix — Dry/wet balance.
Output
- Volume — Final output volume after all effects processing.
The FX tab also has its own Randomize and Mutate buttons that only affect FX parameters.
Synth — LFOs
The LFOs tab provides 4 Low Frequency Oscillators (LFOs 1–4) for continuous parameter modulation. A second tab (LFOs 2) provides 4 more (LFOs 5–8). Each LFO is displayed as a row with the following controls:
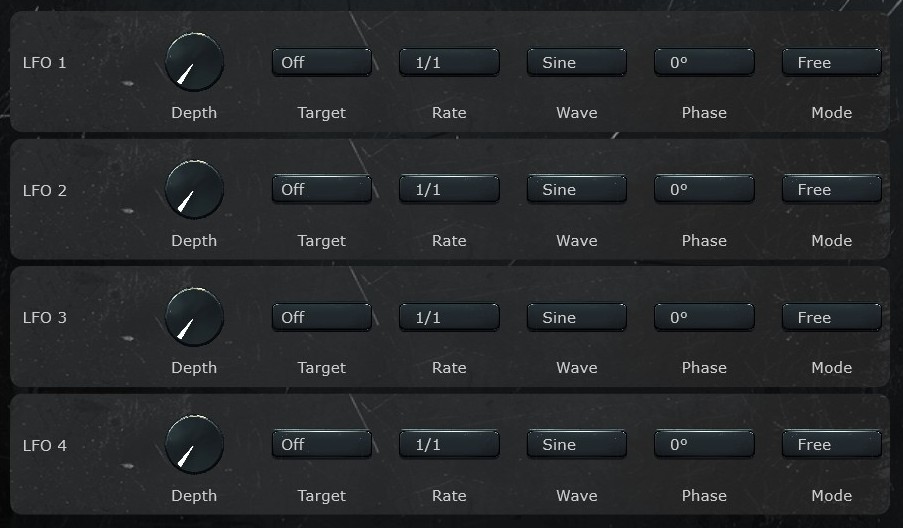
- Depth — Modulation amount. At 0 the LFO has no effect.
- Target — Which synth parameter this LFO modulates. Can target any oscillator, filter, or FX parameter.
- Rate — Speed of the LFO cycle, synced to the host tempo. Options range from 1/16 (fast) up to 16/1 (very slow, 16-bar cycle).
- Wave — The LFO waveform shape. Options: Sine, Triangle, Ramp Up, Ramp Down, Square, Sample & Hold, Smooth S&H, Drift, Decay, Impulse.
- Phase — Starting phase offset: 0°, 90°, 180°, or 270°.
- Mode — LFO behavior. Options: Free (runs continuously, does not reset on new notes), Loop (resets phase on each new note), One Shot (plays one cycle per note then stops), Decay 1x/2x/4x/8x (amplitude fades out over 1–8 LFO cycles).
The LFOs tab has Randomize and Mutate buttons that affect all 4 LFOs on the current page.
Synth — Envelopes
The Envelopes tab provides 4 ADSR modulation envelopes. Unlike LFOs which cycle continuously, envelopes trigger once per note and follow the Attack-Decay-Sustain-Release shape. Each envelope is displayed as a row:
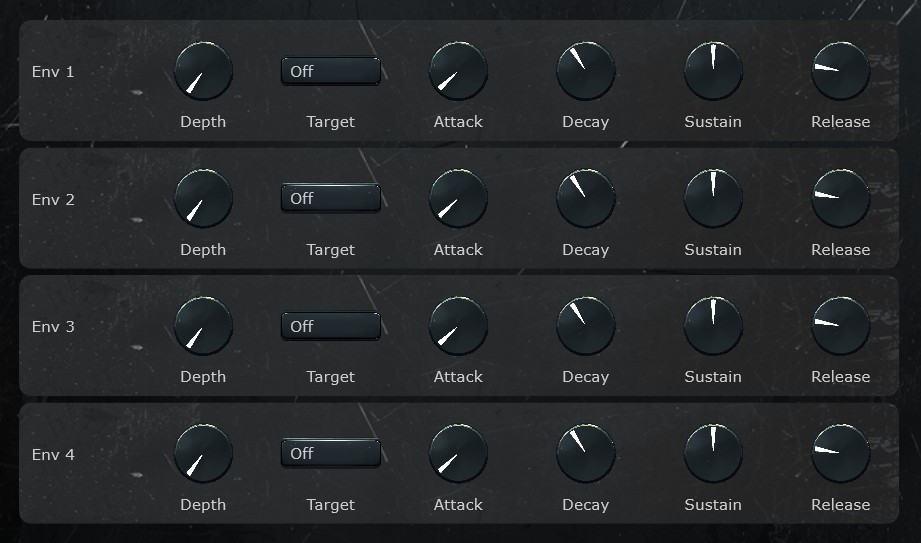
- Depth — Modulation amount. At 0 the envelope has no effect.
- Target — Which synth parameter this envelope modulates. Same target list as LFOs.
- Attack — Time to rise from zero to peak.
- Decay — Time to fall from peak to sustain level.
- Sustain — Level held while the note is held.
- Release — Time to fade to zero after the note is released.
The Envelopes tab has Randomize and Mutate buttons that affect all 4 envelopes.
Synth — Step Mod
Two custom waveform LFOs defined by 16-step fill bar patterns, one per row. See Step Modulator for the full reference. See Sub-Tab Menu Bar for the general menu.
Drums
The Drums module is a dedicated drum machine for generating percussive patterns and grooves. Design rhythmic foundations for your ideas with an intuitive step-based interface. Randomization can generate complete drum patterns that lock in with your melodic and harmonic ideas.
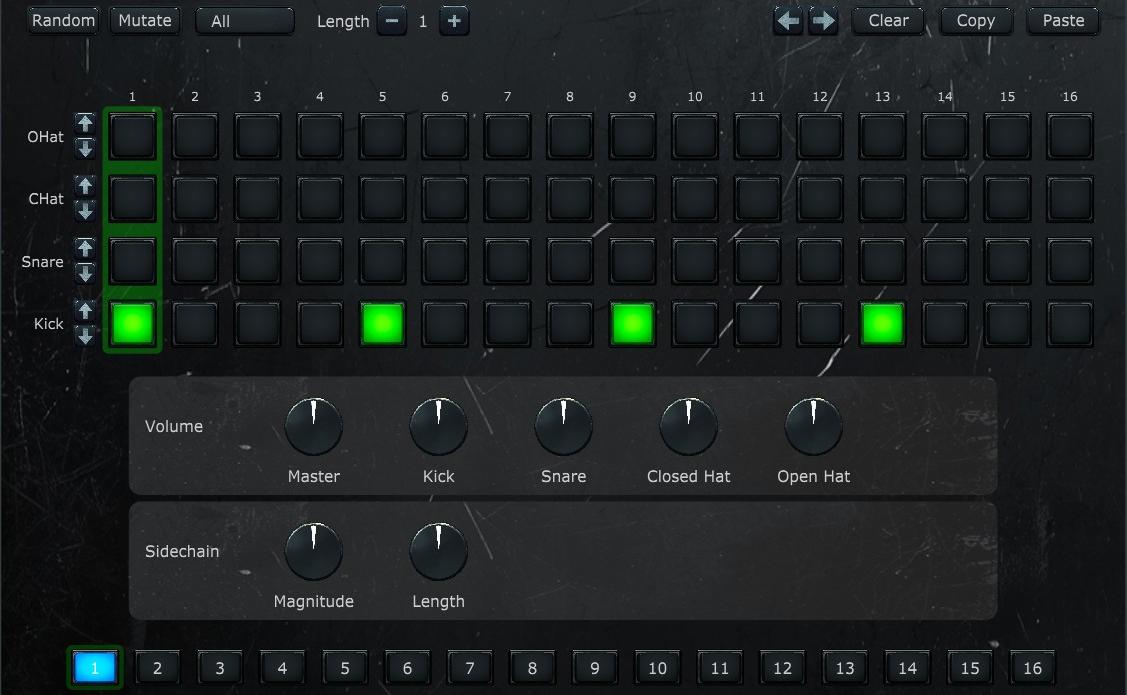
The Drums tab features a 16-step grid with 4 lanes (Kick, Snare, Closed Hat, Open Hat), each with selectable samples. Up to 16 scenes can be created and chained together using the Playback selector or the Sequencer module.
See Tab Menu Bar and Sub-Tab Menu Bar for the general menus.
Step Grid
A 4-lane by 16-step grid. Each lane represents a drum instrument: Kick, Snare, Closed Hat, and Open Hat. Click a cell to toggle it on or off. The current playback position is highlighted during playback.
Sample Selectors
Each lane has up/down arrow buttons to cycle through available samples for that instrument. Different samples provide tonal variation within each drum category.
Volume and Sidechain
- Lane Volumes — Individual volume dials for each of the 4 drum lanes.
- Master Volume — Overall drum machine output volume.
- Sidechain Magnitude — How much the kick drum ducks the synth engines. Creates the classic pumping sidechain compression effect.
- Sidechain Length — How long the sidechain ducking lasts after each kick hit.
Scene Selector
A row of 16 numbered buttons at the bottom of the tab. Each button selects a scene to edit. All controls on the Drums tab reflect the currently selected scene. Scenes are independent — each has its own drum pattern across all 4 lanes.
Sequencer
The Sequencer is where everything comes together. It lets you combine outputs from the individual generators — Patterns, Arpeggiator, Chords, and Drums — and arrange them into a full musical idea that plays out over time. Use it to audition how your different modules work together.
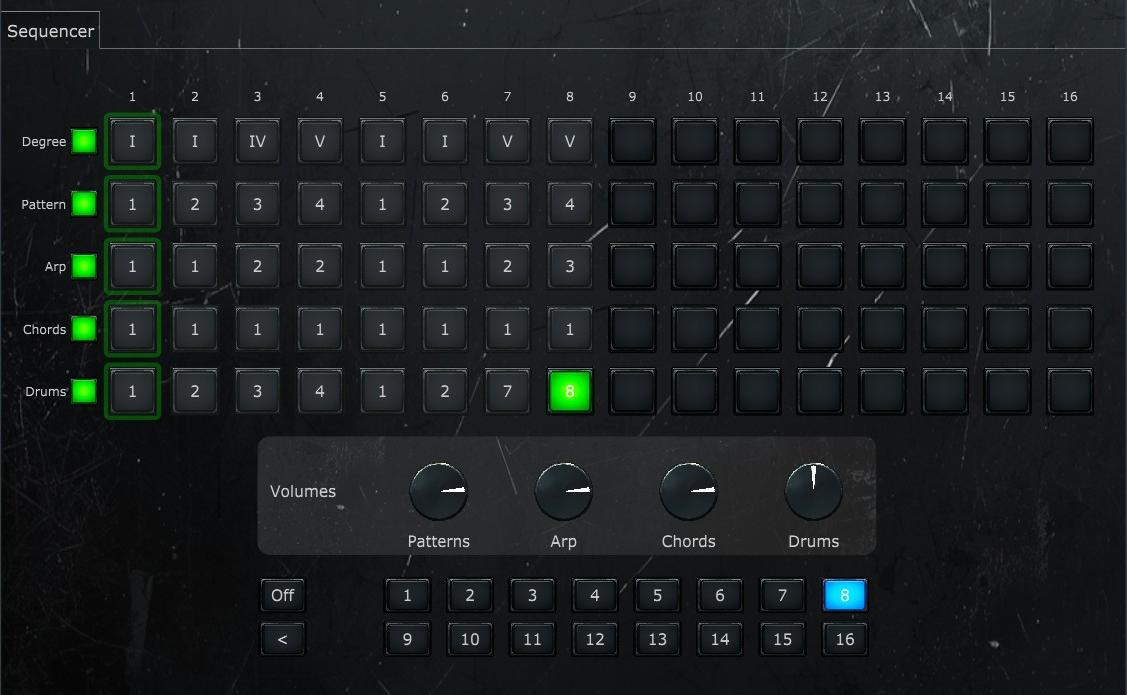
The Sequencer uses a 5-row by 16-step matrix to control which scene each generator module plays on each step. This lets you create arrangements where, for example, the arp switches scenes every 2 steps while the chords hold for 4.
Tab Menu Bar
- Enabled — Turns the Sequencer on or off. When off, each generator module uses its own Playback setting independently.
- Steps — Sets the number of active sequencer steps (1–16). Steps beyond this count are dimmed and skipped during playback.
- Length — Duration of each sequencer step in bars. Options: 1/2, 1, 2, 3, 4.
- Clock — A read-only display showing the current playback position.
- Preset — Selects a sequencer preset.
- Save — Saves the current sequencer configuration as a user preset.
Matrix Grid
A 5-row by 16-column grid. Each row controls a different aspect of the arrangement:
- Degree — Sets the scale degree (I–VII) for each step, transposing all generators relative to the root note. This is how you create chord progressions. In plugin mode, Degree is disabled by default because the DAW controls pitch via MIDI.
- Pattern — Which Patterns scene (1–16) plays on each step.
- Arp — Which Arpeggiator scene (1–16) plays on each step.
- Chords — Which Chords scene (1–16) plays on each step.
- Drums — Which Drums scene (1–16) plays on each step.
Click a cell to select it, then use the value selector below to assign a scene number. Each row has an enable checkbox on the left — when a row is enabled, its corresponding module switches to Sequencer playback mode.
Value Selector
A row of numbered buttons below the matrix for assigning values to the selected cell. For the Degree row, buttons show roman numerals (I–VII). For all other rows, buttons show scene numbers (1–16). Two special buttons are also available:
- Off — Silences that lane for the selected step. The module produces no output on that step.
- < (Repeat) — Restarts the lane from step 1. Useful for creating loops shorter than the full sequence length.
Engine Volumes
Volume dials for each generator engine (Patterns, Arpeggiator, Chords, Drums), allowing you to mix the relative levels of each module in the arrangement.
Step Modulator
The Step Modulator is a 16-step modulator that continuously modulates synth parameters. It appears in four places: on Patterns, Arpeggiator, Chords, and Synth.
Each row contains 16 vertical sliders defining a continuous modulation shape. Drag a bar up for a positive value, down for a negative value, or leave it at center for no modulation. The shape cycles continuously at the Rate set in the menu bar.
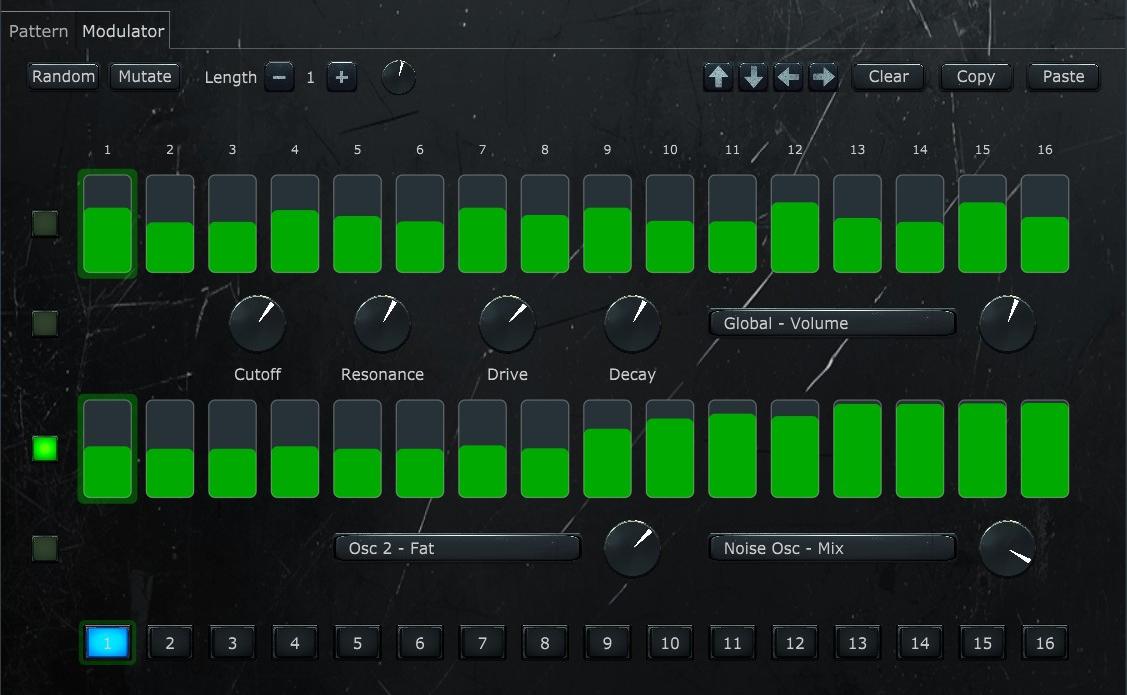
Modulator Tab — Patterns, Arpeggiator, Chords
The Modulator tab has two rows and a scene selector. Scene numbers correspond directly to the parent module's scenes — scene 3 in the Modulator is the modulation layer for scene 3 in the parent module.
Modulation Row 1
Row 1 contains 16 fill bars and four fixed dials that scale the fill bar shape independently for four key parameters:
- Cutoff — Modulation applied to filter cutoff frequency.
- Resonance — Modulation applied to filter resonance.
- Drive — Modulation applied to filter drive.
- Decay — Modulation applied to amp envelope decay.
Each dial is bipolar: center (12 o'clock) means no modulation regardless of the fill bar values; turning it up or down sets the maximum positive or negative modulation depth. Row 1 also has one flexible Target selector and Amount dial for routing the fill bar shape to any additional synth parameter.
Modulation Row 2
Row 2 contains 16 fill bars and two fully flexible modulation slots. Each slot has a Target selector (any synth parameter) and an Amount dial that scales the fill bar shape for that destination.
Row Checkboxes
Four checkboxes on the left determine which parts are included in Randomize, Mutate, Clear, Copy, and Paste operations. The top two correspond to Row 1's fill bars and its dials/target respectively; the bottom two correspond to Row 2's fill bars and its targets/amounts.
Step Mod Tab — Synth
The Step Mod tab in the Synth provides 2 custom waveform LFOs using the same fill bar concept. Both rows are fully flexible: each has its own Rate (synced to tempo) and can target 2 parameters simultaneously via Target and Amount controls. There are no fixed dials and no scene selector — the Step Mod settings are part of the synth engine rather than tied to individual scenes. A step position indicator highlights the current step during playback.
Presets
The Presets tab provides a centralized place to browse, load, rename, and delete presets for all modules. While each module tab has its own quick-access preset dropdown, this tab gives you a full scrollable list with more detail and management options.
Tab Menu Bar
- Category — Selects which module's presets to display. Options: Patterns, Arpeggiator, Chords, Sequencer, Synth, Drums.
- Engine — When the Synth category is selected, this additional dropdown selects which synth engine's presets to show: Patterns, Arpeggiator, or Chords. Hidden for other categories.
Preset List
A scrollable list of all presets in the selected category. Presets are divided into two groups:
- System presets — Built-in presets that ship with Snorkel. These cannot be renamed or deleted.
- User presets — Presets you have saved. These can be freely loaded, renamed, or deleted.
Each preset row shows the preset name and description, along with three buttons:
- Load — Loads the preset into the corresponding module.
- Rename — Renames a user preset. Disabled for system presets.
- Delete — Deletes a user preset. Disabled for system presets.
Settings
The Settings tab contains global configuration options that affect the entire plugin.
Theme
Selects the visual theme for the plugin UI. Options: Scientist, Light, Dark Juice, Parrot.
MIDI/Host Settings
These options are only visible when running as a plugin inside a host app (such as a DAW or AUM on an iPad):
- Generate Sound — When enabled, Snorkel produces audio output. Disable this if you only want to use Snorkel as a MIDI generator.
- Send MIDI Out — When enabled, Snorkel sends its generated notes as MIDI output, allowing you to drive other instruments in your host.
- Autoplay — When enabled, Snorkel automatically starts and stops playback with the host transport. When disabled, Snorkel enters MIDI mode — playback is triggered by incoming MIDI notes instead.
Info
- Mode — Shows whether Snorkel is running in Standalone or Plugin mode.
- Plugin location — The file path where the plugin binary is installed.
- Data folder — The location where Snorkel stores its presets, samples, and user data. A Copy button copies this path to the clipboard.
Main Menu Bar
The main menu bar is the horizontal bar at the very top of the plugin window. It contains global controls that affect all modules, plus a messaging area for feedback.

- Play / Stop — Starts or stops playback. In standalone mode, this controls Snorkel's internal transport. In plugin mode, playback is controlled by the DAW and this button is hidden.
- BPM — Sets the tempo in beats per minute (60–200). In standalone mode, this controls the internal clock. In plugin mode, BPM is synced to the DAW and this control is hidden.
- Root — The root note for all scale-based operations. Options: C, C#, D, D#, E, F, F#, G, G#, A, A#, B. Changing the root transposes all generators.
- Scale — The musical scale used by all generators. Options: Major, Minor, Dorian, Phrygian, Lydian, Mixolydian, Aeolian, Locrian, Harmonic Minor, Melodic Minor, Pentatonic Major, Pentatonic Minor, Blues.
- Swing — Adds a shuffle feel by delaying every other step. At 0% timing is straight; higher values push off-beat steps later for a more relaxed groove.
- Volume — Master output volume for the entire plugin.
The messaging area in the center of the bar shows contextual feedback — parameter values as you turn dials, confirmation messages after actions, and the notes currently being played.
Tab Menu Bar
The tab menu bar runs across the top of each generator module tab (Patterns, Arpeggiator, Chords, Drums) and contains global controls for that module.

- Enabled — Turns the module on or off.
- Playback — Controls which scenes play back and in what order. "Selected" plays only the currently selected scene. "Sequencer" lets the Sequencer module control scene order. The remaining options (Scene 1, Scenes 1–2, etc.) cycle through a range of scenes automatically.
- Rate — How fast the module's steps advance, synced to the host tempo. Options range from 1/32 (fastest) through dotted and triplet divisions up to 1/1 (whole note). Present on Patterns and Drums only — on Arpeggiator and Chords, rate is set per-scene within the sub-tab.
- Preset — Selects a saved preset for this module.
- Save — Saves the current configuration as a user preset.
Sub-Tab Menu Bar
The sub-tab menu bar appears in the edit area of each sub-tab and contains randomization and editing controls. All sub-tabs share a common set; some have additional controls specific to their content.

Common Controls
- Randomize — Generates new random content for the selected scene(s).
- Mutate — Makes small random adjustments to the current content.
- Length — Sets how many consecutive scenes (1–8) are randomized or mutated together. Not present on the Step Mod tab.
- ◀ / ▶ — Shifts the pattern one step to the left or right, wrapping around.
- Reset / Clear — Resets or clears the current scene. Called Reset on most tabs; called Clear on the Modulator tabs, where it sets all fill bars to zero.
- Copy / Paste — Copies or pastes the current scene's data. On the Step Mod tab, uses a shared clipboard that works across all three engines.
Additional Controls by Tab
- ▲ / ▼ — Shifts note or fill bar values up or down. Present on the Grid, Modulator, and Step Mod tabs.
- Density — Controls how many steps are filled when randomizing (0%–100%). Grid tab only.
- Smooth — Controls interpolation between steps. Present on the Modulator and Step Mod tabs.
- Rate — Sets the modulation cycle rate, independent from the note rate. Modulator tabs only.
- Lane selector — Selects which drum lanes are affected by Randomize and Mutate. Drums tab only.