Little Arp Monster Manual
Getting Started
Little Arp Monster is an arpeggiator at heart, but it doesn't stop there. It's a tool for spinning up fresh, genuinely musical patterns, hooks, and melodies. This chapter covers the handful of blocks you'll reach for in your first five minutes, enough to make sound and start exploring. Each one has a chapter of its own later in the manual.
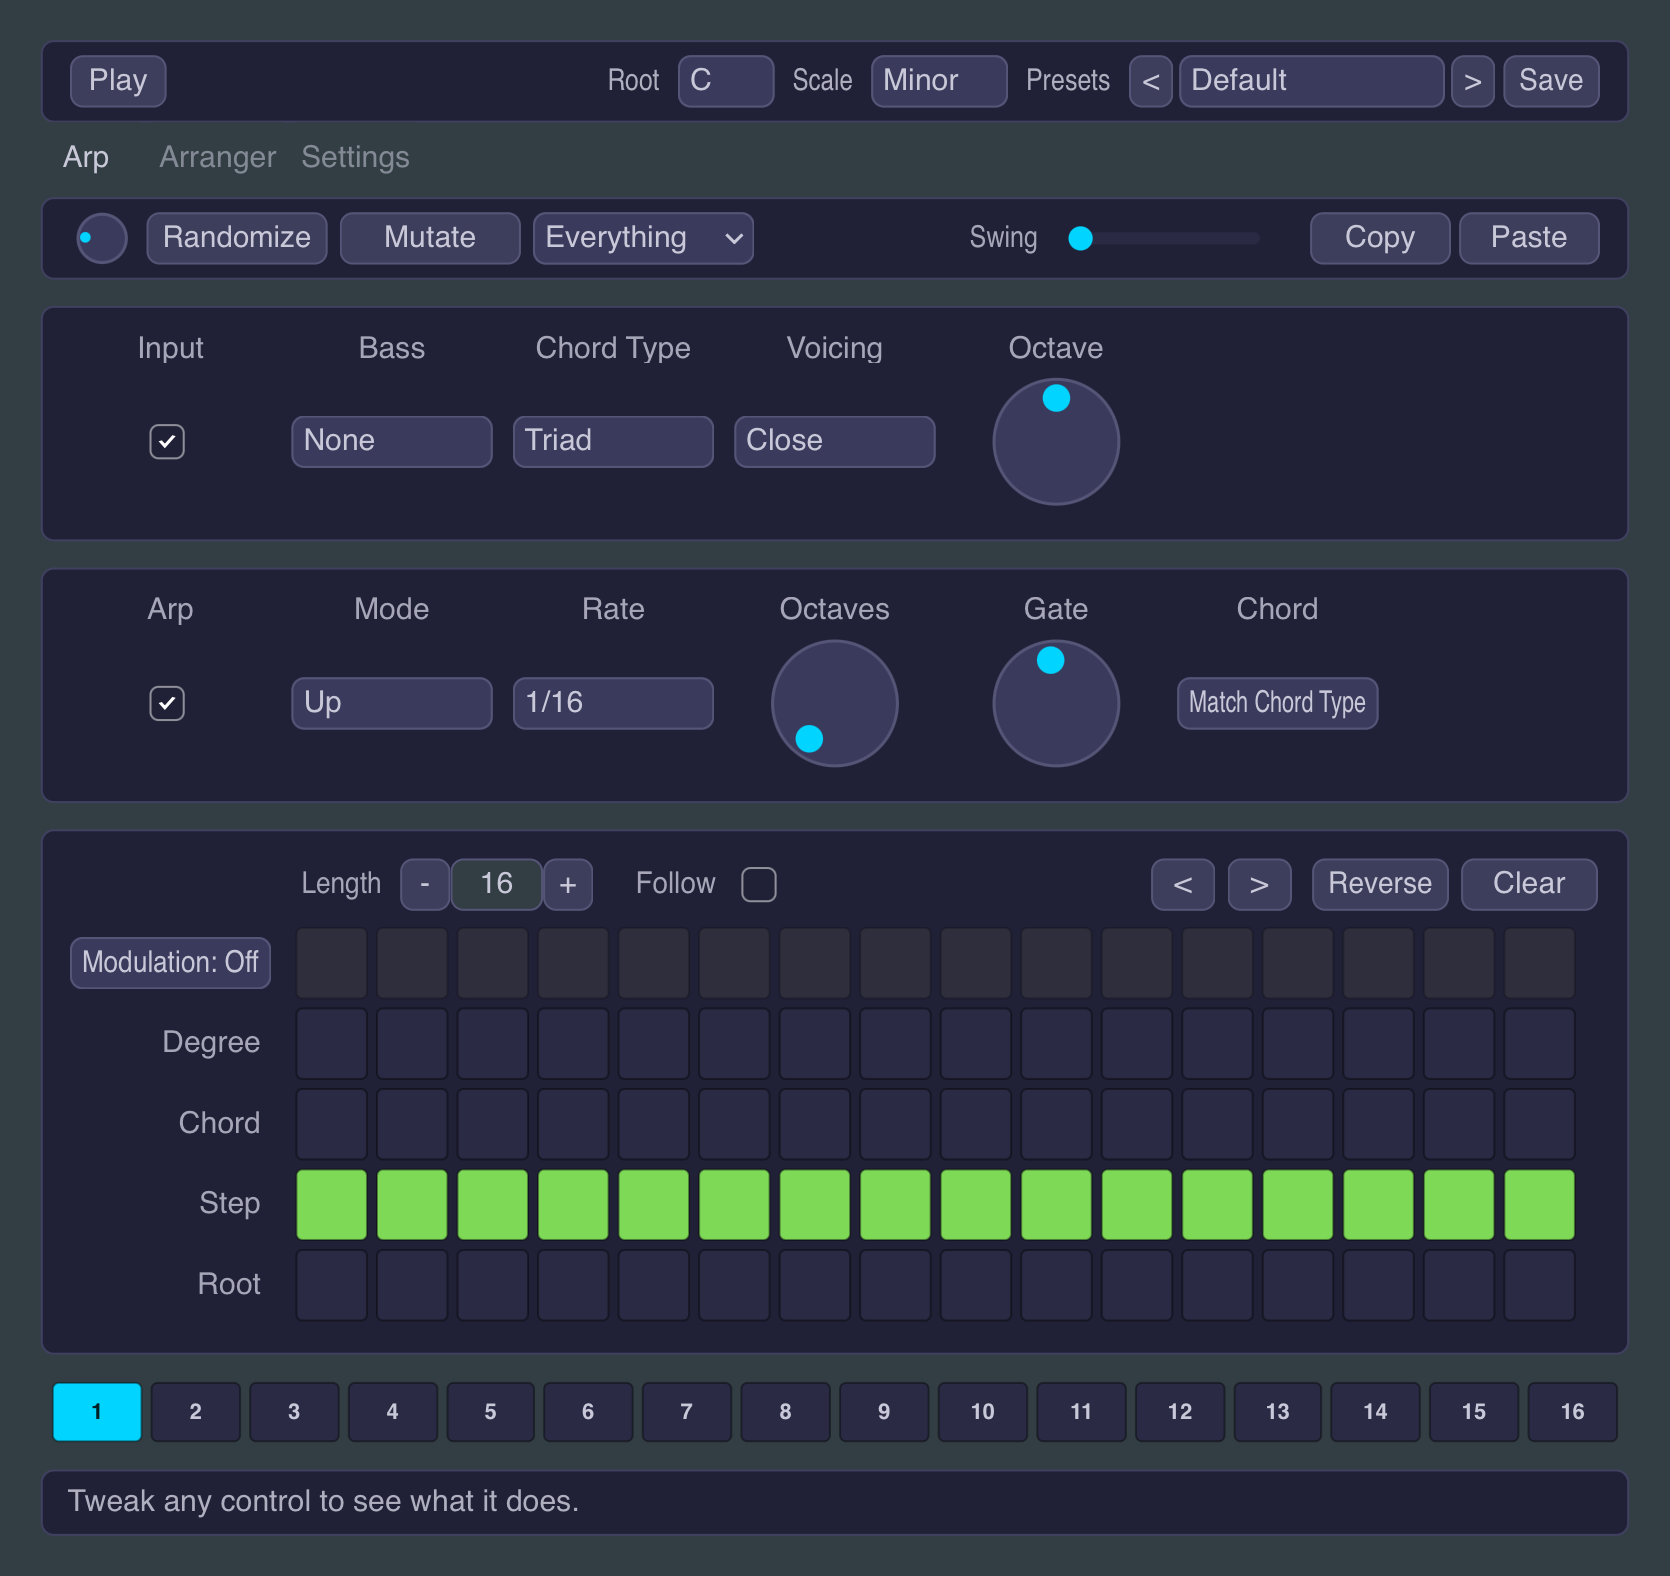
The Step Grid
The Step Grid near the bottom of the Arp tab is the heart of this app. A playhead sweeps from left to right and then loops. By default, every column follows the arp engine, giving you a plain arpeggio. Paint cells in the other rows to vary the melody (root, chord, or any scale note), or leave cells in the Step row blank to add rests. A separate lane on top paints modulation across the same 16 steps.
The Arp row
The Arp row is the engine, what you would expect from any traditional arpeggiator. Given a chord, it sequences those notes through time: the direction it walks, how fast, how many octaves it spans, how long each note rings. Switch it off and the held chord passes straight through, untouched.
The Input row
The Input row is a chord generator. Play a single note and it builds a full chord around it for the Arp row to sequence, so one finger can drive a rich pattern. Switch it off and whatever you play goes straight to the arp. The three flow left to right: Input makes the chord, the Arp row sequences it, and the Step Grid shapes what lands on each step.
Randomize, Mutate, and Spice
This is where Little Arp Monster earns its name. Randomize rolls a fresh pattern from scratch; Mutate nudges the one you have into something related. The Spice dial sets how wild either move gets, from small and safe to genuinely adventurous (past 80% it turns red as a heads-up). A scope dropdown aims the reroll at just part of the pattern and leaves the rest alone. It is the fastest way to find a starting point, or to escape one.
Scenes and the Arranger
The strip of 16 numbered slots under the Step Grid holds 16 independent patterns you can flip between with a click. The Arranger tab strings those scenes into a longer piece, dropping markers along a timeline that swap the playing scene as the bars roll by, and optionally walk a chord progression on top. Together they take you from a single looping pattern to a finished arrangement.
The chapters that follow walk every control on each tab, in the order it appears on screen. The shared menu bar is documented first because its controls are visible from every tab.
Sending MIDI to a Synth
Little Arp Monster is not designed to make sound on its own; instead, it is a MIDI note generator: it sends out a stream of notes for a synth or sampler to play. So the one setup step that matters is routing that MIDI output to an instrument, and how you do it depends on the DAW or host you are using.
See the per-platform sub-sections below. The built-in Audition Synth lets you hear the pattern while you work, but it is designed for sketching quick ideas, not as a full-fledged synth engine.
Sending MIDI to a Synth: Desktop DAW (VST3)
This is the standard arpeggiator setup, the same track-to-track routing you would use for any MIDI effect that emits notes:
- Put Little Arp Monster on its own MIDI / instrument track. What you play goes in; the arp pattern comes out.
- Put the synth or sampler you want to drive on a second track.
- Route the first track's MIDI output to the second track. In Ableton Live, set the Little Arp Monster track's MIDI To to the instrument track and arm it for monitoring. The arp then plays the synth.
VST3 has no same-track MIDI-effect insert slot, so this track-to-track route is the way in Ableton Live, Cubase, and FL Studio. Reaper and Bitwig route MIDI through any plugin in a chain, so there you can also just drop the synth straight after Little Arp Monster on the same track.
Routing recipe for Ableton Live
This walkthrough wires Little Arp Monster up to a synth in Ableton Live from scratch. It uses Live's own Wavetable as the instrument, but any synth or sampler works the same way. The principle is Live's track-to-track MIDI routing: Little Arp Monster sits on one track and emits notes, and the synth sits on a second track that listens to the first track's output.
Step 1: Add Little Arp Monster to track 1
Drag Little Arp Monster (VST3) onto an empty MIDI track. This is the track that receives your playing, a clip, or Autoplay, and turns it into the arpeggiated pattern. Nothing on this track makes sound on its own: its job is to send MIDI out.
Step 2: Add a synth on track 2
On a second MIDI track, drop the instrument you want to hear, for example Live's Wavetable. This is the voice that actually plays the notes Little Arp Monster generates. Load a preset so you have something audible.
Step 3: Set the MIDI input dropdowns
On the synth track (track 2), open the In/Out section (toggle the "I-O" button on the right of the mixer if it is hidden).
- Set the MIDI From top dropdown to track 1, the Little Arp Monster track.
- Set the dropdown just below it to Little Arp Monster (the plugin's output), or Post FX, so you take the arp's output rather than the raw notes feeding into it.
- Make sure the synth track will actually play the routed MIDI: either arm track 2, or set its Monitor to In. On the default "Auto" setting, an unarmed track ignores MIDI routed in from another track, which is the usual reason you hear nothing.
Step 4: Press Play and feed Little Arp Monster some notes
Press Play on Live's transport. Little Arp Monster only runs while the host transport is rolling. Then give it something to arpeggiate, either of:
- Autoplay: on Little Arp Monster's Settings tab, turn on Autoplay. It runs the pattern on the current Root with no keyboard or clip needed. This is the quickest way to hear it.
- A clip: add a MIDI clip on track 1 (the Little Arp Monster track) and draw a single one-bar note on C3 that repeats every bar (a one-bar clip set to loop). Little Arp Monster's Input row turns that single note into a chord and the arp sequences it.
Move the note in the clip, or change the Root, and the whole pattern follows. That is the fastest way to walk a progression by hand. If you would rather play it live, arm track 1 and play your keyboard instead of using a clip or Autoplay.
Sending MIDI to a Synth: iPad (AUv3)
On iPad, Little Arp Monster is an AUv3 MIDI processor. The host has to carry its MIDI to an instrument. Hosts that load it include AUM, Drambo, and Cubasis.
Routing recipe in AUM
- Add Little Arp Monster as a MIDI source.
- Load the instrument (a synth AUv3) on a channel so it can make sound.
- In AUM's MIDI routing matrix, connect Little Arp Monster's MIDI output to the instrument's MIDI input.
Without that route, you likely only hear silence. The standalone app on iPad exists primarily to register the AUv3 with iOS; it is not the main place for Little Arp Monster to be used.
The Menu Bar
The strip across the top of the plugin is always visible, whatever tab you're on. It holds the global controls and the preset chooser.

Transport
Play (Standalone only): starts and stops the app's internal playhead. Hidden in plugin builds, where the DAW's transport drives playback instead.
Root and Scale
The two anchors for every note the arp produces. Root sets the key center; Scale sets the set of degrees the arp and Step Grid can draw from.
Root is the key center. Held notes are read relative to it, so this anchors every scale degree the arp and Step Grid produce. Twelve keys, C through B, plus Off. With Off there is no key lock: the notes you play are not snapped to a scale. Uncheck Input as well and you get classic arp behavior.
Scale is the scale the arp draws its notes from. It changes the mood and the set of degrees available:
- Major: bright and happy; the standard major scale.
- Minor: dark and moody; the standard (natural) minor scale.
- Dorian: minor with a brighter, jazzy lift; common in folk and funk.
- Phrygian: dark and tense, with a Spanish edge.
- Lydian: major with a dreamy, floating quality.
- Mixolydian: major with a bluesy, dominant edge; common in rock.
- Locrian: dark and unstable; rarely used as a home key.
- Harmonic Minor: minor with a raised 7th for a dramatic, exotic sound.
- Melodic Minor: minor with a raised 6th and 7th (ascending form); smooth and jazzy.
- Phrygian Dominant: Phrygian with a major 3rd; the fiery flamenco sound.
- Whole Tone: six-note scale, all whole steps; dreamy and unanchored.
- Pentatonic Major: five-note major scale; open, with no clashing notes.
- Pentatonic Minor: five-note minor scale; bluesy and versatile.
- Blues: minor pentatonic plus a flat-5 "blue note" for a gritty sound.
Presets
At the far right of the bar. A preset stores the whole plugin state: all parameters, all 16 scenes, and the arrangement.
- ◀ / ▶: step to the previous / next preset without opening the list, so you can audition patches in order. Wraps around at the ends.
- Preset list: the full set of factory and saved patches.
- Save / Edit: with a factory preset (or nothing) selected, the button reads Save and stores the current state as a new user preset (prompts for a name). With one of your own user presets selected it reads Edit, opening a menu to save the state as a new preset, overwrite the selected preset in place (renaming it if you like), or delete it.
The Arp Tab
This is where a single pattern lives. Top to bottom: an action bar, the Input panel, the Arp panel, the Step Grid with its own action row, and the scene strip.
Top action bar

Left to right:
- Spice (dial): adds extra flavor to randomized patterns. Low values keep Randomize and Mutate tame; high values get bolder and less predictable. Above 80% the dial turns red, the Danger Zone, where results are deliberately experimental.
- Randomize: generates a fresh random pattern. What it touches is set by the scope dropdown to its right.
- Mutate: nudges the current scene's settings a little, rather than rerolling from scratch. Use it to evolve a pattern you already like.
- Scope dropdown: sets what Randomize and Mutate are allowed to touch. The list has three groups: Everything; a cumulative set that adds one layer at a time (Step Grid, then + Input and Arp, + Modulation, + Swing, + Root and Scale); and an exclusive "...only" set that touches a single slice (Step Grid only, Input only, Arp only, Modulation only, Swing only, or Root and Scale only). It decides what changes; Spice decides how much.
- Swing (slider): delays every other 16th step for a shuffled feel. 0% is straight time.
- Copy: copies the current Step Grid pattern to an internal clipboard.
- Paste: pastes the most recently copied pattern onto the current Step Grid.
Input panel

A chord generator. Play a single note and these controls build a chord around it for the arp engine to sequence.
The Input toggle decides whether incoming notes are transformed: when off, the notes you play pass straight through to the Arp panel as-is; when on, each played note is built into a chord first, and that chord is passed to the arp.
Three controls then shape the chord built around each played note.
Bass adds a bass note below the chord:
- None: no added bass note.
- Add bass: adds the chord root one octave below.
- Two bass: adds the root one and two octaves below.
- Fifth below: adds the fifth below the chord root.
- Root+Fifth: adds both the root and the fifth below the chord.
- Pedal: holds the scale root as a fixed pedal beneath every chord.
Chord Type sets the chord shape built around the played note:
- Off: no chord at all. A Bass setting other than None still adds bass notes.
- Root: root note only.
- Octave: root plus its octave.
- Power: root and fifth; a power chord, neither major nor minor.
- Triad: three-note triad (root, third, fifth) drawn from the scale.
- 7th: seventh chord; the triad plus the seventh.
- Sus4: suspended 4th; the third is replaced by the fourth.
- Sus2: suspended 2nd; the third is replaced by the second.
- 9th: ninth chord; a seventh chord with the ninth stacked on top.
- 11th: eleventh chord; stacked up through the eleventh.
Voicing sets how the chord's notes are spaced:
- Close: notes packed as tightly as possible; the default.
- Open: opens the chord out by lifting alternate inner notes an octave.
- Drop 1: drops the top note down an octave.
- Drop 2: drops the second-from-top note down an octave.
- Drop 3: drops the third-from-top note down an octave.
- Wide: fans every note into its own octave.
- Auto: places each note in the octave nearest the previous chord, for smooth voice leading.
Finally, Octave (dial) is an octave shift applied to your input notes before the arp processes them.
Arp panel
In this panel you see the arp engine, the controls are mainly what you'd expect from a traditional arpeggiator.

The Arp toggle is the master arp switch. When off, held notes pass through as a sustained chord.
Mode sets the order the engine walks through the chord:
- Up: climbs from the lowest note to the highest, then repeats.
- Down: falls from the highest note to the lowest, then repeats.
- Up-Down: climbs to the top, then turns and walks back down.
- Down-Up: falls to the bottom, then turns and climbs back up.
- Converge: alternates outside-in, meeting in the middle.
- Diverge: starts in the middle and fans outward.
- Thirds: plays every other note first, then fills in the skipped ones.
- Skip: leaps through the chord in threes for a broken, gap-filled run.
- Pedal: returns to the lowest note between each higher one.
- Thumb: sounds the lowest note as a thumb before each ascending note.
- Spiral: spirals outward from the middle, wrapping around the chord.
- Add One: builds up the run, adding one more note on each pass.
- Double: plays each note twice before moving on.
- Stutter: plays each note three times before moving on.
- Random: picks chord notes at random.
- As Played: plays the notes in the order you pressed them.
Three dials set the timing and range:
- Rate: the note value each Step Grid cell occupies. Smaller values play faster. The last entry, Free, breaks away from the tempo: instead of a note value it sets the arp speed as a fixed rate in Hz, so the pattern runs at the same speed whatever the host tempo.
- Octaves (dial): how many octaves the arp climbs before wrapping back to the start.
- Gate (dial): how much of each step the note holds. 100% is fully legato; lower values stutter.
Chord sets what the Step Grid's Chord row plays when a cell in it is lit:
- Match Chord Type: replays the exact chord built by the Input panel (Chord Type, Voicing, and Bass).
- Octave: just the root and its octave; the lightest, most neutral shape.
- Power: root and fifth only, no third; open between major and minor.
- Triad: a plain three-note triad built from the scale, ignoring the Input panel.
- Triad + Bass: triad with the root added an octave below.
- Open: open voicing; the third lifted an octave for a wider spread.
- Open + Bass: open voicing with the root added an octave below.
- 1st Inv: first inversion; the third sits in the bass.
- 2nd Inv: second inversion; the fifth sits in the bass.
Step Grid
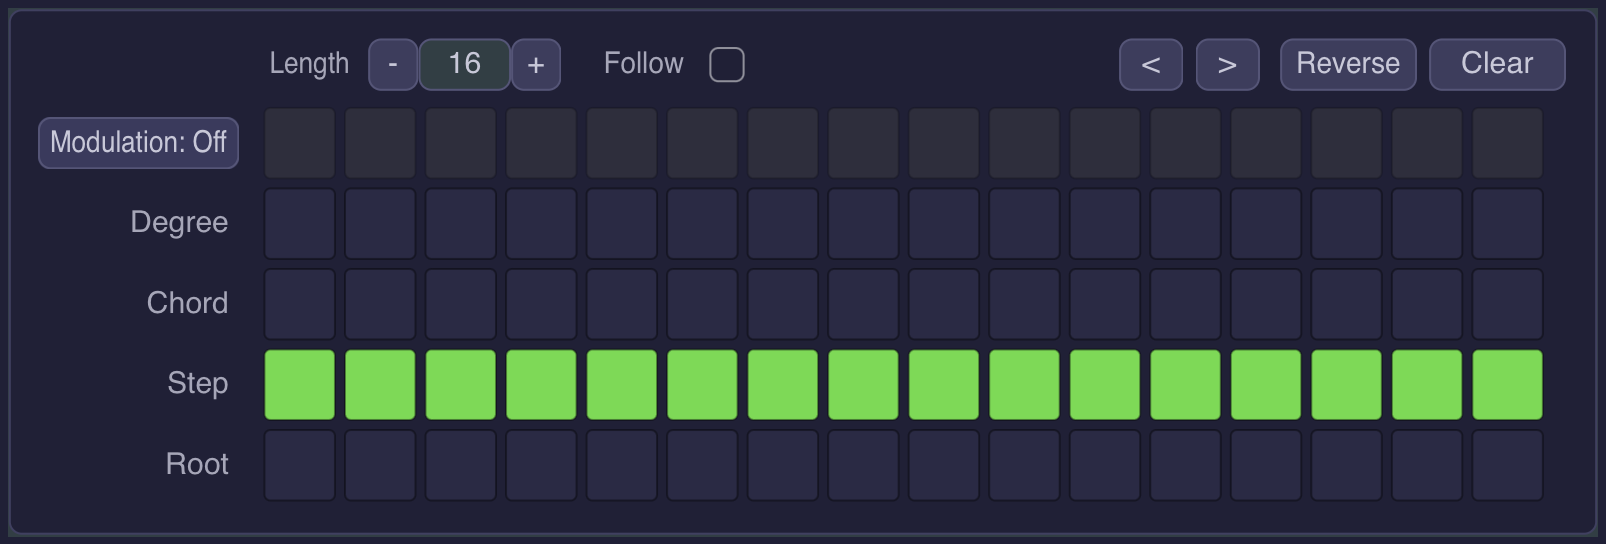
A grid of cells where each column is one step of the pattern and a playhead sweeps across them, left to right, looping. Each row makes a lit cell play something different.
The four note rows, from bottom to top:
- Root row: force the chord's root.
- Step row: play whatever the arp engine would have played on its own at that step.
- Chord row: play the full held chord (shaped by the Arp panel's Chord setting) on that step.
- Degree row: pick a scale degree (1..7) or the chord's root one octave up; click a cell to step through the values.
Only one of the four note rows can be lit per column; clicking a cell in a new row clears the previous selection in that column, and clicking a lit cell again switches it off.
Above the note rows sits the Modulation Lane. It doesn't trigger notes. Instead it draws a control-change curve: click and drag vertically to set each step's value; click the bottom of a cell to silence that step. The lane is independent and sits on top of whatever the note rows are doing. Its row label is a dropdown that picks what the lane controls:
- Off: no CC messages sent.
- Velocity: sets each note's loudness (1-127).
- Mod (CC1): modulation.
- Cutoff (CC74): filter cutoff.
- Resonance (CC71): filter resonance.
- Attack (CC73): envelope attack.
- Decay (CC75): envelope decay.
- Character (CC70): timbre.
- Custom: any CC number you enter, for a mapped parameter on your synth.
By default the grid shows a single Degree row. The Expanded toggle (on the Settings tab) reveals two more, so a column can stack several notes.
Step Grid action row
Above the grid. Left to right:
- Length (stepper): the number of Step Grid columns that play. Cells past this point dim out and never fire, so you can run patterns shorter than 16 steps.
- Follow (toggle): when on, the displayed scene follows whichever scene the arrangement is currently playing (driven by the Arranger's markers). Off shows the scene you've selected manually.
- ◀ / ▶ (shift left / right): move the whole pattern one step left or right. Cells past the Length wrap around.
- Reverse: mirrors the pattern end-to-end so it plays back-to-front.
- Clear: clears every Step Grid cell to off. Leaves the panel settings alone.
Scene strip

The row of 16 numbered slots below the grid. Each slot stores a full Arp-tab state: the panels plus the Step Grid. Click a slot to switch to it. Scenes are what the Arranger arranges into a longer piece.
The Arranger Tab
Where you build a longer piece out of your scenes by placing markers along a timeline. The tab has an action bar, the Note Grid (a timeline preview with a marker band above it), and the marker editor below.
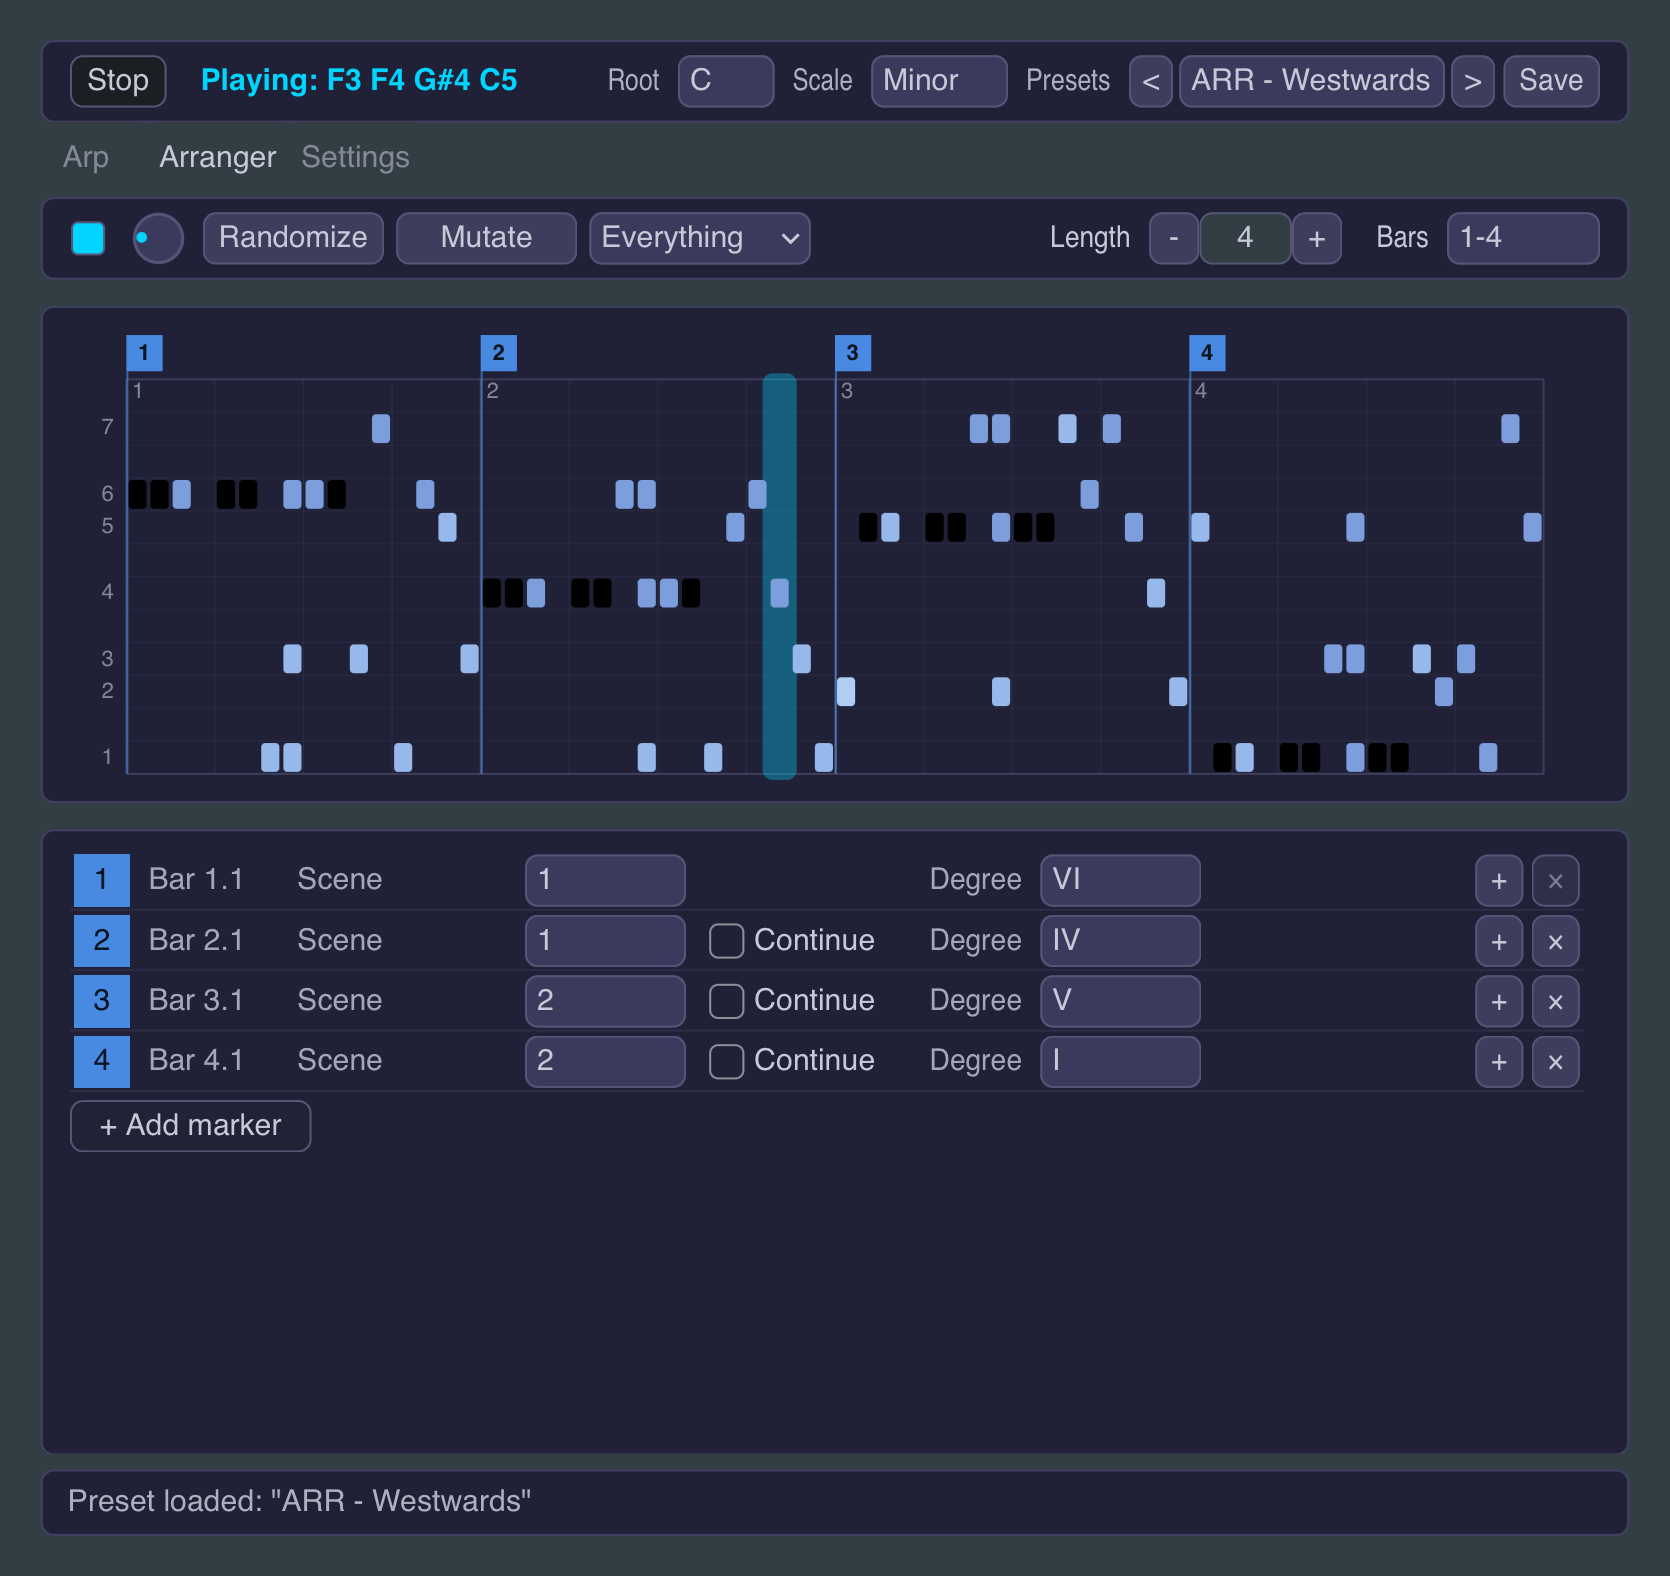
Action bar

Left to right:
- Arranger toggle: the master switch for the whole tab. When On, markers drive scene swaps, degree shifts, and other parameter changes as the playhead moves. When Off, the current scene plays on its own, looping indefinitely.
- Spice (dial): the same Spice value as on the Arp tab (one knob, two views). Here it controls how adventurous the Arranger's Randomize and Mutate get.
- Randomize: builds a fresh arrangement of scenes and variations. The scope dropdown decides how much it rerolls.
- Mutate: nudges the arrangement a little: reorders the form or shifts a section's key, rather than rerolling everything.
The Scope dropdown picks which slices Randomize rerolls:
- Everything: marker placement, the scene structure, the scenes themselves, and the degree progression. The full reroll.
- Scenes only: keep the marker positions and degrees; reroll the structure and all the scene content. "Same arrangement, fresh sounds."
- Degrees only: keep the markers and scenes; reroll just the degree progression, biased toward common diatonic shapes. "Same sound palette, different chord movement."
After the scope dropdown:
- Length (stepper): total length of the arrangement in bars. Defines the loop the markers play over.
- Bars (dropdown): which 4-bar window of the timeline the Note Grid is showing (1-4, 5-8, ...). Windows past the current Length are grayed out.
Note Grid
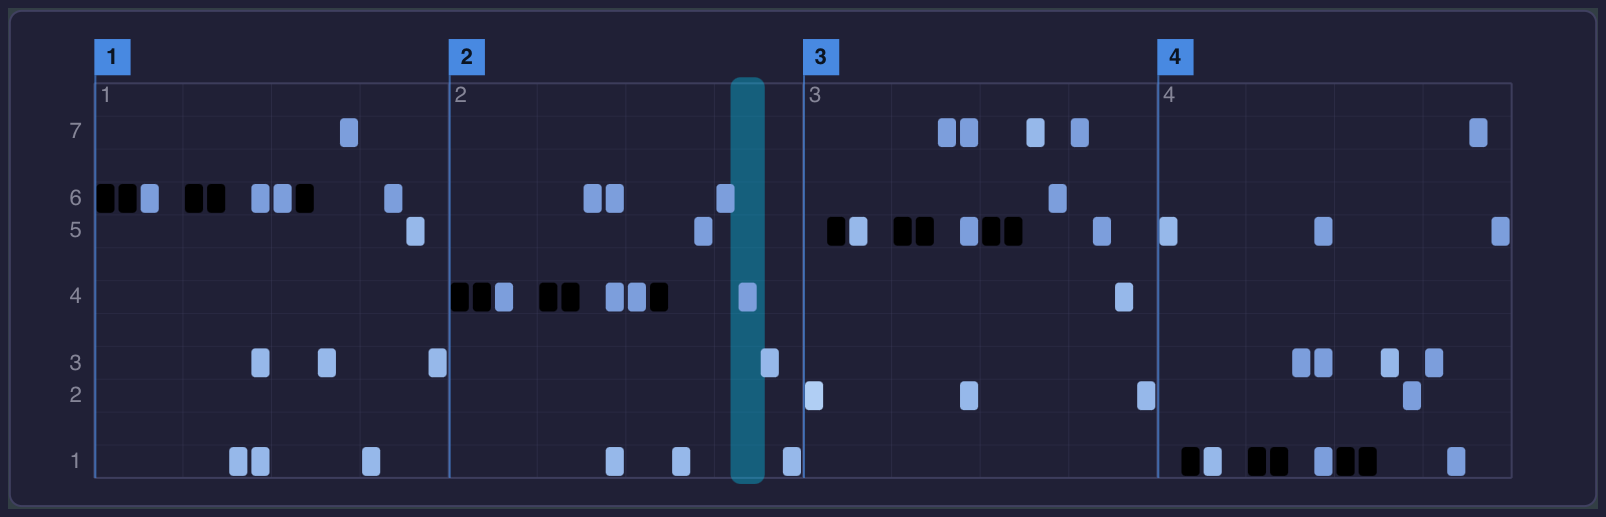
The piano-roll-style preview shows the arrangement that will play. You can add, move and remove markers that initiate changes at a certain time in the arrangement.
- Add a marker: click in the note grid (or use the marker editor's Add button). Marker 1 is the always-on starting marker and stays anchored at bar 1.1.
- Move a marker: drag its flag across the grid; position snaps to 16th steps.
- Remove a marker: use the × on its row in the editor, or right-click its flag.
Up to 10 markers can be added beyond the locked starting marker.
Bottom strip controls
Beneath the grid lanes (desktop builds):
- Drag MIDI: hold and drag this onto a DAW track to drop the rendered arrangement as a MIDI file.
- Follow pitch (toggle): on, the preview follows your live held notes, so the lanes shift with what you play. Off shows a steady preview anchored to a fixed root, so the pattern stays put while you explore.
Marker editor
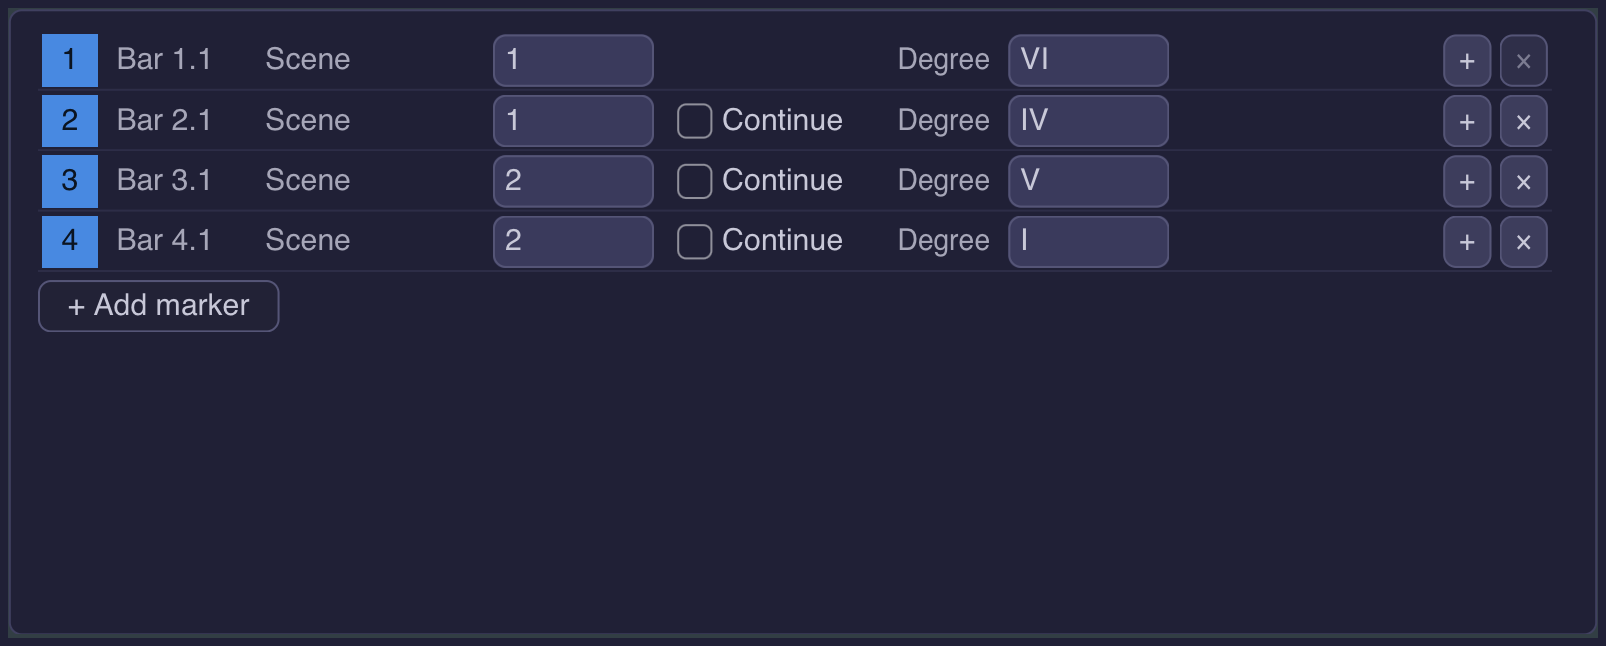
A stacked list below the grid, one row per active marker. Each row carries the marker's number, its position, and one or more actions: what the marker does when the playhead reaches it. A marker can stack up to 6 actions.
Each action has a kind and kind-specific controls. The four kinds:
Scene: jump to a scene.
- Scene: the scene the marker jumps to. "Selected" tracks whatever scene is currently selected on the Arp tab, so the marker follows your manual selection rather than pinning to a numbered slot.
- Continue (toggle): on, the scene continues from its previous arp position; off, it restarts from cell 1.
Param: override one parameter for this section.
- Parameter: which parameter to override.
- Value: the value to write into it.
Transpose: shift pitch downstream of the marker.
- Unit: Semitones (half-steps) or Octaves (whole octaves).
- Amount: how far to transpose.
Degree: shift by scale degrees relative to the current scale and root.
- Amount: how many degrees to shift.
Per row: a + stacks another action onto the marker (up to 6), and an × removes an action. The × at the row level removes the marker entirely.
The Settings Tab
Four panels on desktop, three on iPad. The split mirrors what gets saved with a preset and what doesn't: the Global panel holds sticky user and host preferences; the items in the Preset panel get stored with saved patches; the Audition Synth is the built-in preview voice (and also gets saved with a preset); and License and Info handles activation and reference links.
Global panel

User and host preferences. These survive preset loads so they stay put while you cycle through patches.
- Theme: switches the editor's color scheme (Light / Dark). Pure presentation; it has no effect on the MIDI output.
- MIDI Channel: the channel every note and CC goes out on (1-16). "Off" mutes the plugin's MIDI output.
- Autoplay (plugin builds): runs the arp on the current Root with no keyboard needed; only sounds while the host transport is playing.
- Tempo (Standalone only): sets the playback speed for the standalone app. In a host, the DAW's tempo is used instead. (Autoplay and Tempo share the same slot; you'll see one or the other depending on the build.)
- Latch: holds the last chord so the arp keeps running after you release the keys.
- Panic: sends an all-notes-off to the host and connected synths. Use it to recover from a stuck note. (Its label reads "Hung Notes", the problem it fixes.)
Preset panel

Saved with each preset, because these shape the patch's sound.
Velocity decides how output note velocity is set:
- Input: averages each note's velocity from what you played.
- Fixed: sends a constant velocity.
- Global Transpose: shifts every emitted note by whole octaves, up or down (±2), before it leaves the plugin.
- Expanded (toggle): reveals the Step Grid's extra Degree rows so a column can stack multiple notes. Off keeps the grid compact, with one Degree row.
Audition Synth panel

A built-in simple preview synth for sketching ideas. It lets you hear a pattern without wiring up a synth first. It is deliberately simple and designed only for monitoring. Little Arp Monster's real job is sending MIDI out.
- Enable (toggle, under the panel title): turns the preview synth on or off. On by default in the iPad standalone, off as a plugin in a DAW or host. Not saved with presets.
- Cutoff (dial): base cutoff of the synth's filter.
- Character (dial): tone color, from clean to fat.
- Env Amt (dial): how far the filter envelope sweeps up from the base cutoff on each note.
- Decay (dial): how long each preview note rings before fading away.
- Space (dial): adds delay and reverb for a sense of space.
The five dials are saved with presets (the monitoring tone rides with the patch); the on/off toggle is not.
License and Info panel
On desktop, the bottom panel handles activation and a few reference links:
- License key: paste your key into the field and click Activate to unlock the full version. Once activated the field is replaced by a "Licensed" line.
- Manual: a link to this manual online.
- Version: the build version, handy when reporting an issue.
Until you activate, Little Arp Monster runs as a demo that allows 15 minutes of playback per day. When today's demo time is used up, MIDI output and the preview synth are muted until you enter a valid key, or until the next day, when the clock resets. On iPad this becomes a simpler Info panel: the manual link, a link to buy, and the version, because the App Store handles your entitlement there.