Little Drum Machine Manual
Overview
Little Drum Machine is what the name suggests: a drum machine that is easy to use and has all the necessary bits, without the frills. It runs as a VST3 or Audio Unit plugin on macOS, as a VST3 plugin on Windows, and as an AUv3 instrument on iPad in any AUv3 host.
Make sound your way: start right away with the built-in sounds, load your own samples as you go, or send MIDI and let your favorite drum modules or synths do the talking.
The feature set at a glance:
- Step grid with per-step velocity for accents and ghost notes.
- 32 samples across 8 drum categories included to get you started.
- Four sample variants per drum: switch them per lane, or even per step.
- Load your own samples and build the kit you want.
- Tune, trim and shape every sample with pitch, volume and envelope controls.
- Musical Randomize for instant grooves; Mutate to generate variations of your patterns.
- 16 scenes per preset, chained in the Arranger into full arrangements.
- Polyrhythms and polymeters: give any lane its own step count and loop length.
- Built-in mixer with per-lane EQ, panning, mute and solo.
- Tempo-synced delay and reverb with per-lane sends, plus per-lane drive.
- Master EQ, and a glue compressor you can drive with one knob or dial in fully.
- Flexible MIDI routing to trigger external sound generators.
- Swing to get groovy.
- Thirty-one presets included: Techno, House, Hip Hop, Drum & Bass, Jazz and more, plus a set built to show off the polyrhythm, star-mode and FX features.
- Save and manage your own presets.
- Light and dark themes.
The chapters that follow walk every control on each tab, in the order it appears on screen. The menu bar is documented first because its controls are visible from every tab.
The Grid Tab
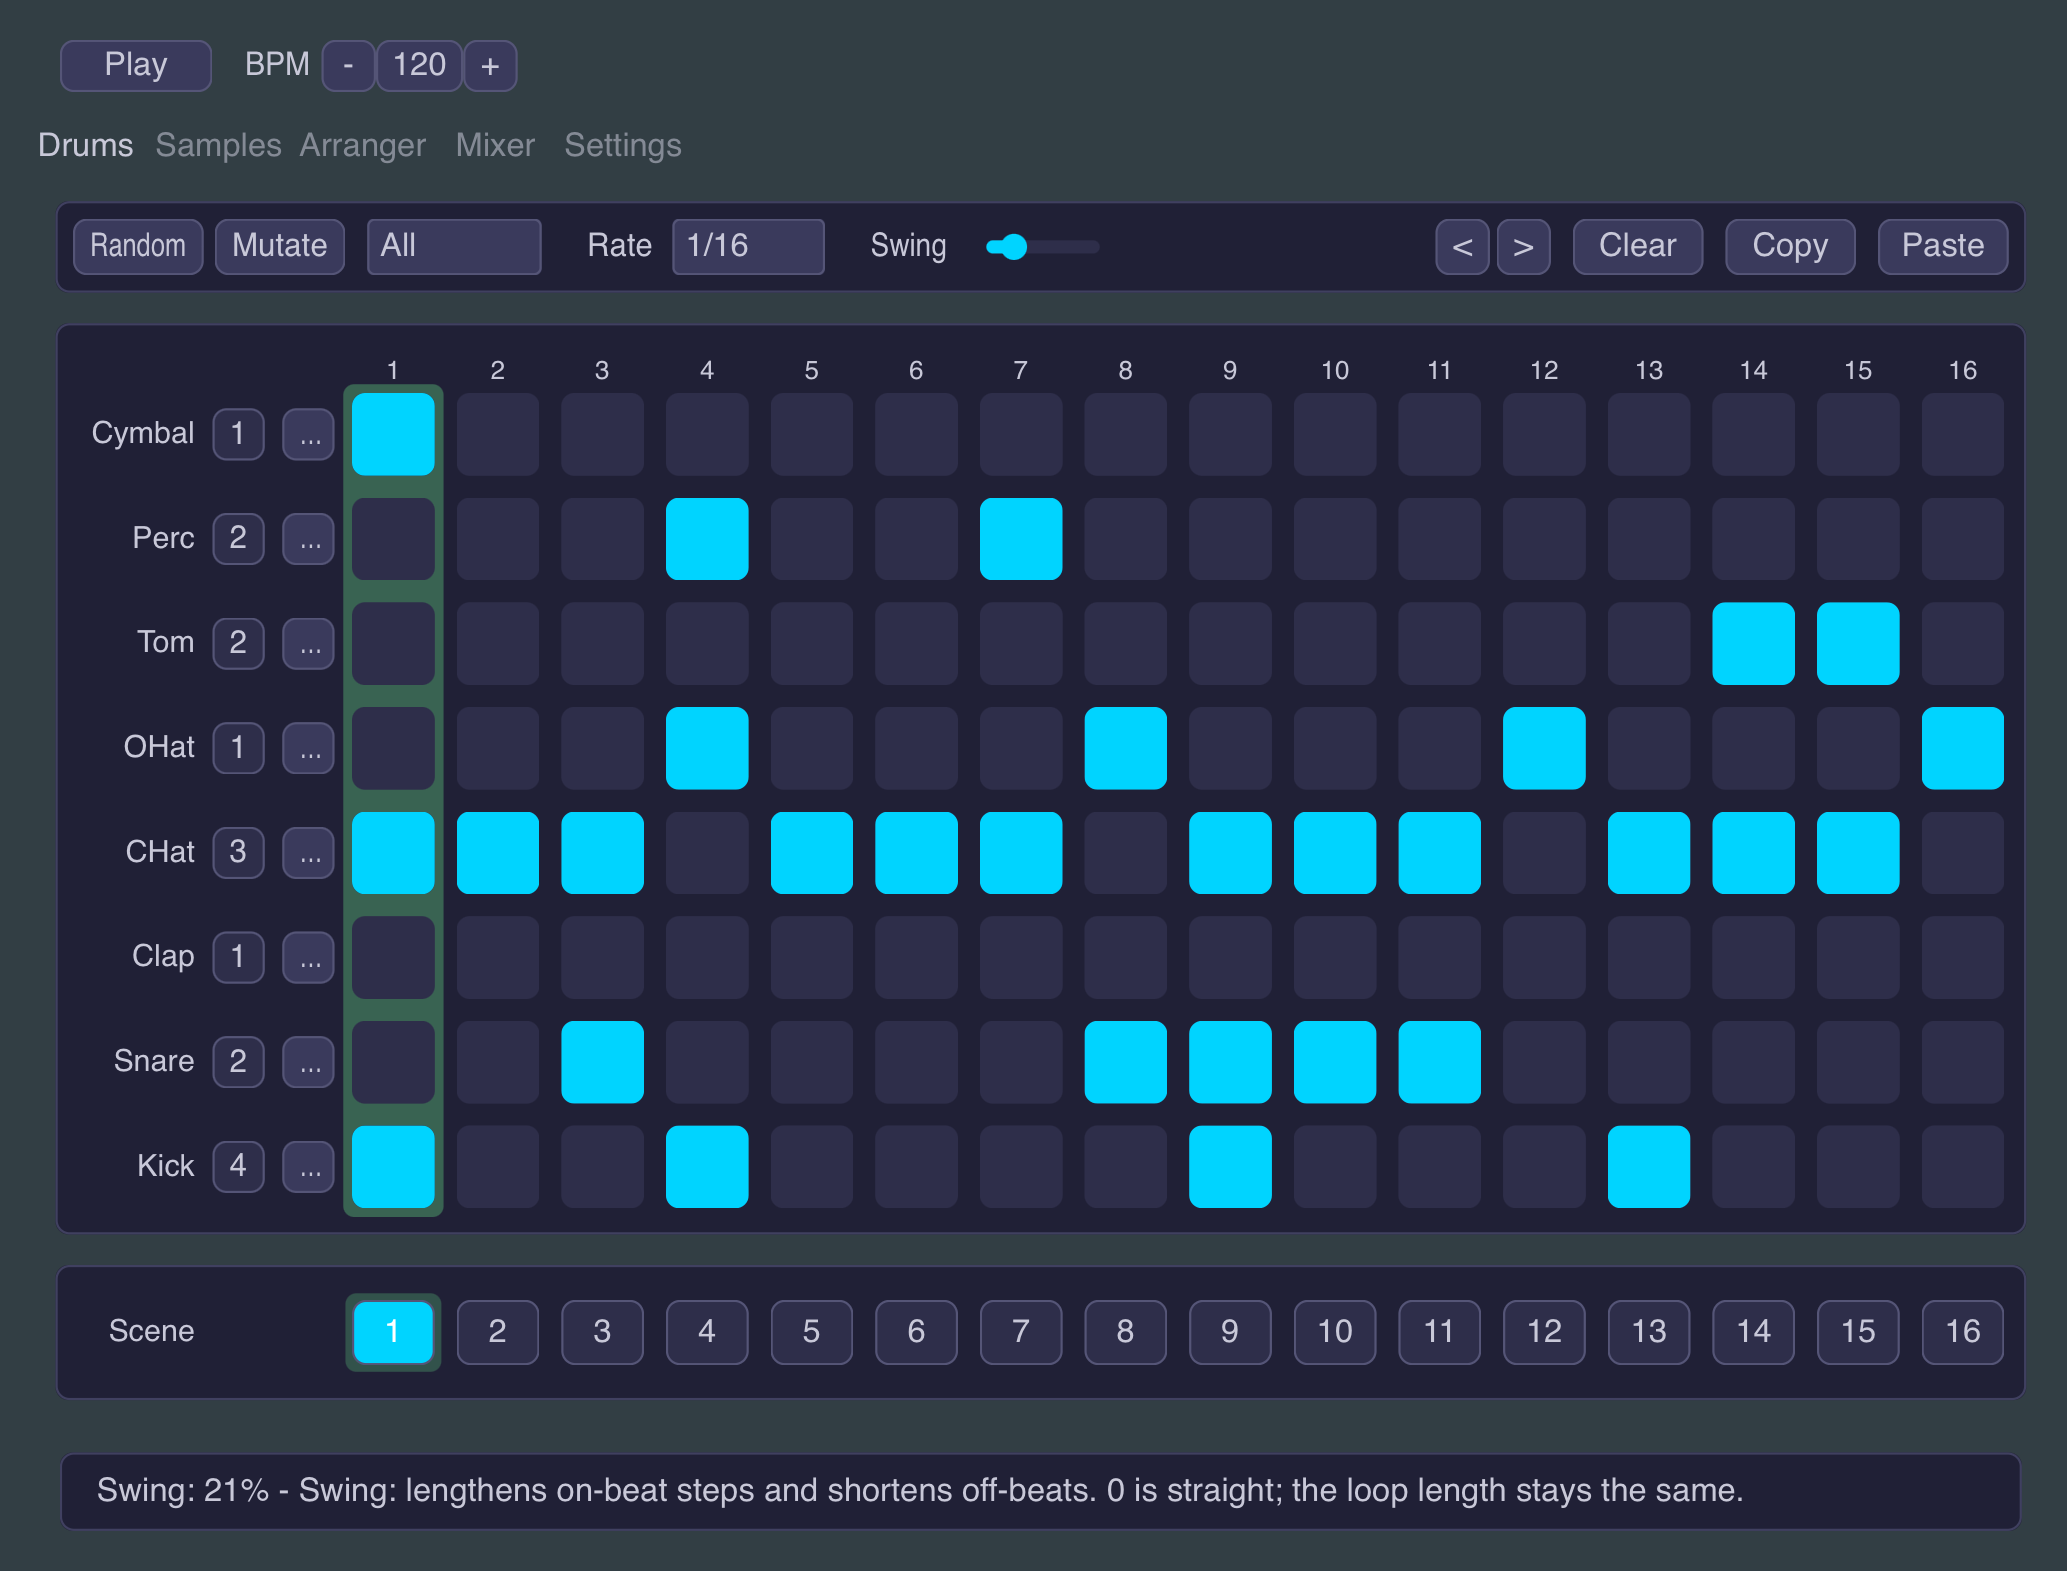
This is where a pattern lives. Top to bottom: an action bar, the 16-step sequencer grid with its lane gutter, and the scene strip.
Action bar
Left to right:
- Random: generates a fresh pattern for the current scene. Each lane gets a musically informed part: kicks land on the floor, snares on the backbeat, hats fill the pulse, so the result is a groove, not noise.
- Mutate: nudges the current pattern instead of rerolling it: adds and removes a few hits at random. Use it to evolve a pattern you already like.
- Lane dropdown: restricts Random and Mutate to a single lane, or All to touch every lane. Handy for rerolling just the hats while keeping a kick pattern you like.
- Rate: the note value of each step (1/32, 1/16, 1/8, 1/4). At 1/16 the sixteen steps span one bar; 1/32 runs double-time, 1/8 half-time, and 1/4 stretches the pattern over four bars for slow, long-form grooves. Every setting spans a whole number of bars, so the Arranger keeps switching scenes on bar lines, but remember it counts bars, not pattern loops, so at 1/8 a slot needs a Length of 2 to hold one full pattern, and at 1/4 a Length of 4.
- Swing (slider): lengthens on-beat steps and shortens off-beats for a shuffled feel. 0 is straight time; the loop length stays the same.
- Follow (toggle): when on, the grid follows playback: each time the playing scene changes, whether the Arranger or the host's Scene parameter switched it, the grid shows the new one. You can still click a scene to edit it; the grid holds your choice until the next scene change. Grayed out while neither the Arranger nor remote scene control is driving playback, since there's nothing to follow.
- ◀ / ▶: shift every lane one step left or right, with wrap-around. A lane with its own timing wraps within its own set of steps.
- Clear: clears every step in the current scene.
- Copy: copies the current scene's pattern (steps, step volumes, and lane timings) to an internal clipboard.
- Paste: pastes the clipboard into the current scene. Copy from one scene, switch, paste: the quickest way to build variations.
The step grid
Sixteen columns by eight lanes, with a step-number row on top; each lane's playhead marker sweeps left to right and loops. At the default settings they move as one column, but a lane with its own timing (see below) runs at its own pace. The marker is green while the grid shows the scene that's playing, and gray while you're editing a different scene, a reminder that the steps under it aren't the ones you're hearing. The lanes read bottom to top, the way drum machines traditionally do: Kick, Snare, Clap, CHat (closed hat), OHat (open hat), Tom, Perc, Cymbal.
- Click a cell to toggle the step on or off. New steps start at full volume.
- Drag vertically on a cell to set that step's volume; the fill height shows the level. Step volume shapes both the sound and the MIDI velocity the lane emits, so ghost notes and accents carry through to anything Little Drum Machine is driving.
The lane gutter
To the left of the grid, each lane has a row of small controls:
- Lane name: which drum this row plays.
- Slot button: picks which of the lane's four samples plays (see the Kit tab). Clicking cycles 1 → 2 → 3 → 4 → ★ and back to 1. The star is per-step mode: each step chooses its own sample slot. In star mode a lit step shows its slot number, and clicking a step cycles it through off → 1 → 2 → 3 → 4 → off, so a single lane can, say, alternate two different toms.
- M / S: mute and solo. The same switches as on the Mixer tab; the two tabs mirror each other live.
Lane timing (steps / length)
An opt-in feature: enable it with the Polyrhythm switch on the Settings tab (it's off by default, and off means the grid is the classic 16-step machine described above). Once on, to the right of each lane sit two small numbers, 16 over 16 by default. Together they give the lane its own clock:
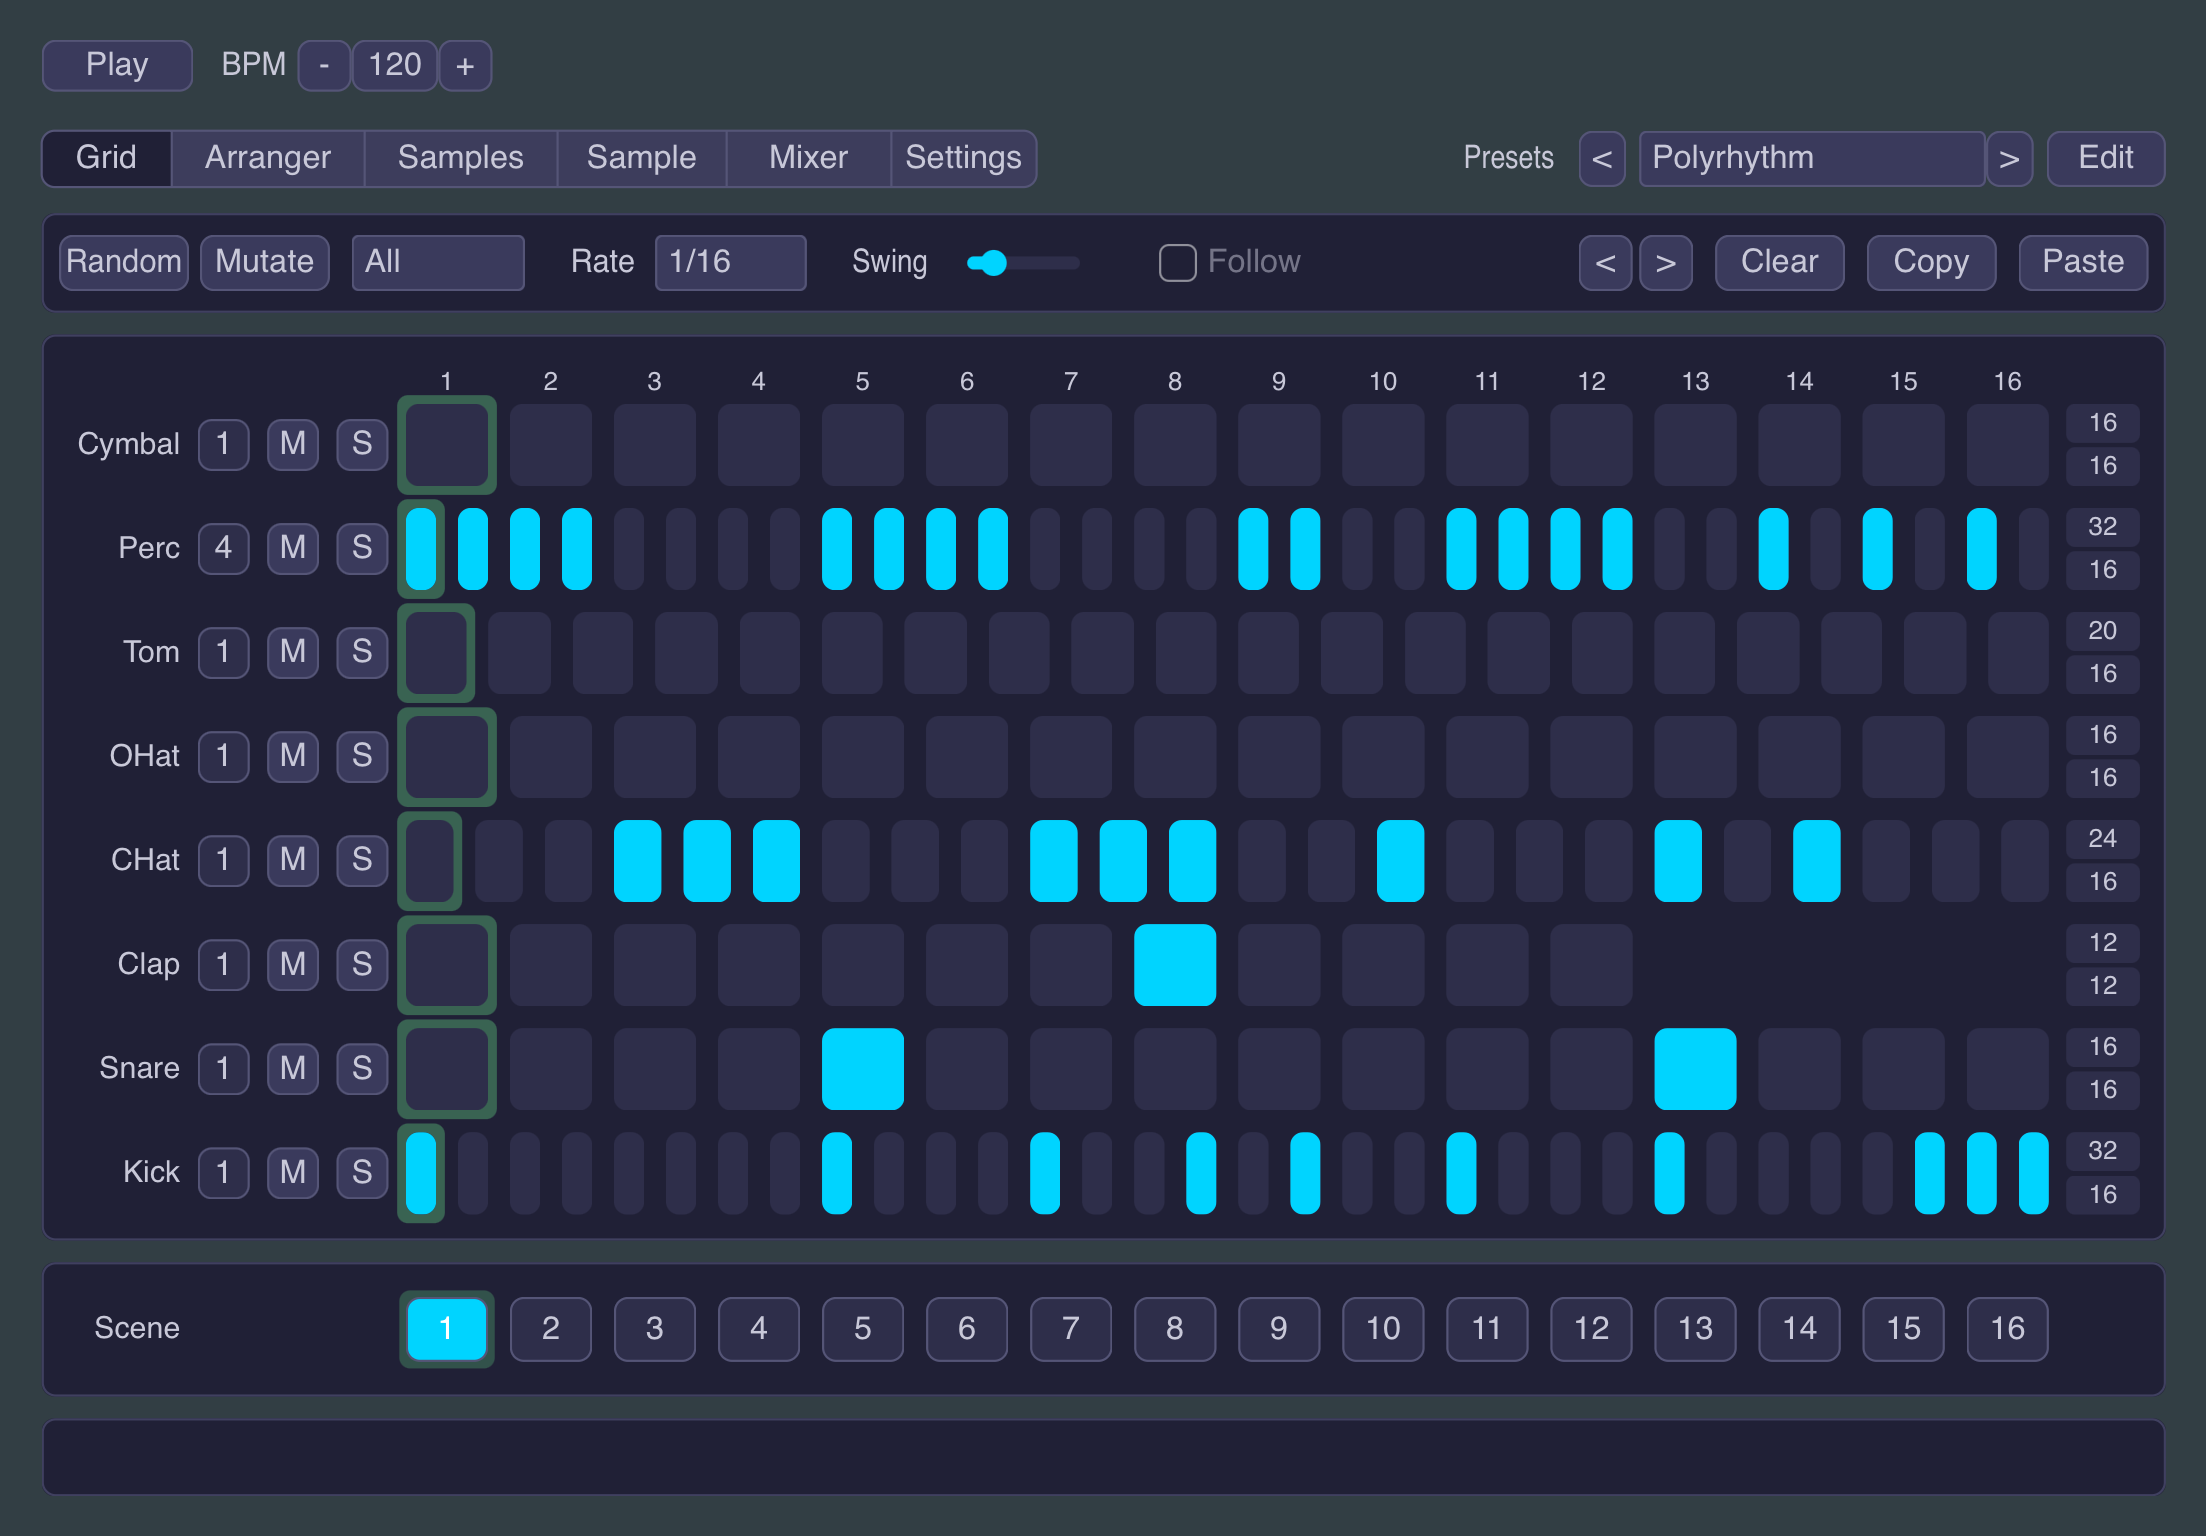
- Length (bottom number): how many grid steps of time the lane occupies before it loops. At 15 the lane restarts one step early and drifts against the other lanes bar after bar, classic polymeter, falling back into line on its own after enough bars, or immediately when you restart the transport.
- Steps (top number): how many equally spaced cells divide that time. 8 over a length of 16 plays one cell per 8th note; 11 over 12 squeezes eleven cells into the time of twelve steps, a true tuplet against the rest of the kit.
Length runs from 3 to 16; steps from 2 to 32, capped at twice the length, so cells never run more than twice as fast as the grid.
Drag either number up or down to change it; double-click resets to 16. While the two numbers are equal, dragging the length moves the steps count with it, so the lane keeps one cell per grid step, like setting a track length on a classic drum machine. Set the steps number yourself to uncouple them (dragging the length down through the twice-the-length cap still pulls the steps down with it). The lane's row redraws to match: it shows only its own cells, each sized to its real duration. Cells hidden by shortening a lane aren't lost; dial the number back up and they return as they were.
Lane timing is scene content, like the steps themselves: each scene stores its own steps and length for every lane, so a hat can run 16 cells in one scene and 12 in the next, and Copy / Paste carries the timing with the pattern. What happens to a lane's phase when the playing scene changes is chosen by the Phase button on the Settings tab: Sync (the default) restarts every lane at the top of the new scene, keeping the arrangement locked together; Drift lets each lane roll on through the switch, so a drifting hat keeps drifting while scenes change under it.
At the default 16 over 16, everything behaves like a classic 16-step machine.
Swing follows each lane's own cells, not the master grid: the shuffle is applied to pairs of that lane's cells. So the default 16th swing becomes 8th swing on a lane set to 8 over 16 (its cells are 8th notes), and a lane with an odd number of steps leaves its last cell straight.
Scene strip
The row of 16 numbered slots at the bottom. Each scene stores its own pattern (steps, step volumes, per-step slot choices, and lane timings) for all eight lanes. Everything else (samples, mixer, EQ, Rate, Swing) is shared across scenes, so flipping scenes changes the rhythm, not the sound. Loading a preset replaces all 16 scenes and returns you to scene 1: the factory presets fill the first four and leave the rest empty for you to build on.
Click a slot to switch which scene you're editing; with the Arranger off, that scene also plays. The filled slot is the scene you're editing; a border marker shows the scene that's playing, which can differ while the Arranger runs the show. Scenes are the building blocks you chain together on the Arranger tab.
Scenes can also be switched remotely. Little Drum Machine exposes a parameter named Scene (1-16) to your host, so anything your host can point at a parameter works: map a MIDI CC from a hardware knob or pads to it (in AUM: menu, then MIDI Control), draw it as automation in your DAW's timeline, or drive it from an LFO. A remote change switches the scene that plays: the border marker moves and the sound follows, while the scene you have selected for editing stays put, exactly like the Arranger's own scene switching. Turn on Follow if you want the grid to chase the remotely-driven scene.
Once remote control has spoken, it keeps deciding what plays: scene clicks still only pick what you edit, and the Arranger's chain display goes quiet to show it's not in charge. Control hands back when you start the transport again, turn the Arranger on, or edit the chain on the Arranger tab; the chain display lights up where the arrangement resumes, and the next remote change takes over again from there. In a DAW this works out naturally: every play start begins with your arrangement in charge, and the Scene automation lane takes over exactly where you drew it.
The Arranger Tab
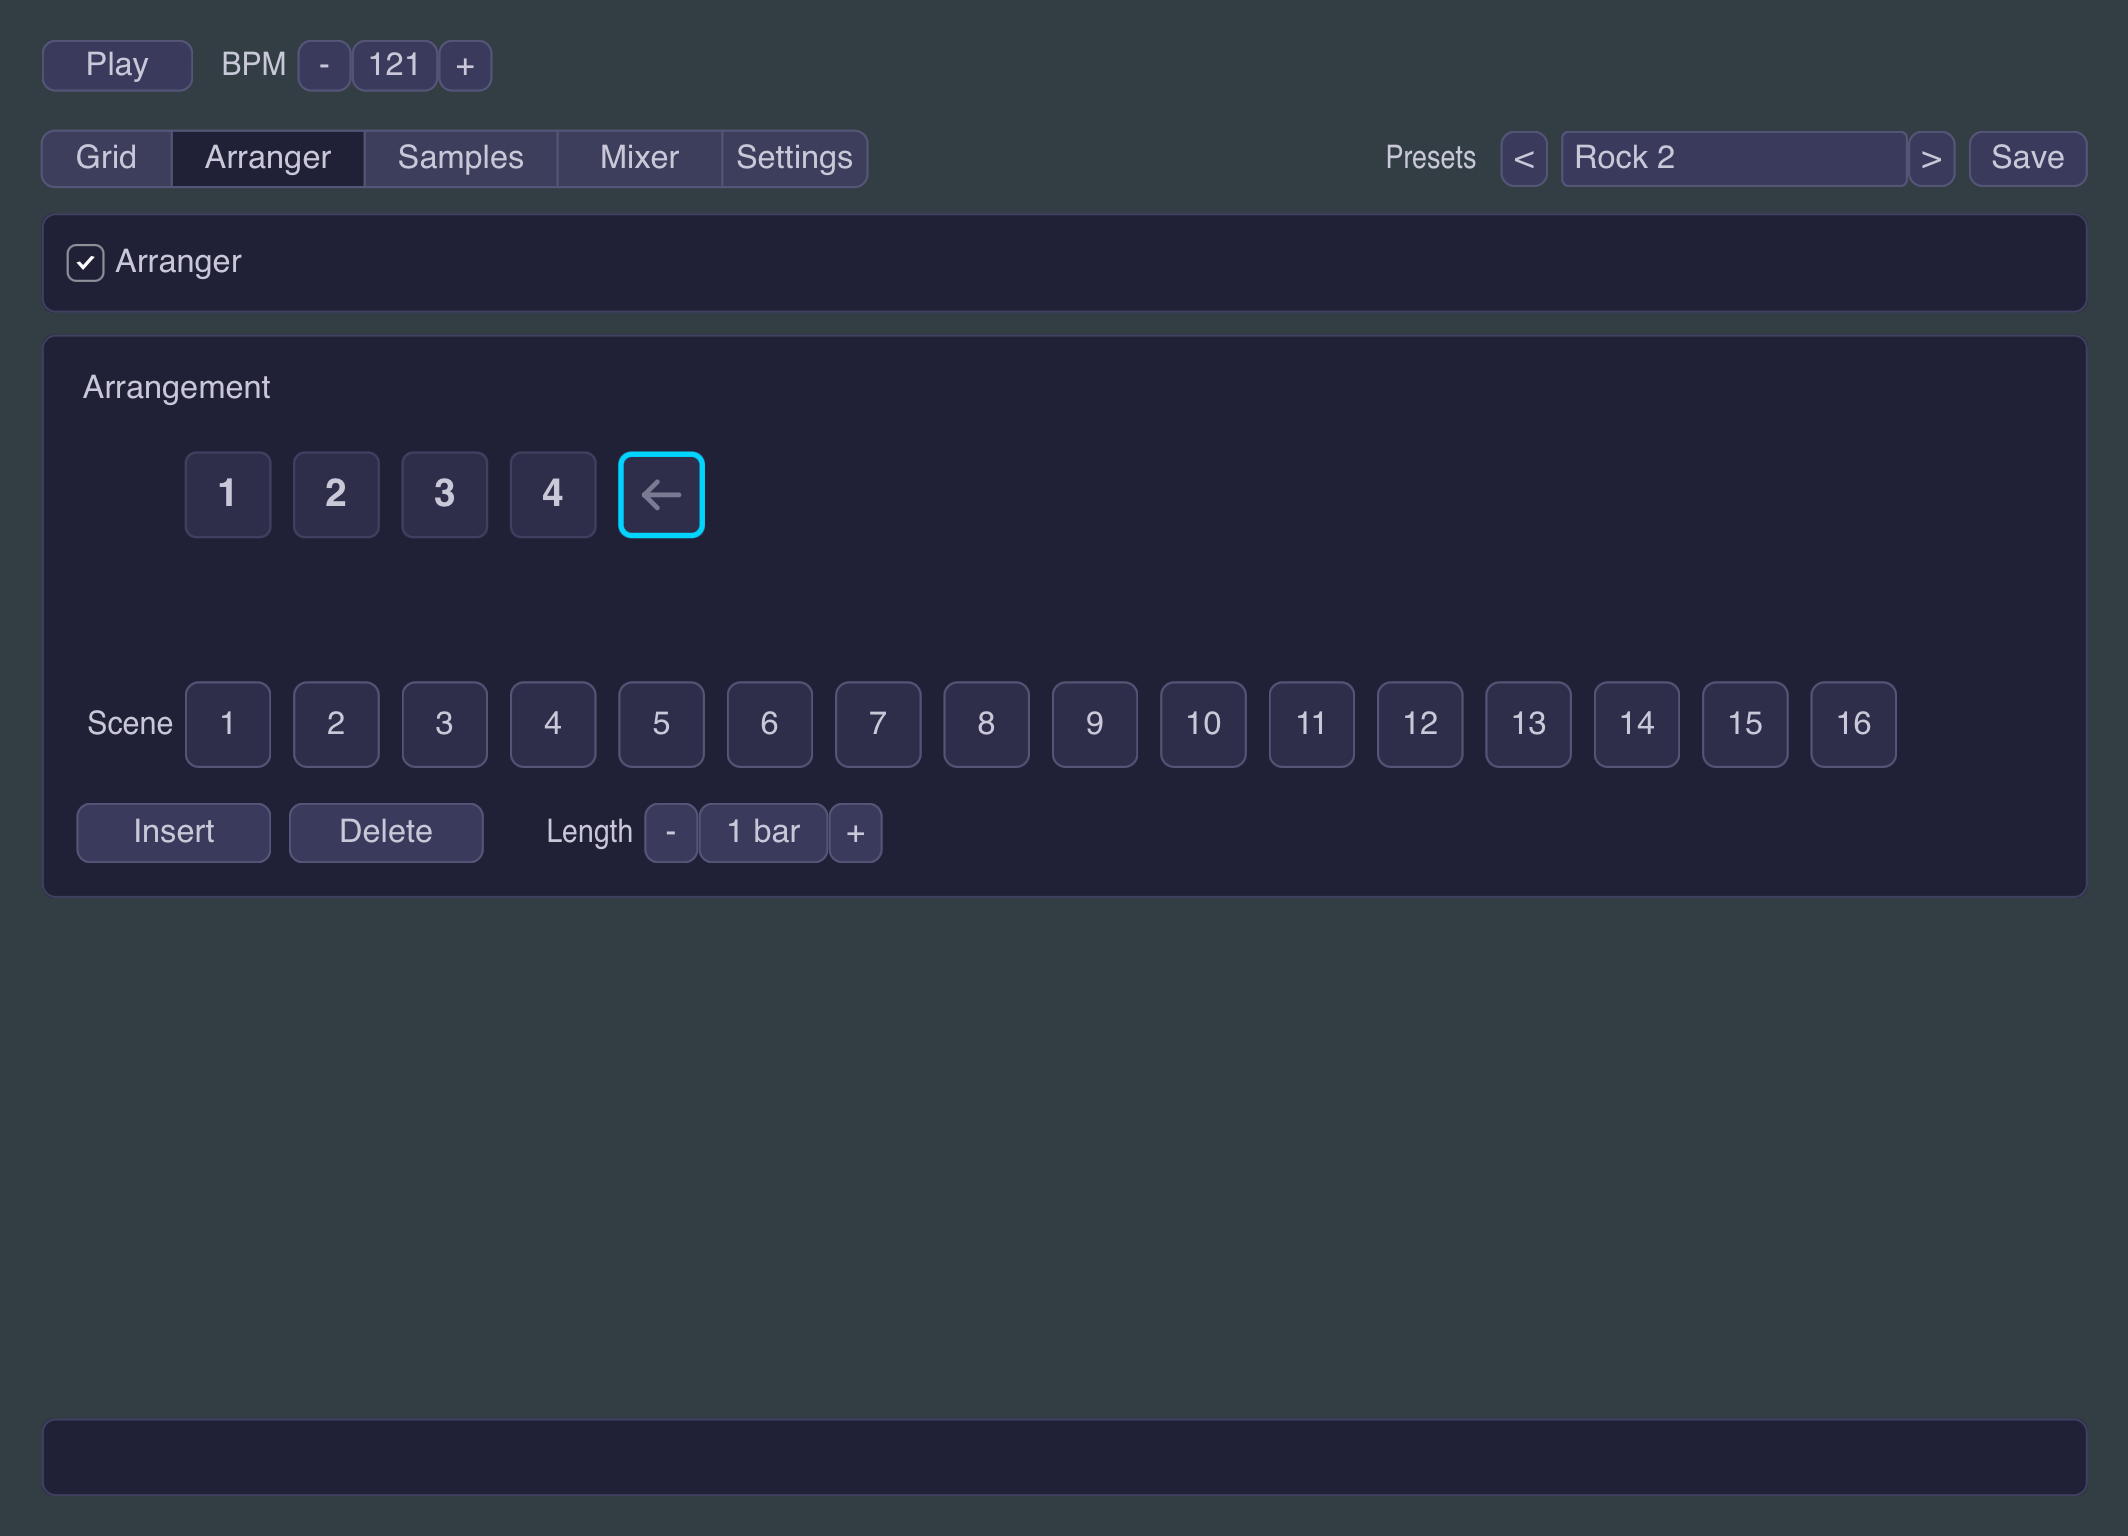
Where you build a longer piece out of your scenes by chaining them into a sequence. The tab has a menu box with the master toggle, the Arrangement panel with the chain itself, a scene keypad, and an action row.
Arranger toggle
In the menu box at the top:
- On: the chain drives playback: each slot plays its scene for its bar count, then the next slot takes over, looping back to the start after the last one.
- Off: the scene selected on the Grid tab simply loops. Useful while you're focused on a single pattern and the arrangement would get in the way.
The chain
The Arrangement panel shows the chain as a row of cells reading left to right, up to 32 slots across two rows. Each cell names a scene; a small tag in its top-right corner shows the bar count when it's more than one bar.
- The playing cell is filled with the accent color and moves with playback.
- The selected cell has a thick outline: that's the cell your edits target. Click any cell to select it.
- After the last cell sits the append cell, marked with a loop arrow: this is where the chain wraps back to the start, and it's also the typing cursor, where new slots are added. It's the default selection, so a fresh tab is ready to extend the song.
Scene keypad
The row of 16 numbered buttons under the chain. Editing works like typing on a classic drum machine:
- With the append cell selected, tapping any scene adds it to the end of the chain as a new 1-bar slot. The cursor stays on the append cell, so you can type out a whole song scene by scene.
- With a real slot selected, tapping a different scene rewrites that slot in place, keeping its length. Tapping the slot's own scene inserts another 1-bar slot of it right after and moves the selection there, so repeated taps march forward through the chain, extending the section bar by bar.
Action row
Below the keypad:
- Insert: inserts a copy of the selected slot right after it, then retype its scene on the keypad. From the append cell it appends a copy of the last slot. Grayed out when the chain is full.
- Delete: removes the selected slot, like backspace. From the append cell it removes the last slot. The last remaining slot can't be deleted: a chain always has at least one.
- Length (stepper): the selected slot's length in bars (1-8). The direct route to "scene 5 for 8 bars" without eight keypad taps. With Polyrhythm on (see the Settings tab) the stepper counts pattern loops instead of bars: a slot plays its scene for one full loop per count, and a loop lasts as long as the scene's longest lane, so a scene whose lanes all run 12 steps hands over cleanly after exactly 12 steps.
The Kit Tab
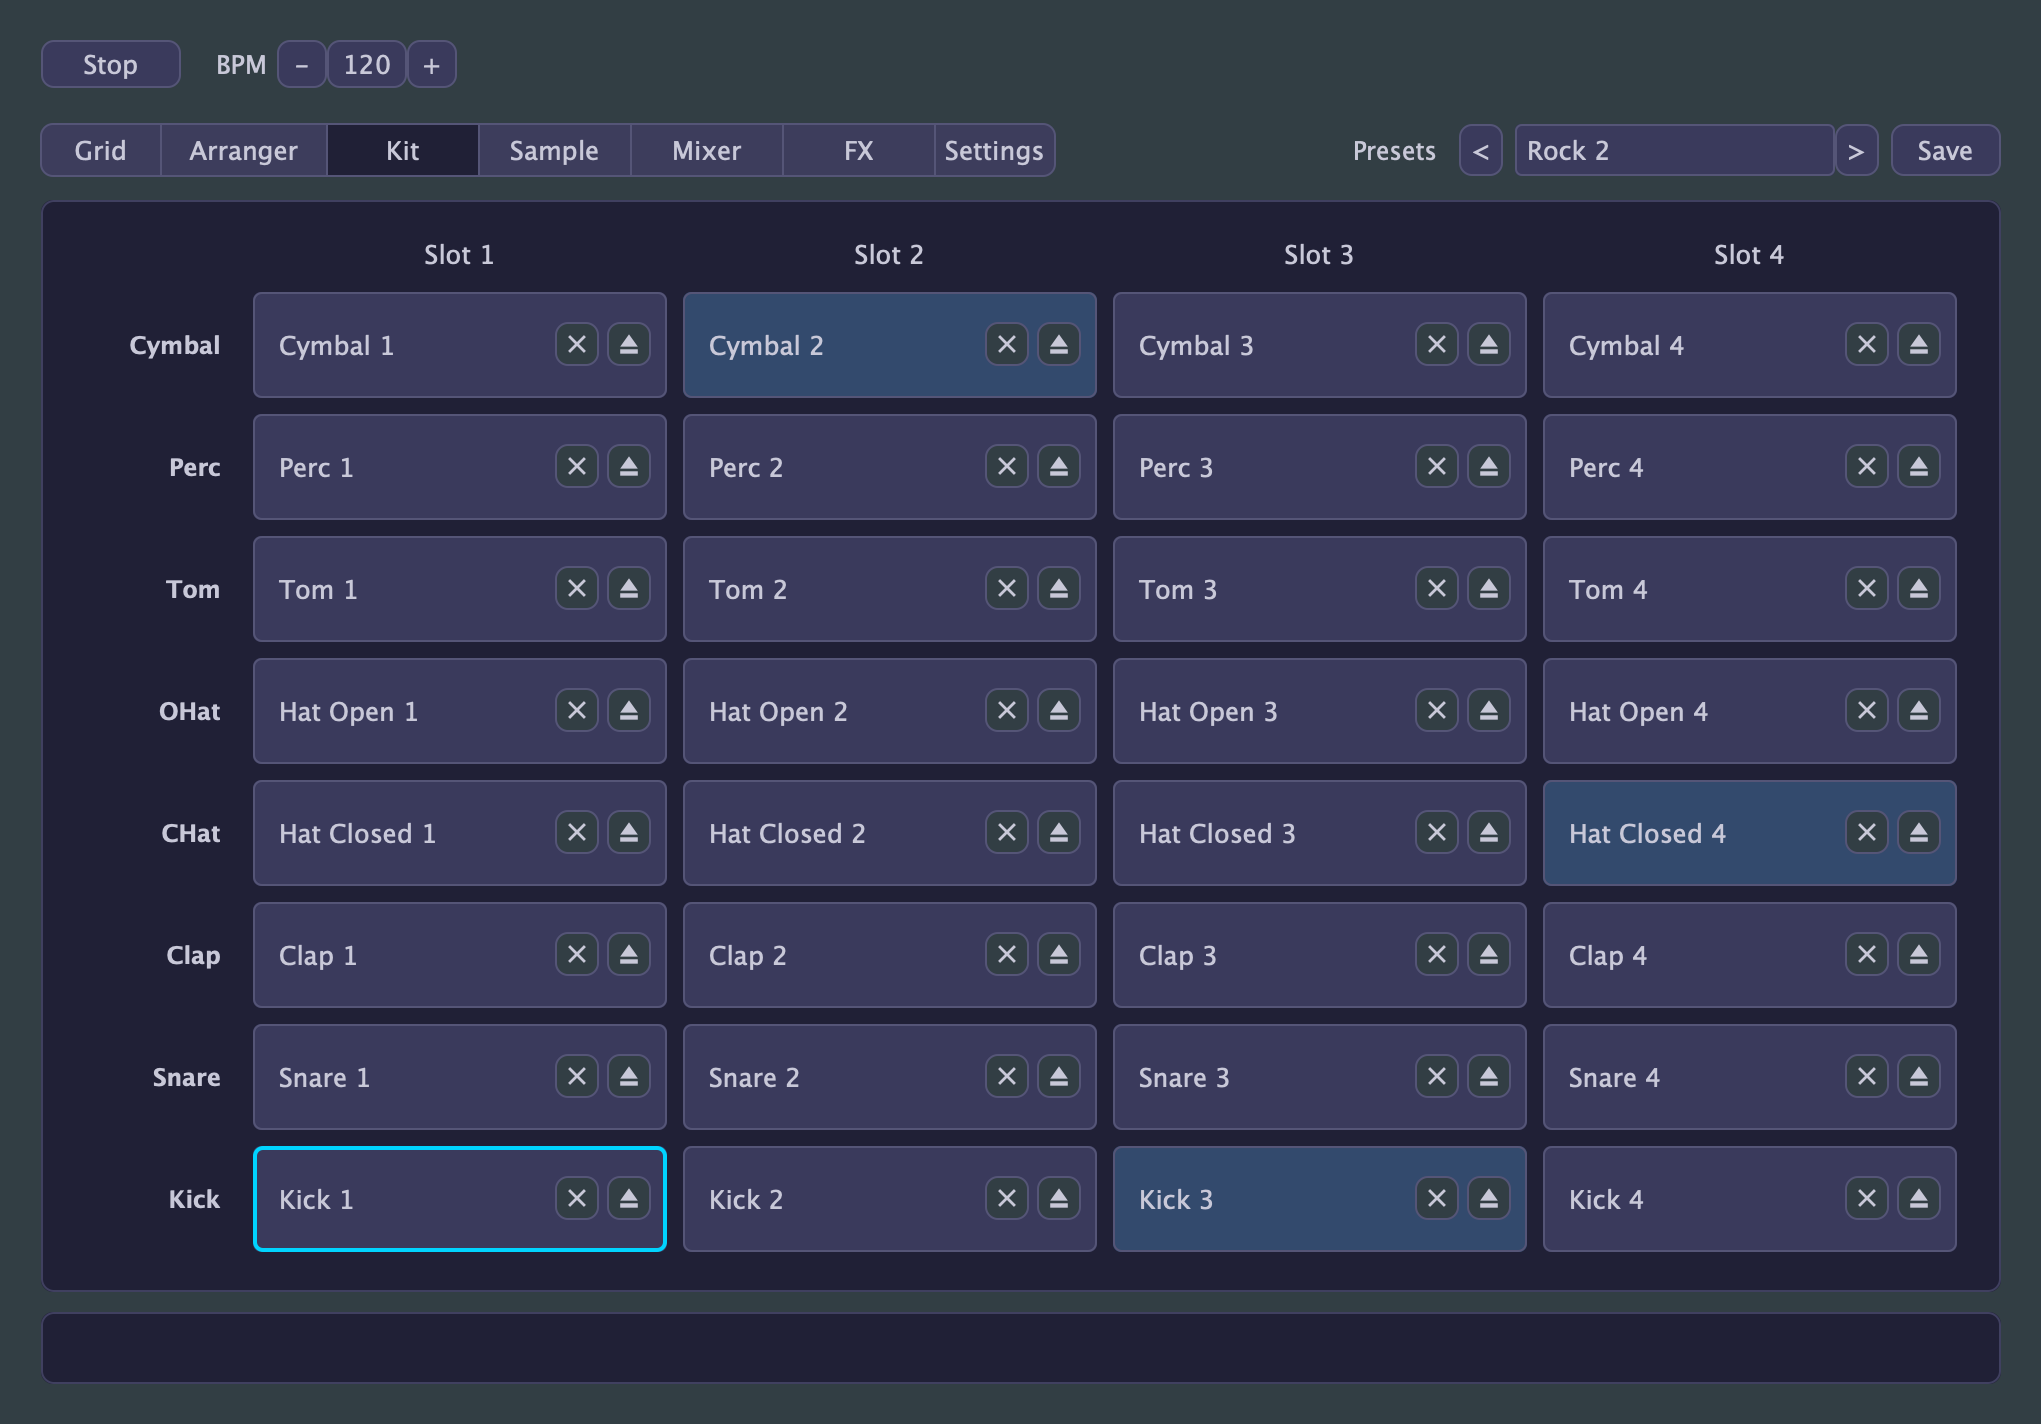
Each lane plays one of four samples, and this tab is where you manage them: a table of eight lane rows by four slot columns. Every slot ships with a built-in sample (four characters per drum), and the Grid tab's slot button (or its per-step star mode) picks which one plays.
Each cell holds:
- Sample name: tap anywhere on the cell to play its sample. The cells are pads: a tap plays that drum at the level and in the space it occupies in the mix, with the lane's volume, panning and effect sends, so you can jam along with a running pattern and your hits sit where the sequenced ones do. A tap layers over whatever the pattern is playing rather than interrupting it, and it sounds even if the lane is muted or another lane is soloed, since a pad you press should always speak. Tapping also selects the slot for the Sample tab, where you can tune and shape it.
- × button: resets the slot to its built-in sample.
- Eject button: loads your own .wav file into the slot, replacing the built-in sample for that slot.
Presets and saved sessions reference your loaded samples by file location rather than copying the audio (on iPad, the file is copied into the app's own storage when you load it, so it stays available). If a file can't be found when a preset loads, the slot shows its name in red, stays silent, and the info bar raises a warning naming the missing file; load the file again or reset the slot to clear it.
Saving a kit: kits aren't saved separately from presets. A preset always stores the whole patch, kit included, so to keep a kit you've put together for reuse, simply save a preset; putting "Kit" in the name (say, "808 Kit") makes it easy to spot in the list later. Loading it brings back the samples along with everything else, ready as a starting point for a new beat.
The Sample Tab
Where you shape a single sample: tune it, trim it, fade it in and out. The Kit tab manages which samples are loaded; this tab edits how the selected one plays. Top to bottom: a menu bar, the waveform view, and a row of seven dials.
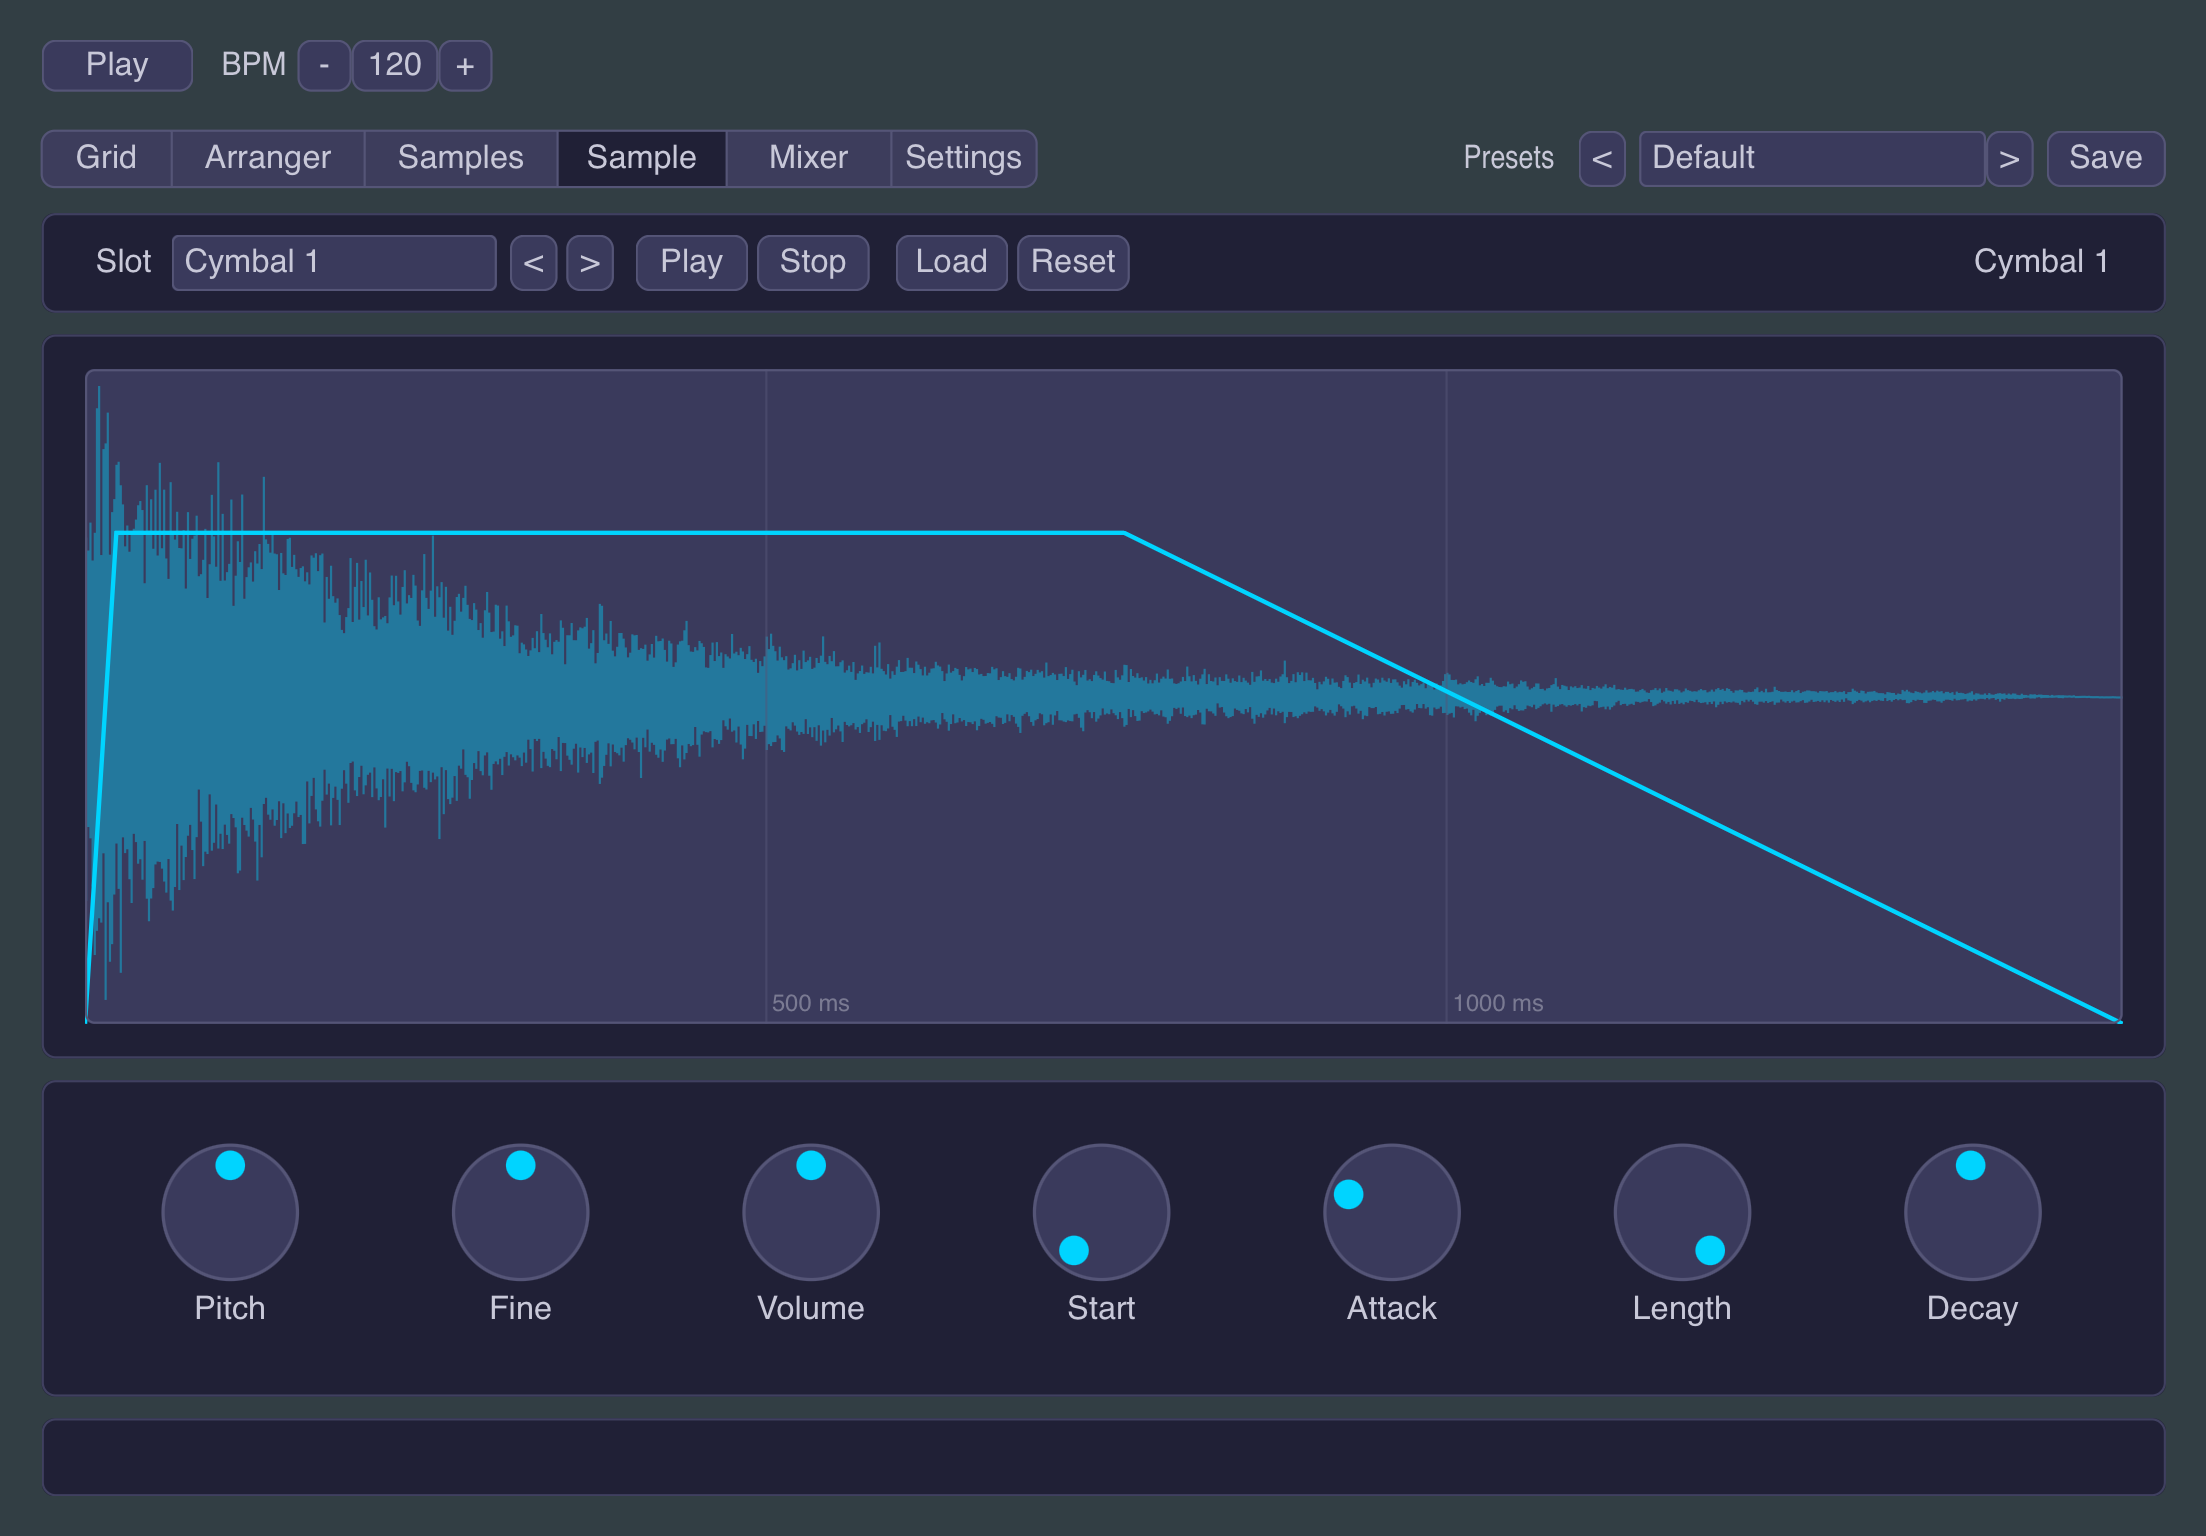
Menu bar
Left to right:
- Slot (dropdown): selects which of the 32 slots you're editing, from Kick 1 to Cymbal 4. Tapping a cell on the Kit tab selects it here too; the two tabs share one selection.
- ◀ / ▶: step to the previous / next slot without opening the list. Wraps around at the ends.
- Play / Stop: audition the selected sample with all its settings applied, same as clicking the waveform. Stop cuts the audition short; handy when a loaded sample is long.
- Load / Reset: the same actions as the Kit tab's eject and × buttons: load your own .wav into the slot, or reset it to its built-in sample.
- Sample name: the selected slot's sample. Shows "(missing)" in red when a preset references a file that can't be found, and "(empty)" when the slot holds nothing.
Waveform view
The large display shows the selected sample with its envelope drawn over it:
- A time ruler along the bottom in the sample's own time.
- The parts that won't play (before the Start point and past the Length cutoff) are dimmed.
- The envelope line traces the fade-in, the level plateau (its height follows the Volume dial), and the fade-out.
- Click anywhere in the view to audition; a playhead line tracks the preview as it plays.
The dials
Every change except Start is heard live on a sounding hit, so tweak while auditioning. Double-click any dial to reset it to neutral.
- Pitch (±24 semitones) and Fine (±100 cents): classic drum-machine tuning: repitching also shortens or stretches the sample, like changing a tape's speed.
- Volume (±12 dB): level trim for this one sample, on top of the lane fader. Use it to balance the four samples within a lane.
- Start (0-500 ms): where in the sample playback begins; everything earlier is skipped. Takes effect from the next hit.
- Attack (0-500 ms): fade-in from the start point.
- Length (0-100%): how much of the sample plays before it's cut off, measured from the start point. 100% plays to the end.
- Decay (0-100%): a fade-out ending at the cutoff, like a clip's fade-out handle, sized as a share of what plays. At 0% the sample stops dead at the cutoff.
Length and Decay are shares of the sample rather than times, so both dials stay useful whether a sample lasts fifty milliseconds or five seconds. The settings shape Little Drum Machine's own sound only; the MIDI notes a lane emits are unaffected.
Settings belong to the sample, not the slot: loading a different file into the slot (or resetting it to the built-in sample) starts fresh at neutral. Your presets save all of these settings along with everything else.
The Mixer Tab
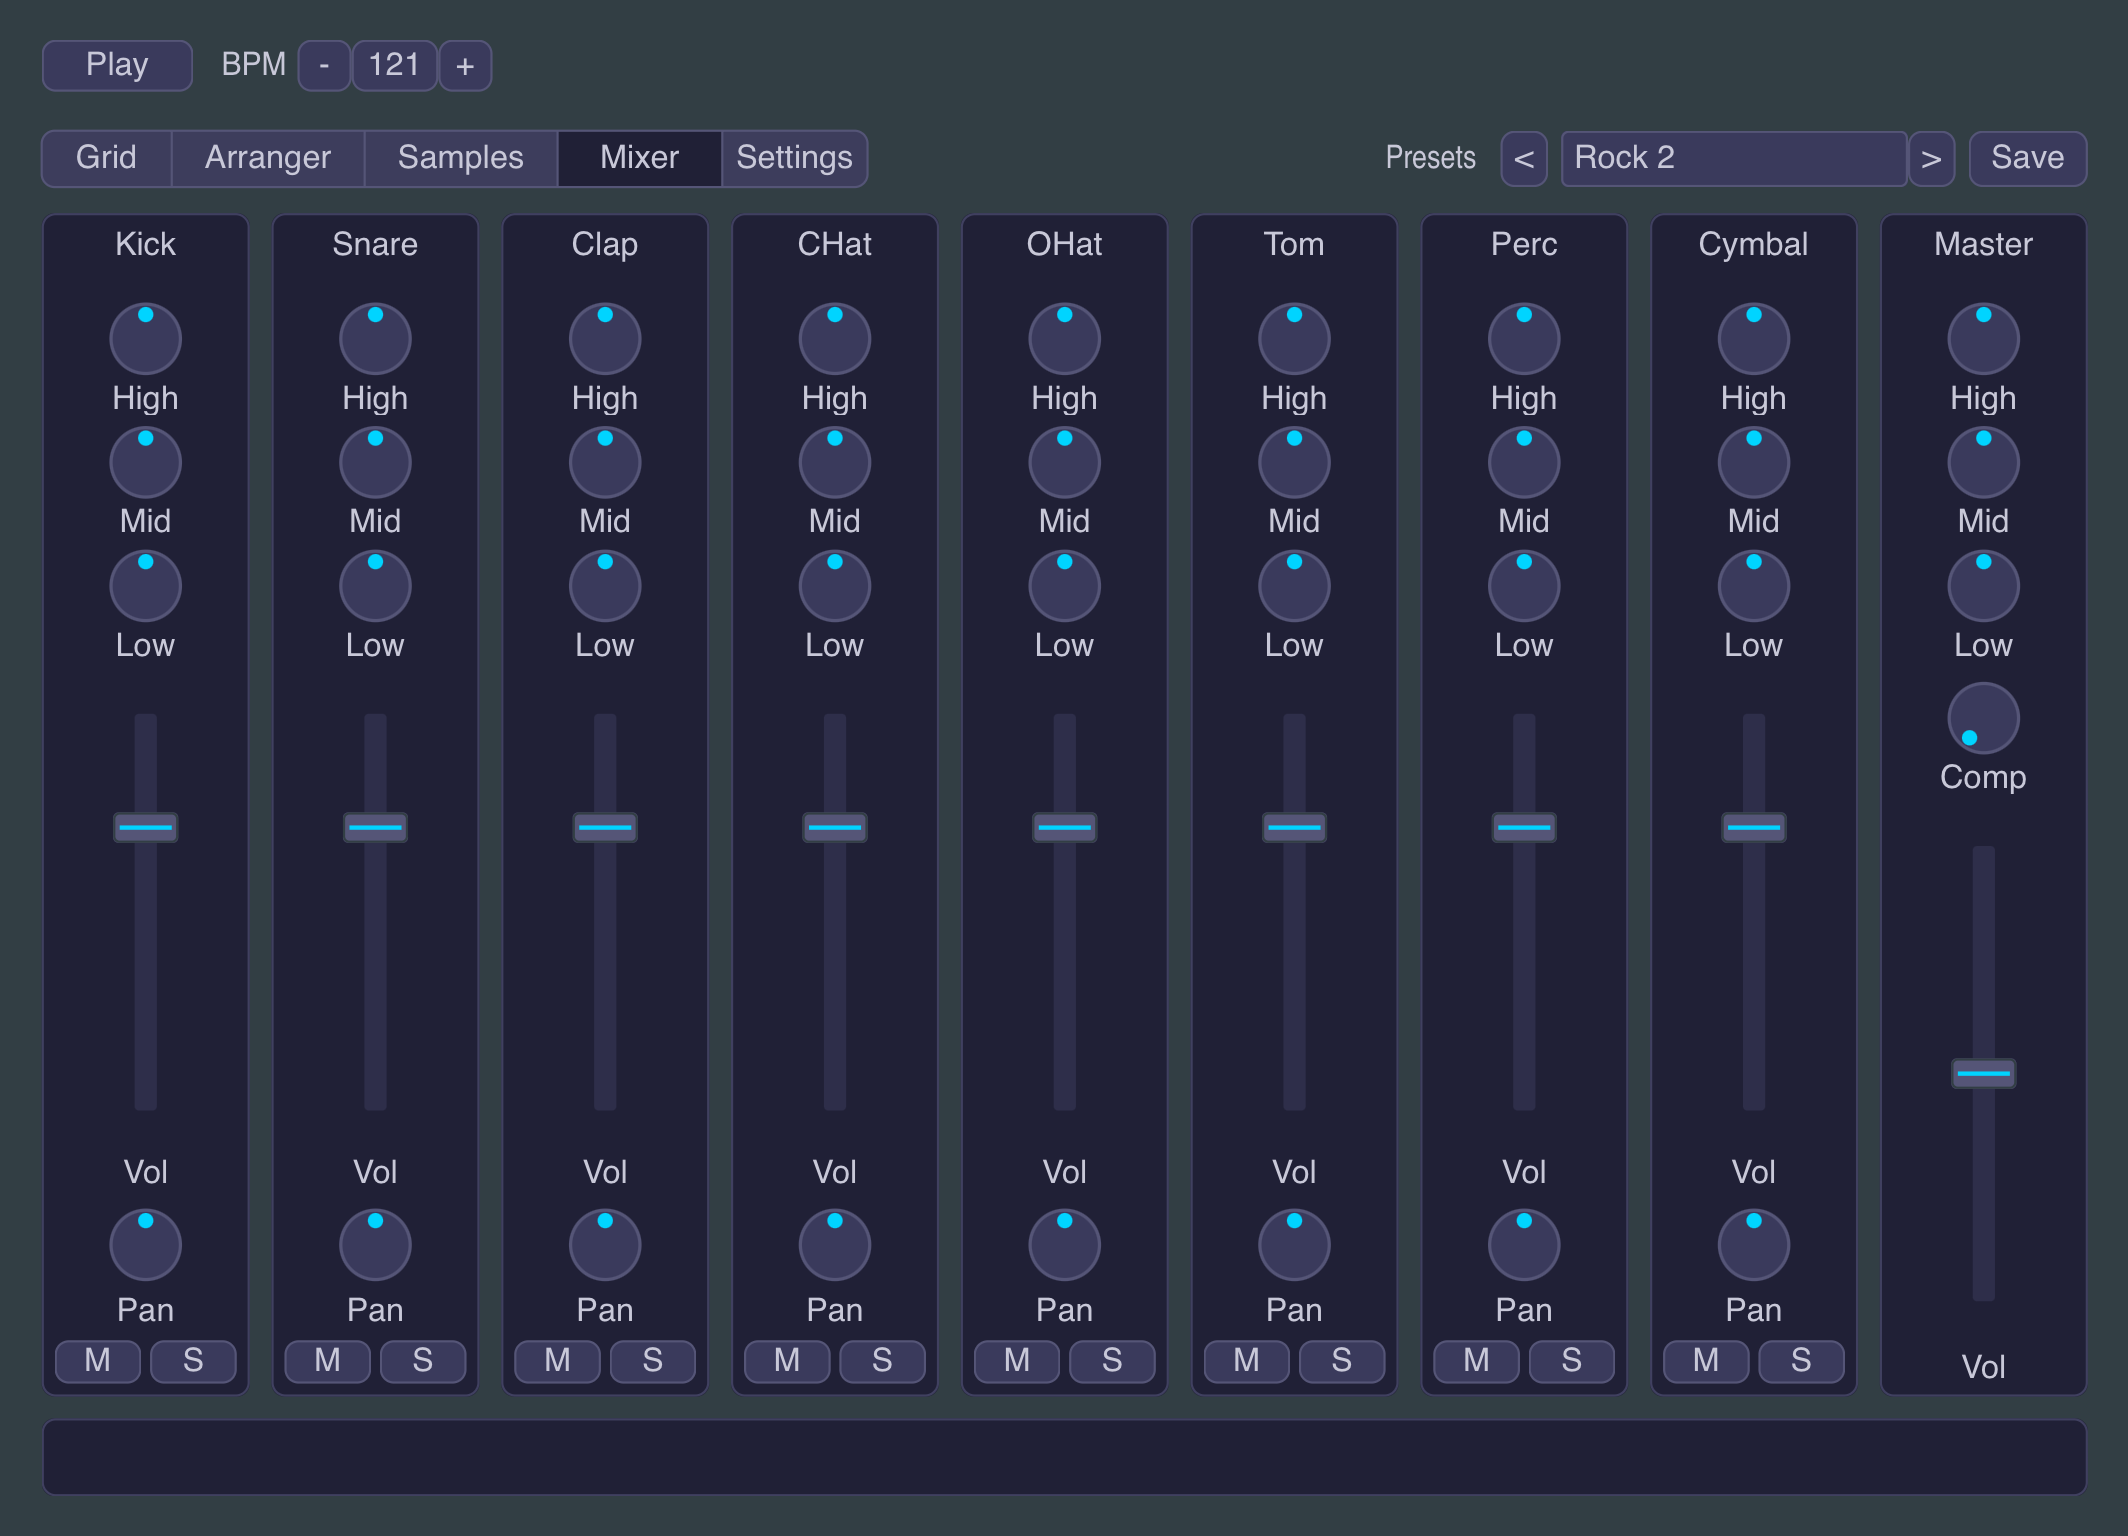
Nine channel strips: one per lane, plus Master on the right. Each lane strip, top to bottom:
- Lane name.
- High / Mid / Low (dials): a 3-band EQ for the lane: high shelf at 8 kHz, mid bell at 1 kHz, low shelf at 100 Hz, each ±12 dB.
- EQ / FX (button): swaps the three dials above between the EQ and the lane's FX amounts. The switch applies to every strip at once, and the button's label shows the current view. The tab opens on the FX view, since that is where the effects on the FX tab are switched on at all.
- Vol (fader): the lane's level into the master bus, shown in dB in the info bar while you drag. The fader rides a console-style curve: even movements change the loudness evenly across the whole throw, with the stock level about two-thirds of the way up and +6 dB of boost above it. The fader track doubles as the lane's level meter, lighting green through amber to red with the signal.
- Pan (dial): the lane's stereo position.
- M / S: mute and solo. Solo silences every non-solo lane; mute silences this one. Mute and solo also stop the lane's MIDI output, so what you hear is what downstream gear gets. The same switches appear on the Grid tab's gutter and the Settings tab; all views stay in sync.
In the FX view the three dials become, top to bottom:
- Delay: how much of this lane feeds the shared delay (see the FX tab).
- Verb: how much feeds the shared reverb.
- Drive: how hard this lane is pushed into the shared drive shaper. What the drive sounds like, and how much of the driven signal you hear, are set on the FX tab.
Both sends follow the lane fader, mute and solo: a muted lane feeds no echo.
Double-click (double-tap on iPad) any dial or fader on this tab to put it back where a fresh instance starts: flat EQ, centered pan, sends and drive off, and a fader back to its stock level. The faders return to their stock position rather than to silence; use M for that.
The Master strip drops Pan and M/S (meaningless on the sum) and keeps everything else, so it reads as a ninth channel:
- Vol (fader): the output level, after the master EQ, drive and compressor, shown in dB in the info bar while you drag. It runs longer than a lane fader, having the Pan and M/S space to itself, and unity sits the same fraction of the way up its travel as a lane's stock level does, with +6 dB of boost above. Its meter shows the final output. It starts a little under unity, at −6 dB, and that gap is deliberate: eight lanes of full-scale samples can easily sum past what the output can carry, so the factory presets leave themselves room. Push it up if you want Little Drum Machine hotter, and watch the meter when you do.
The glue compressor is on the FX tab, with the other effects. Every dial on the Mixer answers one question (how much of this channel goes where) and a compressor that only ever exists once has no answer to give.
In the FX view the Master strip shows the same three dials as a lane strip, applied to the whole kit:
- Delay and Verb: send the entire mix into the delay or reverb, on top of whatever the individual lanes already send. Handy for a quick global wash without touching eight dials; if you want the usual drums treatment (a wet snare over a dry kick) use the lane sends instead.
- Drive: saturates the summed bus rather than each lane separately. That is a different sound, not a shortcut for turning up all eight lane Drives: on the sum the lanes distort into each other, which is where bus saturation's glue and density come from. It sits after the master EQ and before the compressor, so the comp has something already driven to work on.
The effects' own output levels are not here: they live on the FX tab, next to the effect they belong to.
The FX Tab
Everything that belongs to the four effects themselves: what each one sounds like, and how loud it comes back. What is not here is how much of each channel goes in: the sends live on the Mixer tab's FX view, so no control appears in two places. All FX settings are part of the preset. The factory style presets come with genre-typical FX already dialed in: usually just a send or two plus matching delay and reverb settings, with a few leaning in where the genre demands it (Trap's snare reverb, Reggae's dub delay, Lo-fi's drive). Breakcore, Industrial, EBM and Glitch go much further: they're built around heavy drive and are the place to look if you want to hear what this tab can do. Patches saved before FX existed load with all sends and drive at zero, so nothing sounds different until you turn something up.
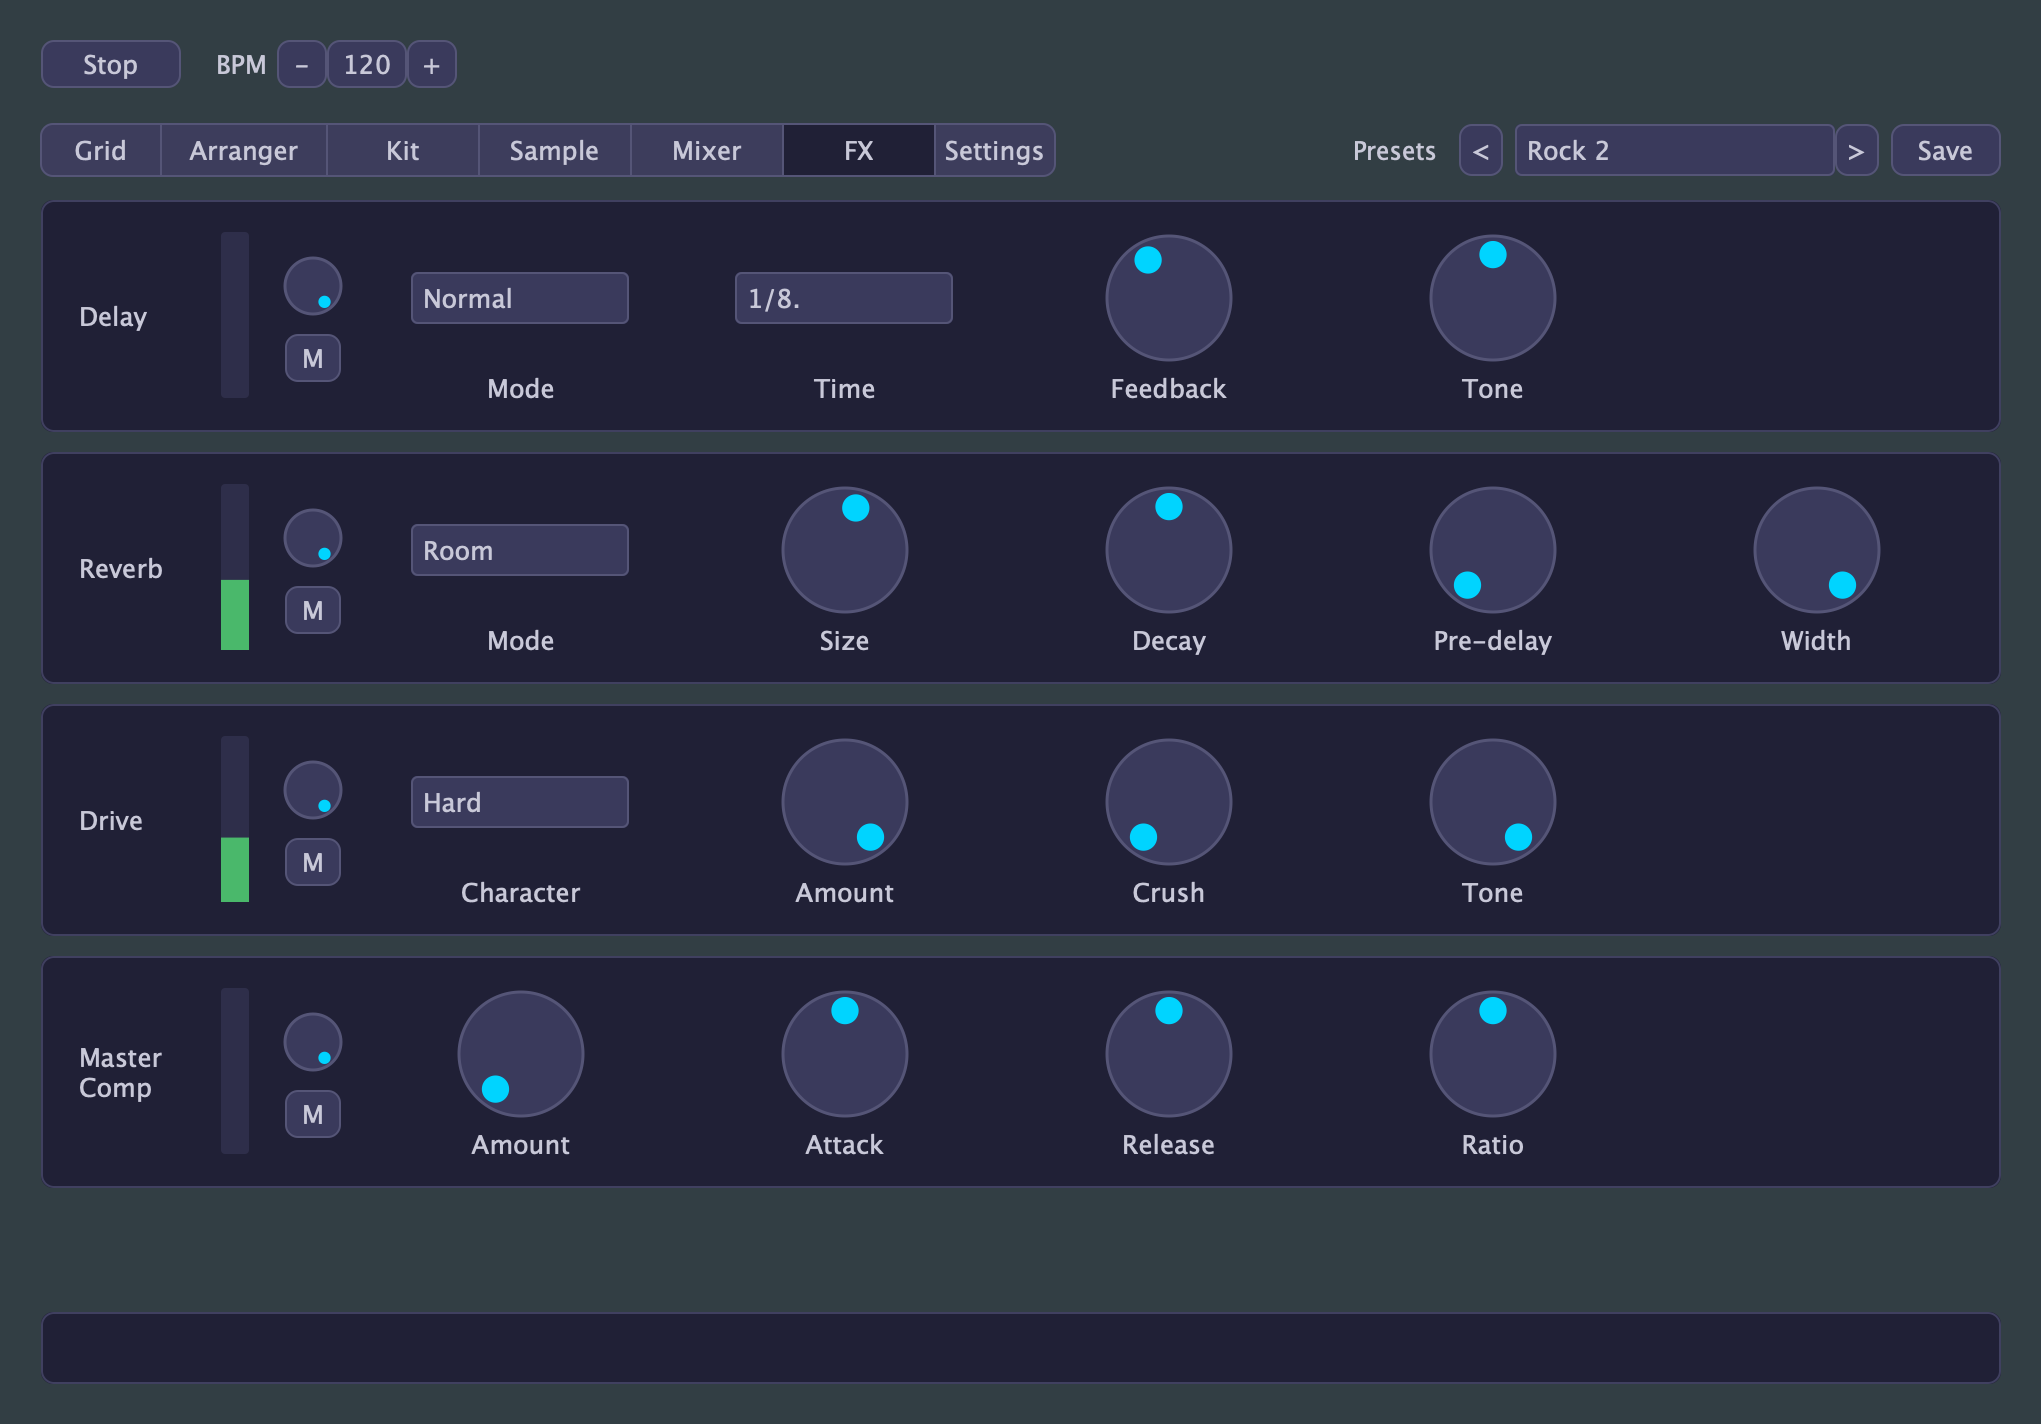
Each row starts with the effect's name, then a meter, then its output section: a small dial with an M button under it.
- The meter shows what that effect is actually contributing. It reads zero when the dial is closed or M is down, so it answers both "am I feeding this" and "can I hear it". On the Comp row it shows how hard the compressor is working rather than a level; the master fader already meters the output.
- The dial is how much of the effect reaches the mix: the return level for Delay and Reverb, the dry/wet blend for Drive and Comp. It has no caption because it isn't one of the character controls; the info bar names it while you turn it.
- M takes that effect out so you can hear the kit without it, then bring it straight back; your levels are untouched. On the Comp row it bypasses rather than silences, a compressor having nothing to mute. It's a listening aid rather than a setting, so it isn't saved in presets, and loading a preset always restores everything.
Delay and Reverb are always fully wet inside their own effect, so the return dial is that effect's mix; there's no separate Mix control to get out of step with it.
Delay
A tempo-synced echo shared by all lanes.
- Mode: the echo's behavior. Normal is a clean stereo echo. Ping Pong bounces the repeats left, right, left across the stereo field. Tape wobbles the playback speed slightly and saturates the loop, so repeats smear and thicken as they decay. Free unlocks the time from the tempo and hands the Time slot over to a millisecond dial.
- Time: the echo spacing as a note value, locked to the tempo: straight, dotted (.) and triplet (T) versions of everything from a sixteenth to a whole note. 1/8 dotted is the classic. In Free mode this becomes a millisecond dial instead, from 5 ms up to two seconds.
- Feedback: how much of each echo feeds the next. Low values give a single slap; high values a long trail. It always dies out on its own; it can't run away.
- Tone: a filter inside the feedback loop. Each repeat passes it again, so trails get progressively darker the lower it's set, like a tape echo.
- Return (the header dial): how loud the echoes sit in the mix. Since the delay itself is fully wet, this is the delay's mix control. It starts fully up, so what you send is what you get back, and the per-lane sends are the only thing you have to move.
Reverb
A room shared by all lanes.
- Mode: the kind of space. Hall is the plain, open room. Room is smaller and darker, for ambience that stays out of the way. Plate is a dense, bright body: the classic snare reverb. Bright keeps the low end completely dry and puts the tail up in the air above the kit, the one to reach for when a reverb would otherwise muddy a bass-heavy pattern. Shimmer feeds an octave-up copy of the tail back into the room, so it climbs while it decays. Ducked pulls the reverb back while the kit is playing and lets it bloom in the gaps. Gated does the opposite: the tail blooms with the hit and is then cut off abruptly, the big 80s drum sound.
- Size: from a tight ambience to a long wash.
- Decay: how long the tail rings. Lower settings damp the highs faster, pushing the room into the background. In Shimmer mode it doubles as the octave loop's character: how bright the climbing tail is and how long it sustains.
- Pre-delay: how long the reverb waits before it starts. A little goes a long way on drums: it keeps the tail off the attack, so hits stay punchy even with a lot of reverb behind them.
- Width: the stereo spread of the tail; fully down collapses it to the center. In Shimmer, Ducked and Gated mode this slot is taken over by that mode's own control, described below.
- Return (the header dial): how loud the tail sits in the mix. Since the reverb itself is fully wet, this is the reverb's mix control. Like the delay's, it starts fully up.
The three modes that take over the Width slot:
- Amount (Shimmer): how much octave-up tail is fed back in. Gentle settings add air; high settings turn the reverb into a rising pad.
- Ducking (Ducked): how far the reverb drops while the kit hits.
- Hold (Gated): how long the tail is allowed to ring before the gate closes. Each new hit re-opens it, so busy bars stay open and isolated hits get the characteristic burst. Only lanes you actually send to the reverb can open the gate, which means the sends double as its trigger: send just the snare and you get the classic snare-only gate, untouched by the kick.
Drive
Per-lane saturation (each lane has its own Drive amount on the Mixer) with a shared character:
- Character: the shape of the distortion, gentlest first. Soft rounds the signal into overdrive the harder it's pushed. Hard clips it flat for a rougher, more aggressive edge. Fold reflects overdriven peaks back on themselves instead of flattening them, which turns a hit metallic and clangy: the most destructive setting here, and worth trying on toms and cymbals where a clipper only gets louder. Fuzz is the sound of a snare through a broken pedal. It collapses towards a square wave like Hard does, but it also starves the way the circuit it imitates does: a hit splats at full force and then the body right behind it thins out and sputters away, and on a busy pattern it never quite recovers between hits. It strips the low end out before distorting, too, so where Hard comes out flat-topped and full, Fuzz comes out thin, nasal and considerably nastier. Turn Mix up for the full effect, or back for weight under a driven kick. Distortion is the one that doesn't hold back at all: it rectifies the signal for a savage octave-up snarl on top of everything else. Use it when you want the drum to stop sounding like a drum.
- Amount: rides every lane's Drive at once. It multiplies the per-lane amounts on the Mixer rather than replacing them, so the balance you set between drums is kept and the whole kit gets pushed harder or softer together. It starts fully up, so it does nothing until you reach for it. This is the quick way to tame a preset that arrives more distorted than you want, without walking nine dials on the Mixer.
- Crush: bit-depth and sample-rate reduction after the shaper, for digital lo-fi grit. Gentle amounts add a dusty edge; high amounts are full sampler-from-1987 territory. It pairs particularly well with Soft, which is the classic lo-fi hip hop combination.
- Tone: a lowpass at the end of the chain that tames both the shaper's fizz and Crush's harshness. Fully up is open.
- Mix (the header dial): blends the driven signal back under the untouched one. Fully up, all you hear is the driven version. It starts a little below that, because a trace of clean signal under the drive is what keeps a driven hit still reading as a drum. A lane with Drive at zero is unaffected either way.
All five are shared by every lane; how much of any of it you hear on a given lane is that lane's own Drive amount on the Mixer. A lane with Drive at zero stays completely clean no matter how these are set, so you can dial in an extreme character and then apply it to just the snare.
Drive vs. Mix. They both make the drive gentler, but not in the same way, and the difference is the useful part. Drive (on the Mixer, per lane) decides how hard the signal is pushed: back it off and the whole sound is simply less distorted, transients included. Amount does the same thing to every lane at once, so it belongs on the Drive side of this distinction rather than the Mix side. Mix (here, shared) leaves the drive as savage as you set it and folds the clean signal back in underneath. That's parallel drive: the original attack survives at full height while the distorted body thickens up behind it. Low Drive at full Mix gives you a politely warmed-up hit; full Drive at half Mix gives you a hit that still cracks like the original but has something ugly growing under it. Crush shows the difference most clearly: a little Crush is just dusty, whereas a fully crushed signal blended in at 30% keeps the drum intact and hangs a shattered ghost off it.
Master Comp
A "glue" compressor across the whole master bus, the thing that makes eight separate hits sound like one kit playing in one room. It sits after the master EQ and drive and before the master fader, so moving the fader never changes how hard it compresses, and the delay and reverb returns pass through it along with the drums.
- Amount: the one knob you actually need. At 0 the compressor is bypassed. Turning it up lowers the threshold, so more of the signal is compressed, and adds makeup gain to match, so the kit glues and gets gradually a touch louder rather than quieter as you go. The makeup follows the Ratio dial too, which is why turning Ratio up also costs you no level. Turn Amount up until the kit pulls together. On a loud, dense kit the drum attacks can push past full scale at high Amounts; the master fader is the place to take that back.
- Attack: how quickly it clamps down once a hit crosses the threshold. Short settings catch the transient itself and tame the click; longer ones let the stick through and squeeze only the body, which is usually what you want on drums.
- Release: how quickly it lets go again. Long settings keep the compressor engaged between hits, so consecutive drums duck against one continuous movement; that's where the "glue" and the pumping come from. Short settings recover between every hit and sound busier.
- Ratio: how hard anything over the threshold is squeezed. Low ratios lean on the signal; high ratios flatten it.
- Mix (the header dial): blends the compressed bus back under the untouched one. Fully up, you hear only the compressed version.
The stock Attack, Release and Ratio are a classic bus-compressor setting that suits drums, so you can leave all three alone and just ride Amount.
Amount vs. Mix. As with Drive, these are not two ways of saying "less". Amount decides how hard the compression is: turn it down and everything is compressed, just more gently. Mix leaves the compression exactly as heavy as you set it and folds the untouched bus back in underneath. That's parallel compression: a high Amount with Mix around halfway keeps the kick's attack completely intact while the squashed copy fills in body and sustain behind it, punch and density at once, which no setting of Amount alone will give you. With Amount at 0 nothing is compressed, so Mix does nothing.
The Settings Tab
Three boxes: instance settings on top, MIDI routing in the middle, resources below.
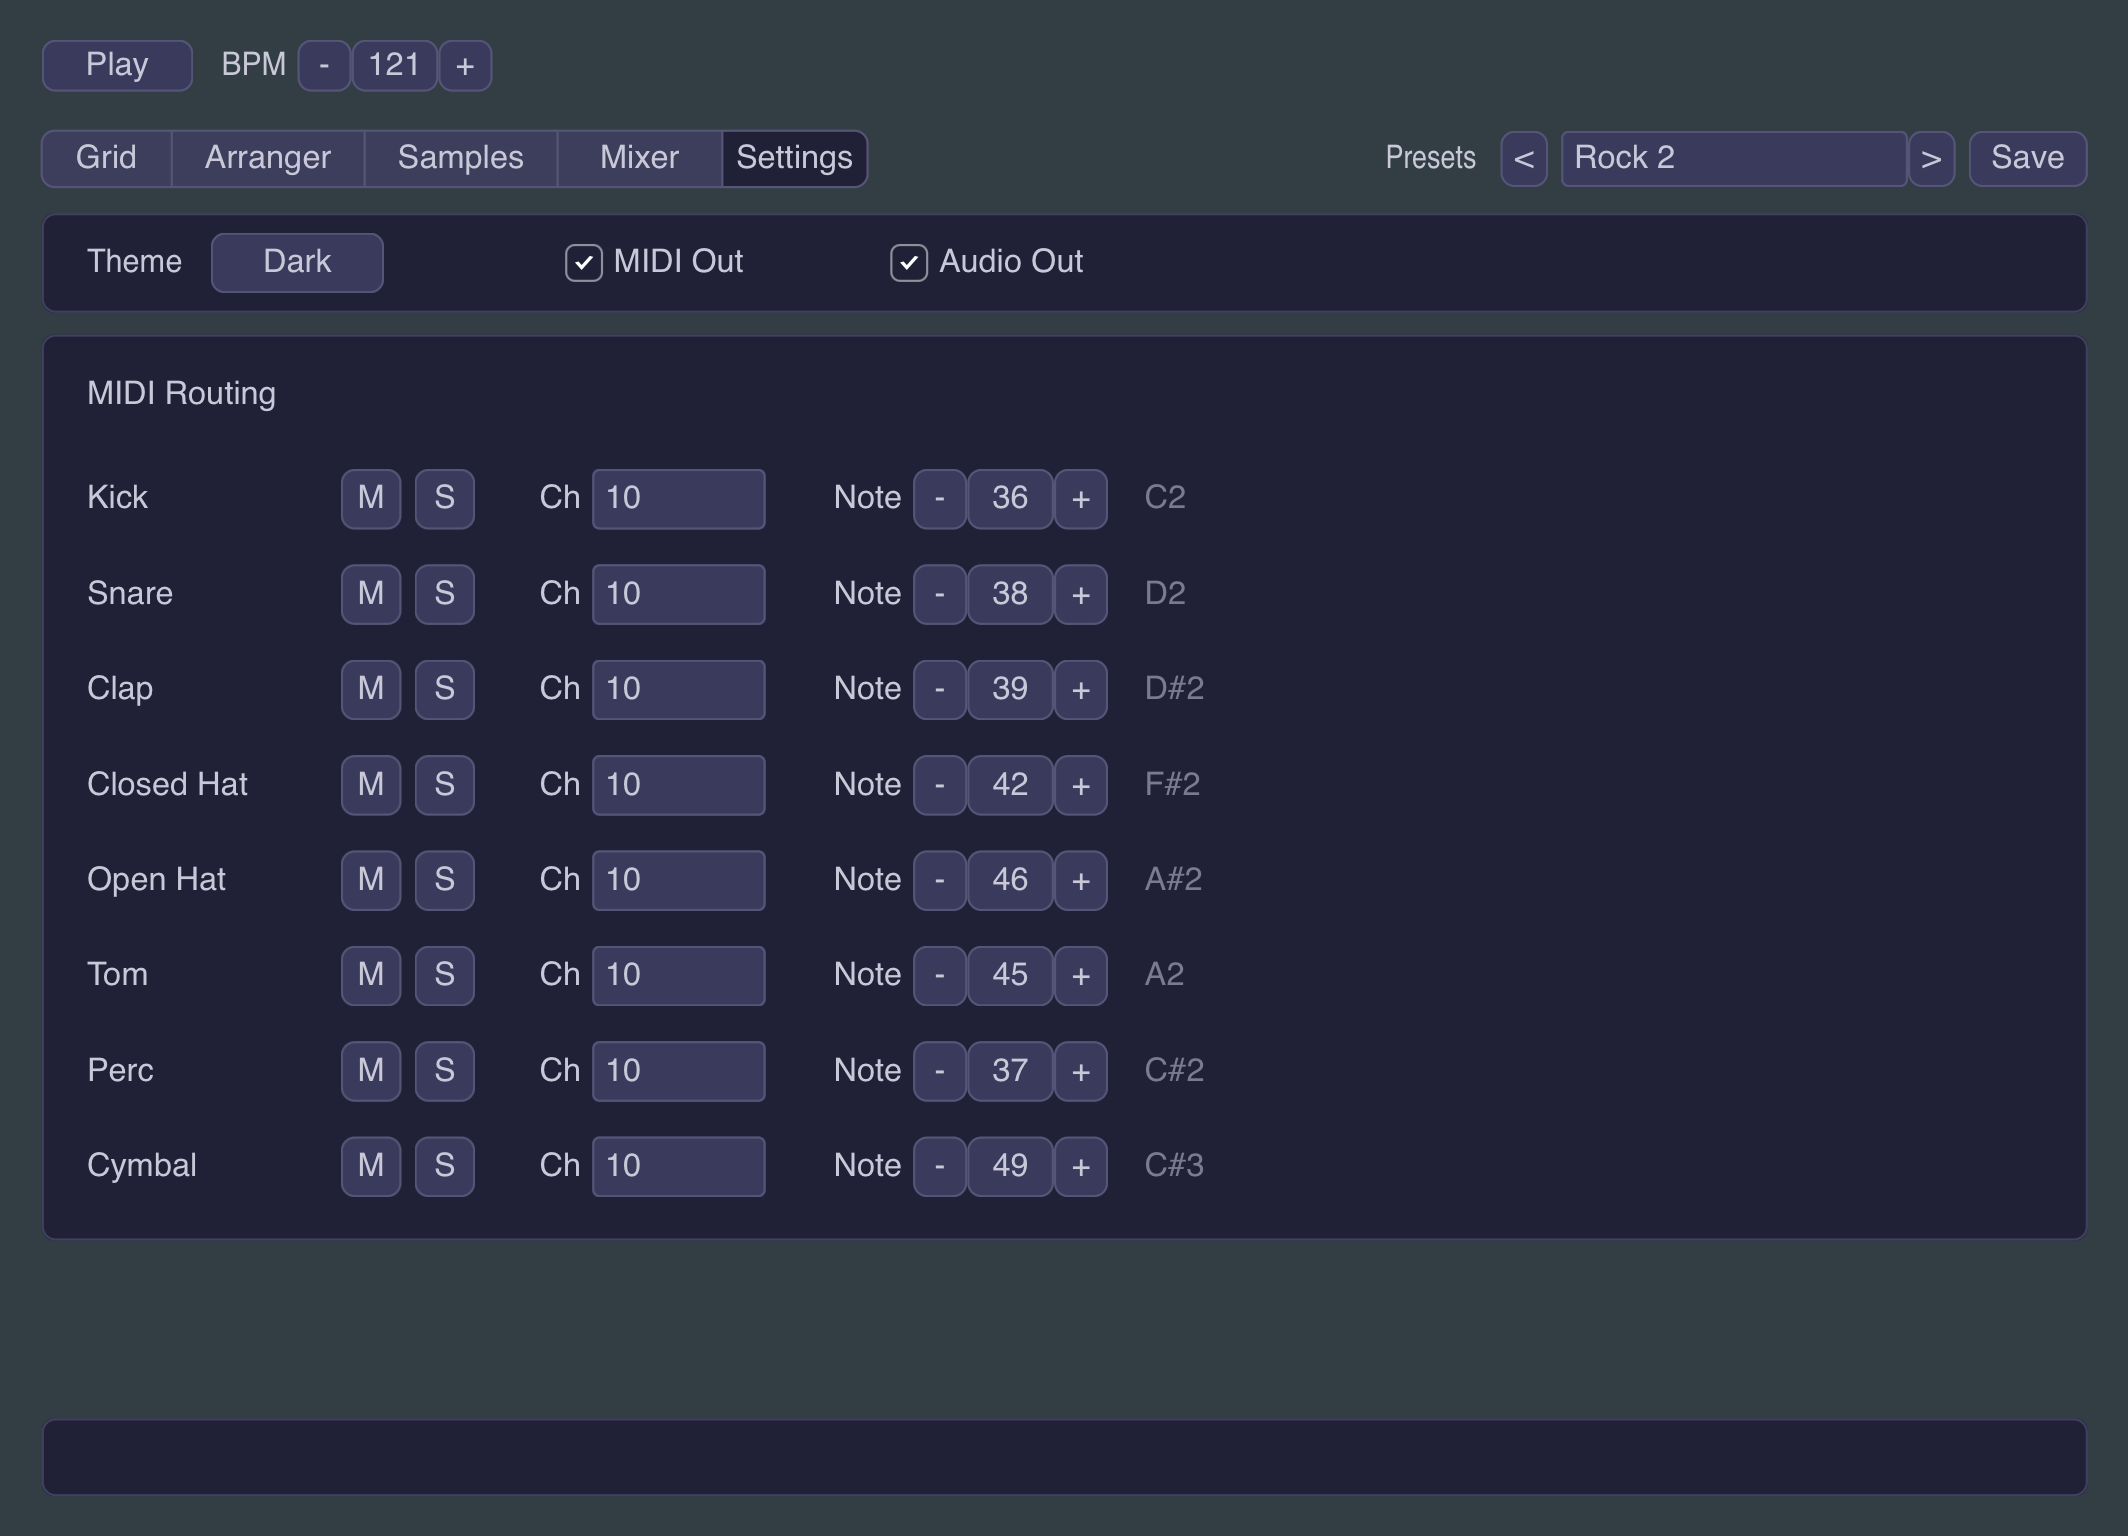
Instance settings
These are preferences about the instance rather than the pattern; most stay put while you cycle through patches. The exceptions are Polyrhythm and Phase, which your own presets remember.
- Theme: switches the editor's color scheme; the button shows the active theme (Light / Dark) and clicking flips it. Applies to every Snorkel Audio plugin window on the machine. Pure presentation.
- MIDI In (toggle, plugin only): play the drums live from incoming MIDI. A note matching a lane's note (set in the MIDI Routing rows below) triggers that lane at the velocity you play, on any channel, whether or not the sequencer is running, so you can finger-drum from a pad controller or keyboard over the pattern, or use Little Drum Machine as a plain drum sound module. Live hits use the lane's selected sample (sample 1 on lanes in star mode) and are never echoed to the MIDI output.
- MIDI Out (toggle, plugin only): emit a MIDI note for every audible drum hit, on the per-lane channel and note set below. Use it to have Little Drum Machine's grooves drive external drum modules or synths.
- Audio Out (toggle, plugin only): render the internal drum sounds. Switched off, Little Drum Machine becomes a pure MIDI sequencer: the lanes still emit MIDI and the Sample tab's preview still sounds, but the pattern itself and the Kit tab's pads are silent.
- Polyrhythm (toggle): unlocks per-lane timing on the Grid tab: each lane gets a steps / length pair and runs its own loop (see the Grid tab's "Lane timing" section). Off (the default), the grid is the classic 16-step machine; any lane timings you have set are kept and come back when you switch it on again. Presets remember whether it was on: six factory presets switch it on because their patterns are built on it (the three "Polyrhythm" presets, plus Industrial, Trap and Afrobeat, which use lane clocks as genre moves rather than as showcases), and the rest of the factory bank switches it back off.
- Phase (button, shown while Polyrhythm is on): what happens to lane timing when the playing scene changes. Sync, the default, restarts every lane at the top of the new scene, so the arrangement stays locked together. Drift lets each lane keep rolling through the switch, floating freely over the arrangement. Like Polyrhythm, your own presets remember the choice, and the factory presets built on the feature set it to match how they were written.
The standalone app hides the three MIDI In / MIDI Out / Audio Out switches: playing live via MIDI In and the internal drum sounds are always on, and MIDI output is off, since the standalone has no way to route MIDI to other software or hardware.
MIDI Routing
One row per lane:
- Lane name.
- M / S: the same mute and solo switches as the Grid and Mixer tabs. Muted or soloed-out lanes emit no MIDI.
- Ch: the MIDI channel this lane emits on, Off or 1-16. Off silences just this lane's MIDI. The default is channel 10, the General MIDI drum channel.
- Note (stepper): the MIDI note this lane emits, and responds to when MIDI In is on, 0-127, with the note name shown beside it. Defaults follow the General MIDI drum map (Kick 36, Snare 38, and so on), so Little Drum Machine lines up with GM-compatible drum modules out of the box. Double-click the value to reset it to the default.
Resources
One line with two links that open a browser: Discover more nice things from Snorkel Audio goes to the Snorkel Audio website, and read the manual goes to this manual online.