WaveBlender Manual
Overview
WaveBlender is a sonic playground where two waveforms collide to create the unexpected. It is an audio effect that combines two waveforms using 22 blend modes, from classic vocoders and ring modulation to spectral splicing, probabilistic gating, and scrub-style time-mangling. A 16-step modulator can sweep the blend in time with the host, and every parameter is automatable from the DAW or AUv3 host.
What makes WaveBlender special
- 22 blend modes across five families (Spectral, Modulation, Stochastic, Dynamics, Math). Pick from Classic / FFT / Distorted Vocoder, Frequency Splice, Spectral Gate, Phase Swap, Bin Interleave, FM, AM, Ring Modulation, Sidechain Duck, Amplitude Follow, Probabilistic, Scrub, plus eight Math operators.
- Unique dials per mode, all designed to push the sound somewhere surprising while still leaving a useful musical zone in the middle of each range.
- Sophisticated 16-step modulator that adds movement to the blend in sync with the host transport, with five flavours of groovy randomization (walk, pattern, accent, pulse, curve).
- Three Randomize options: fast variations, happy accidents, and a one-button "everything new" roll for whole-instrument-style exploration.
- Morph macro that crossfades the dry inputs with the FX in a single dial, perfect for parameter automation and live performance.
- Soft-clip safety net with an adjustable ceiling that doubles as a tone-shaping saturator when you lean into it.
- All parameters automatable from the DAW or host.
Sonic character
WaveBlender is built for experimental and creative sound design. It is at its best when fed two ordinary sources you would not normally pair together.
- Playful: a sonic playground for combining two sources you would not normally pair.
- Glitchy and trippy: probabilistic switching, bin interleave, scrub, and step-modulated morphing produce textures that sit between rhythm and chaos.
- Often harsh, sometimes aggressive: many modes lean into distortion, ring-mod overtones, and brutal spectral surgery.
- But also beautiful and subtle: vocoders, amplitude follow, and gentle morphs can produce smooth, musical results when the dials are eased back.
The Two Inputs
Every WaveBlender mode operates on two audio signals, Audio 1 and Audio 2. How you feed them in depends on which wrapper the plugin runs in.
See the per-platform sub-sections below: Desktop DAW (VST3), iPad (AUv3), and Desktop Standalone. The Direction toggle swaps which signal is the carrier and which is the modulator.
The Two Inputs: Desktop DAW (VST3)
- Audio 1 is the track WaveBlender sits on. Drop the plugin onto a regular audio or instrument track and that track's signal becomes Audio 1.
- Audio 2 is the sidechain input. Route a second source to WaveBlender's sidechain in your DAW. In Ableton Live, Cubase, Logic, Reaper, etc. this is the standard sidechain workflow you would use for a compressor.
If you have not wired up the sidechain yet, the info bar at the bottom of the plugin shows "Connect sidechain input for Audio 2". Once the sidechain is connected but stays silent for 10 seconds while Audio 1 has signal, a red "Warning! No input signal detected on Audio 2." appears, a reminder that most modes (Multiply, vocoders, Amplitude Follow, etc.) produce silence with a silent Audio 2.
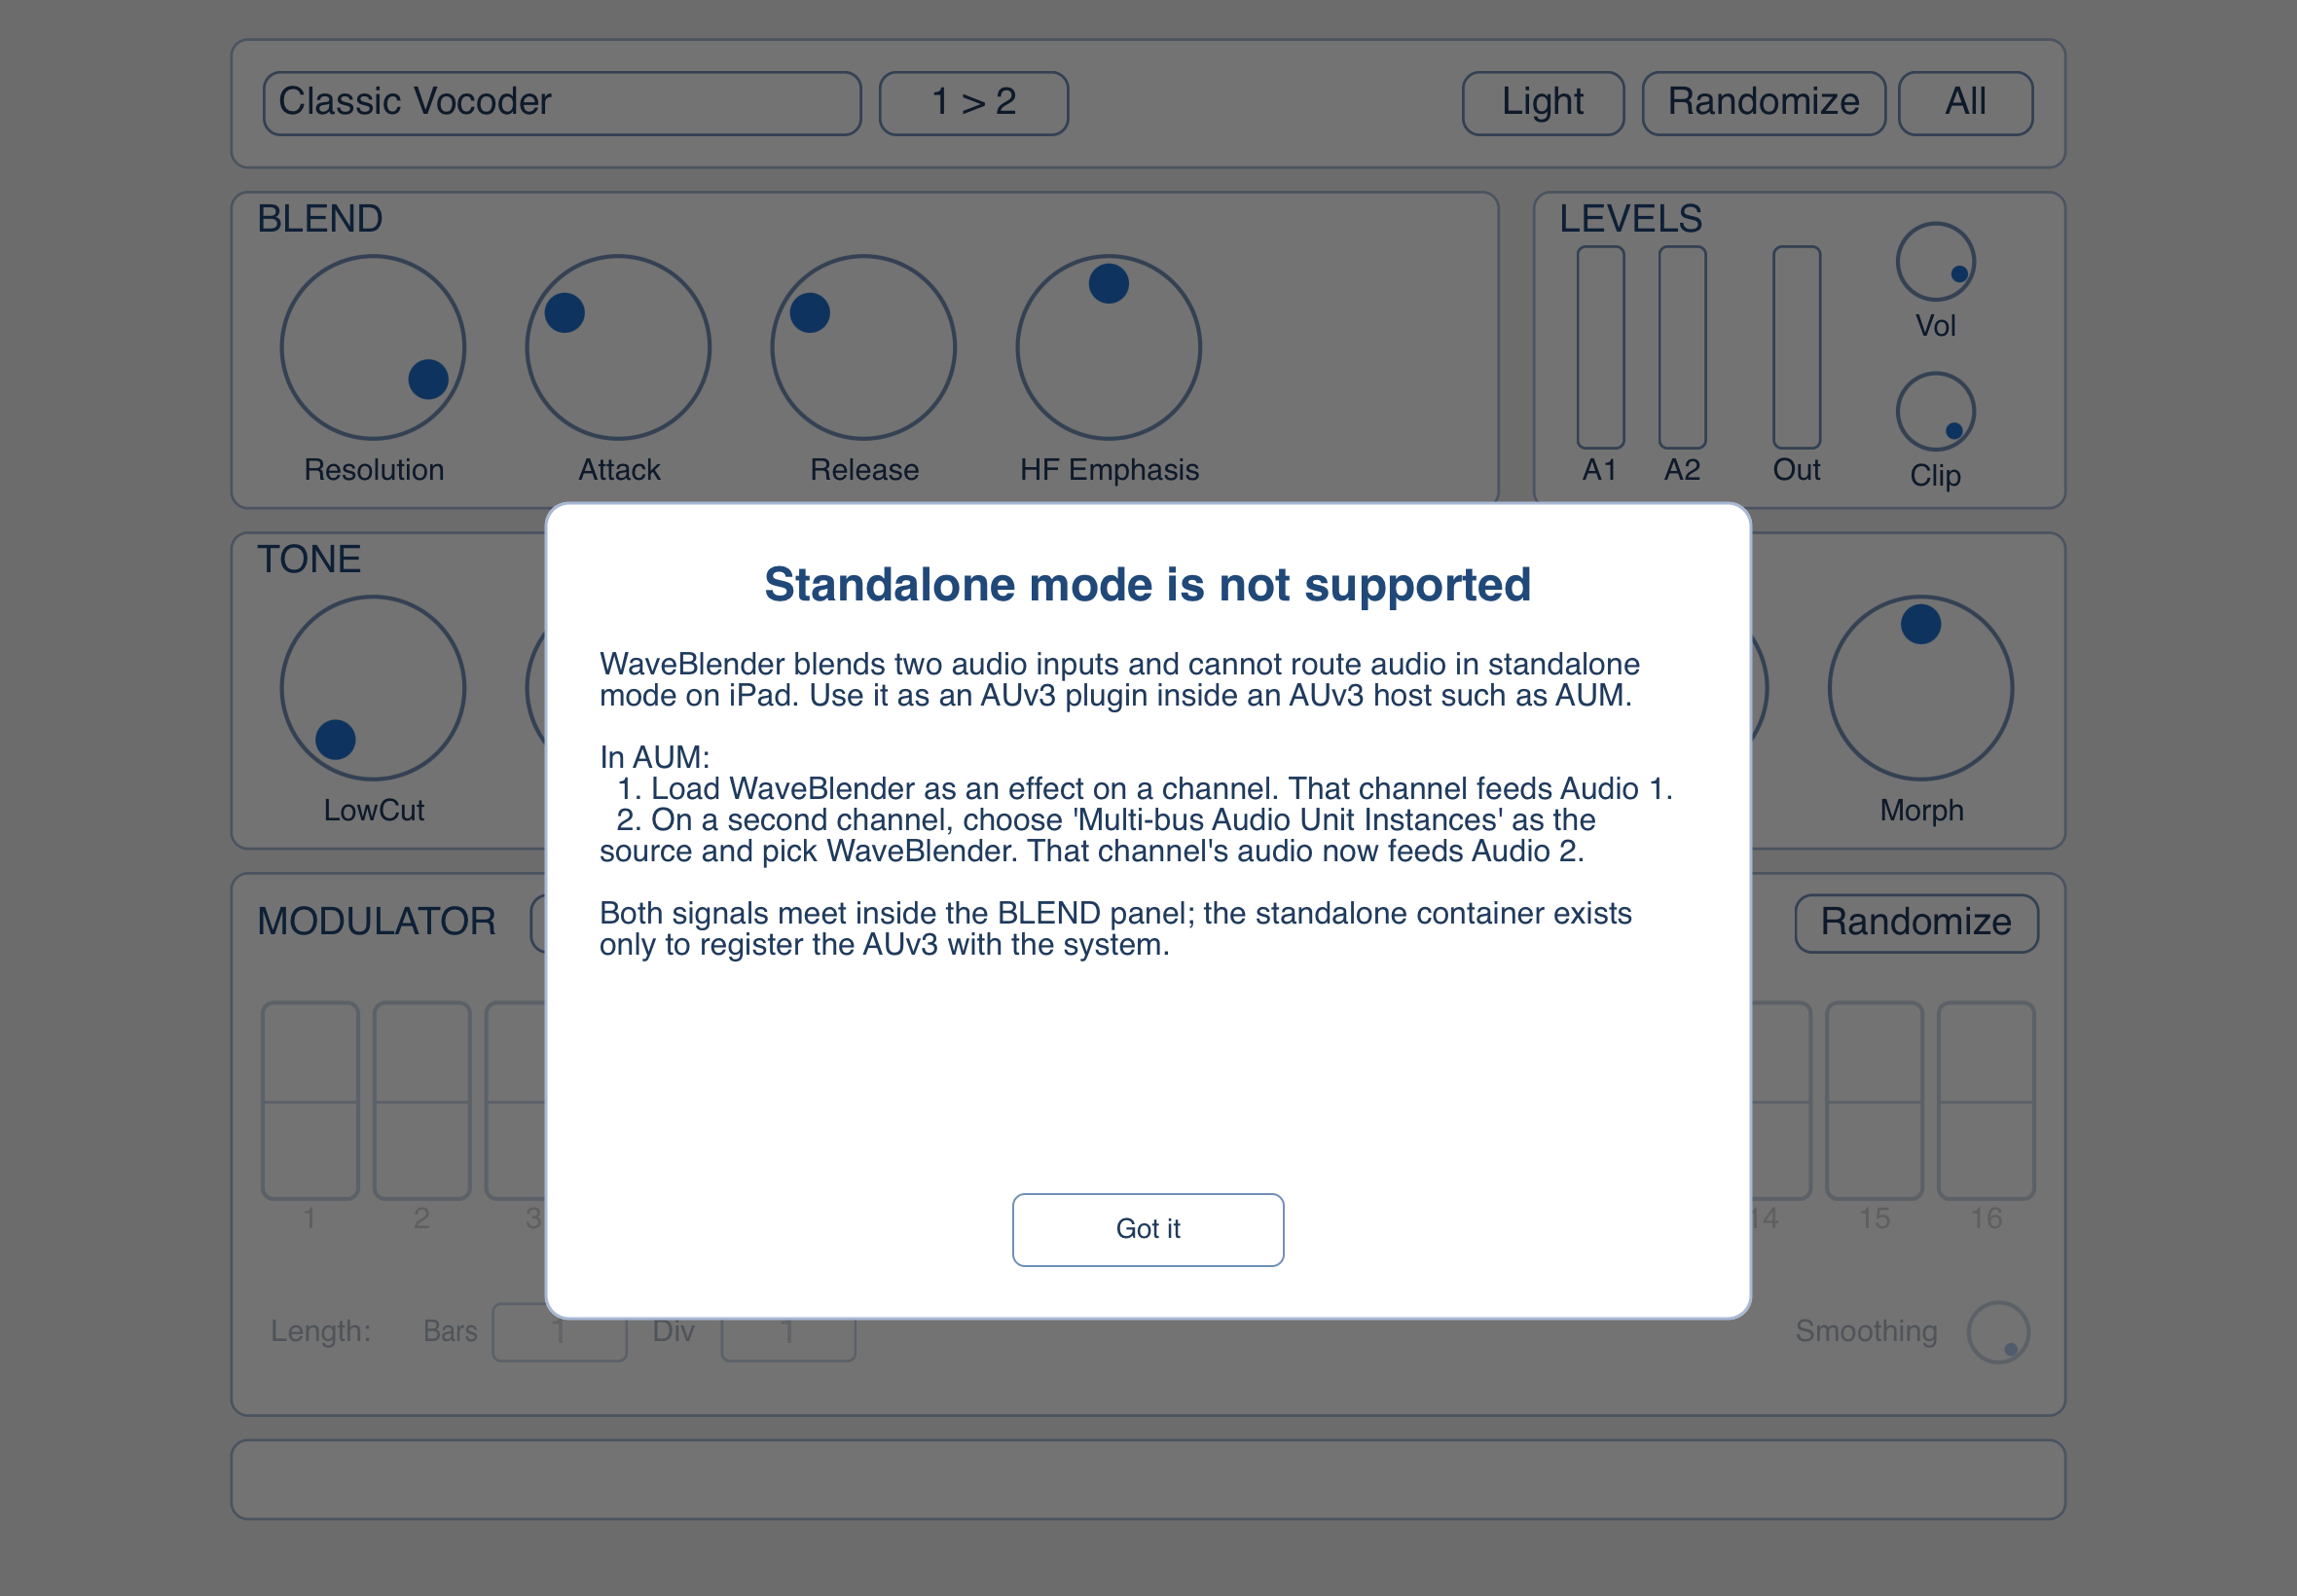
The Two Inputs: iPad (AUv3)
WaveBlender on iPad is AUv3 only. It needs a host that supports two audio inputs, e.g. AUM.
Routing recipe in AUM
- Load WaveBlender as an effect on the first channel. That channel feeds Audio 1.
- On a second channel, choose 'Multi-bus Audio Unit Instances' as the source and pick WaveBlender. That second channel's signal then feeds Audio 2.
- Mute the second channel. Otherwise its unprocessed audio plays in the background alongside the blend.
Without this routing, WaveBlender only receives one signal and most blend modes will sound silent or dry. Other AUv3 hosts (Drambo, Cubasis, AudioBus, ...) handle two-bus plugins differently; if the host's standard sidechain or send routing does not deliver a second bus, the AUM 'Multi-bus Audio Unit Instances' trick is the universal fallback.
The standalone container app on iPad exists only to register the AUv3 with iOS. On launch it shows a modal card explaining the same routing recipe.
The Two Inputs: Desktop Standalone
The desktop standalone is a self-contained sandbox for auditioning blend modes. It loads two WAV files from disk and plays them back through the same realtime engine the plugin uses.
- A 36 px top bar at the top of the window holds Play, Stop, and Loop transport controls.
- Three tabs underneath: Blend (the main panel, the same view you see in the plugin), Audio 1, and Audio 2 (file pickers and waveform displays for the two source files).
- The Audio 1 / Audio 2 tabs let you load any WAV from disk, scrub the waveform, and switch between presets shipped under
samples/.
The Two Inputs: Direction Toggle
Most blend modes treat the two inputs asymmetrically. One is the carrier, the other is the modulator. The Direction toggle next to the mode selector swaps them, so you can audition the mode both ways without rewiring your session.
The Direction button is hidden for the Math modes that are symmetric (Add, Min, Max, Absolute Difference, XOR, Ring Modulation) or only differ in polarity (Subtract). It is exposed for Divide and Sign Multiply, which produce genuinely different results in each direction, alongside every non-Math mode.
The Direction toggle only swaps the FX path. The output-mix Signal 1 and Signal 2 dials always refer to the labelled input slots regardless of direction.
Blend Modes
WaveBlender has 22 blend modes, organised under five section headings in the dropdown. The first row of dials below the mode selector is mode-specific; each entry below documents that row.
The second row (FX Level, Signal 1, Signal 2, Morph) and the step sequencer below it are shared by every mode and behave the same way regardless of selection. They are documented in Output Mix & Morph and The 16-Step Modulator.
Blend Modes: Spectral
These modes work in the frequency domain by splitting incoming audio into many narrow frequency bands, doing their work per band, then reassembling the result. Most use an FFT, which adds a small amount of latency that the plugin reports to the host so DAW delay compensation keeps everything aligned. The two filter-bank vocoders (Classic and Distorted) are the exception: they use a bank of bandpass filters and run with zero latency.
Classic Vocoder
The traditional analogue-style vocoder: a bank of bandpass filters with envelope followers, no FFT. It has zero latency and a more 'organic' character than the FFT versions, at the cost of less detailed frequency tracking.
- Resolution (number of bands): How many filter bands the spectrum is split into. More bands = more intelligibility but a less coloured sound; fewer bands = the classic chunky vocoder texture.
- Attack (0.5 – 50 ms): Per-band envelope follower attack. Same role as in the FFT Vocoder.
- Release (5 – 500 ms): Per-band envelope follower release. Same role as in the FFT Vocoder.
- HF Emphasis (-12 – +12 dB): High-frequency tilt on the output. Vocoders tend to sound dark; positive values restore some sparkle.
FFT Vocoder
Imprints the spectral shape (the 'formants') of Audio 1 onto the harmonic content of Audio 2. Classic vocal-on-pad effect: speech as Audio 1 + a synth pad as Audio 2 makes the pad 'talk'.
- Resolution (8 – 4096 bins): FFT size. Larger values give finer frequency detail at the cost of slower response and more latency. Lower values track fast changes better but smear the harmonic content. 2048 is a good starting point for vocals.
- Attack (0.5 – 50 ms): How quickly the per-band level follower reacts to a rise in Audio 1. Shorter values keep transients (consonants) crisp; longer values smooth them out.
- Release (5 – 500 ms): How quickly the level follower decays after a fall in Audio 1. Short values feel snappy and percussive; long values produce sustained, washed-out tails.
- HF Emphasis (-12 – +12 dB): Tilts the output's high frequencies up or down. Useful when the vocoded result feels too dull (push positive) or too sibilant (pull negative).
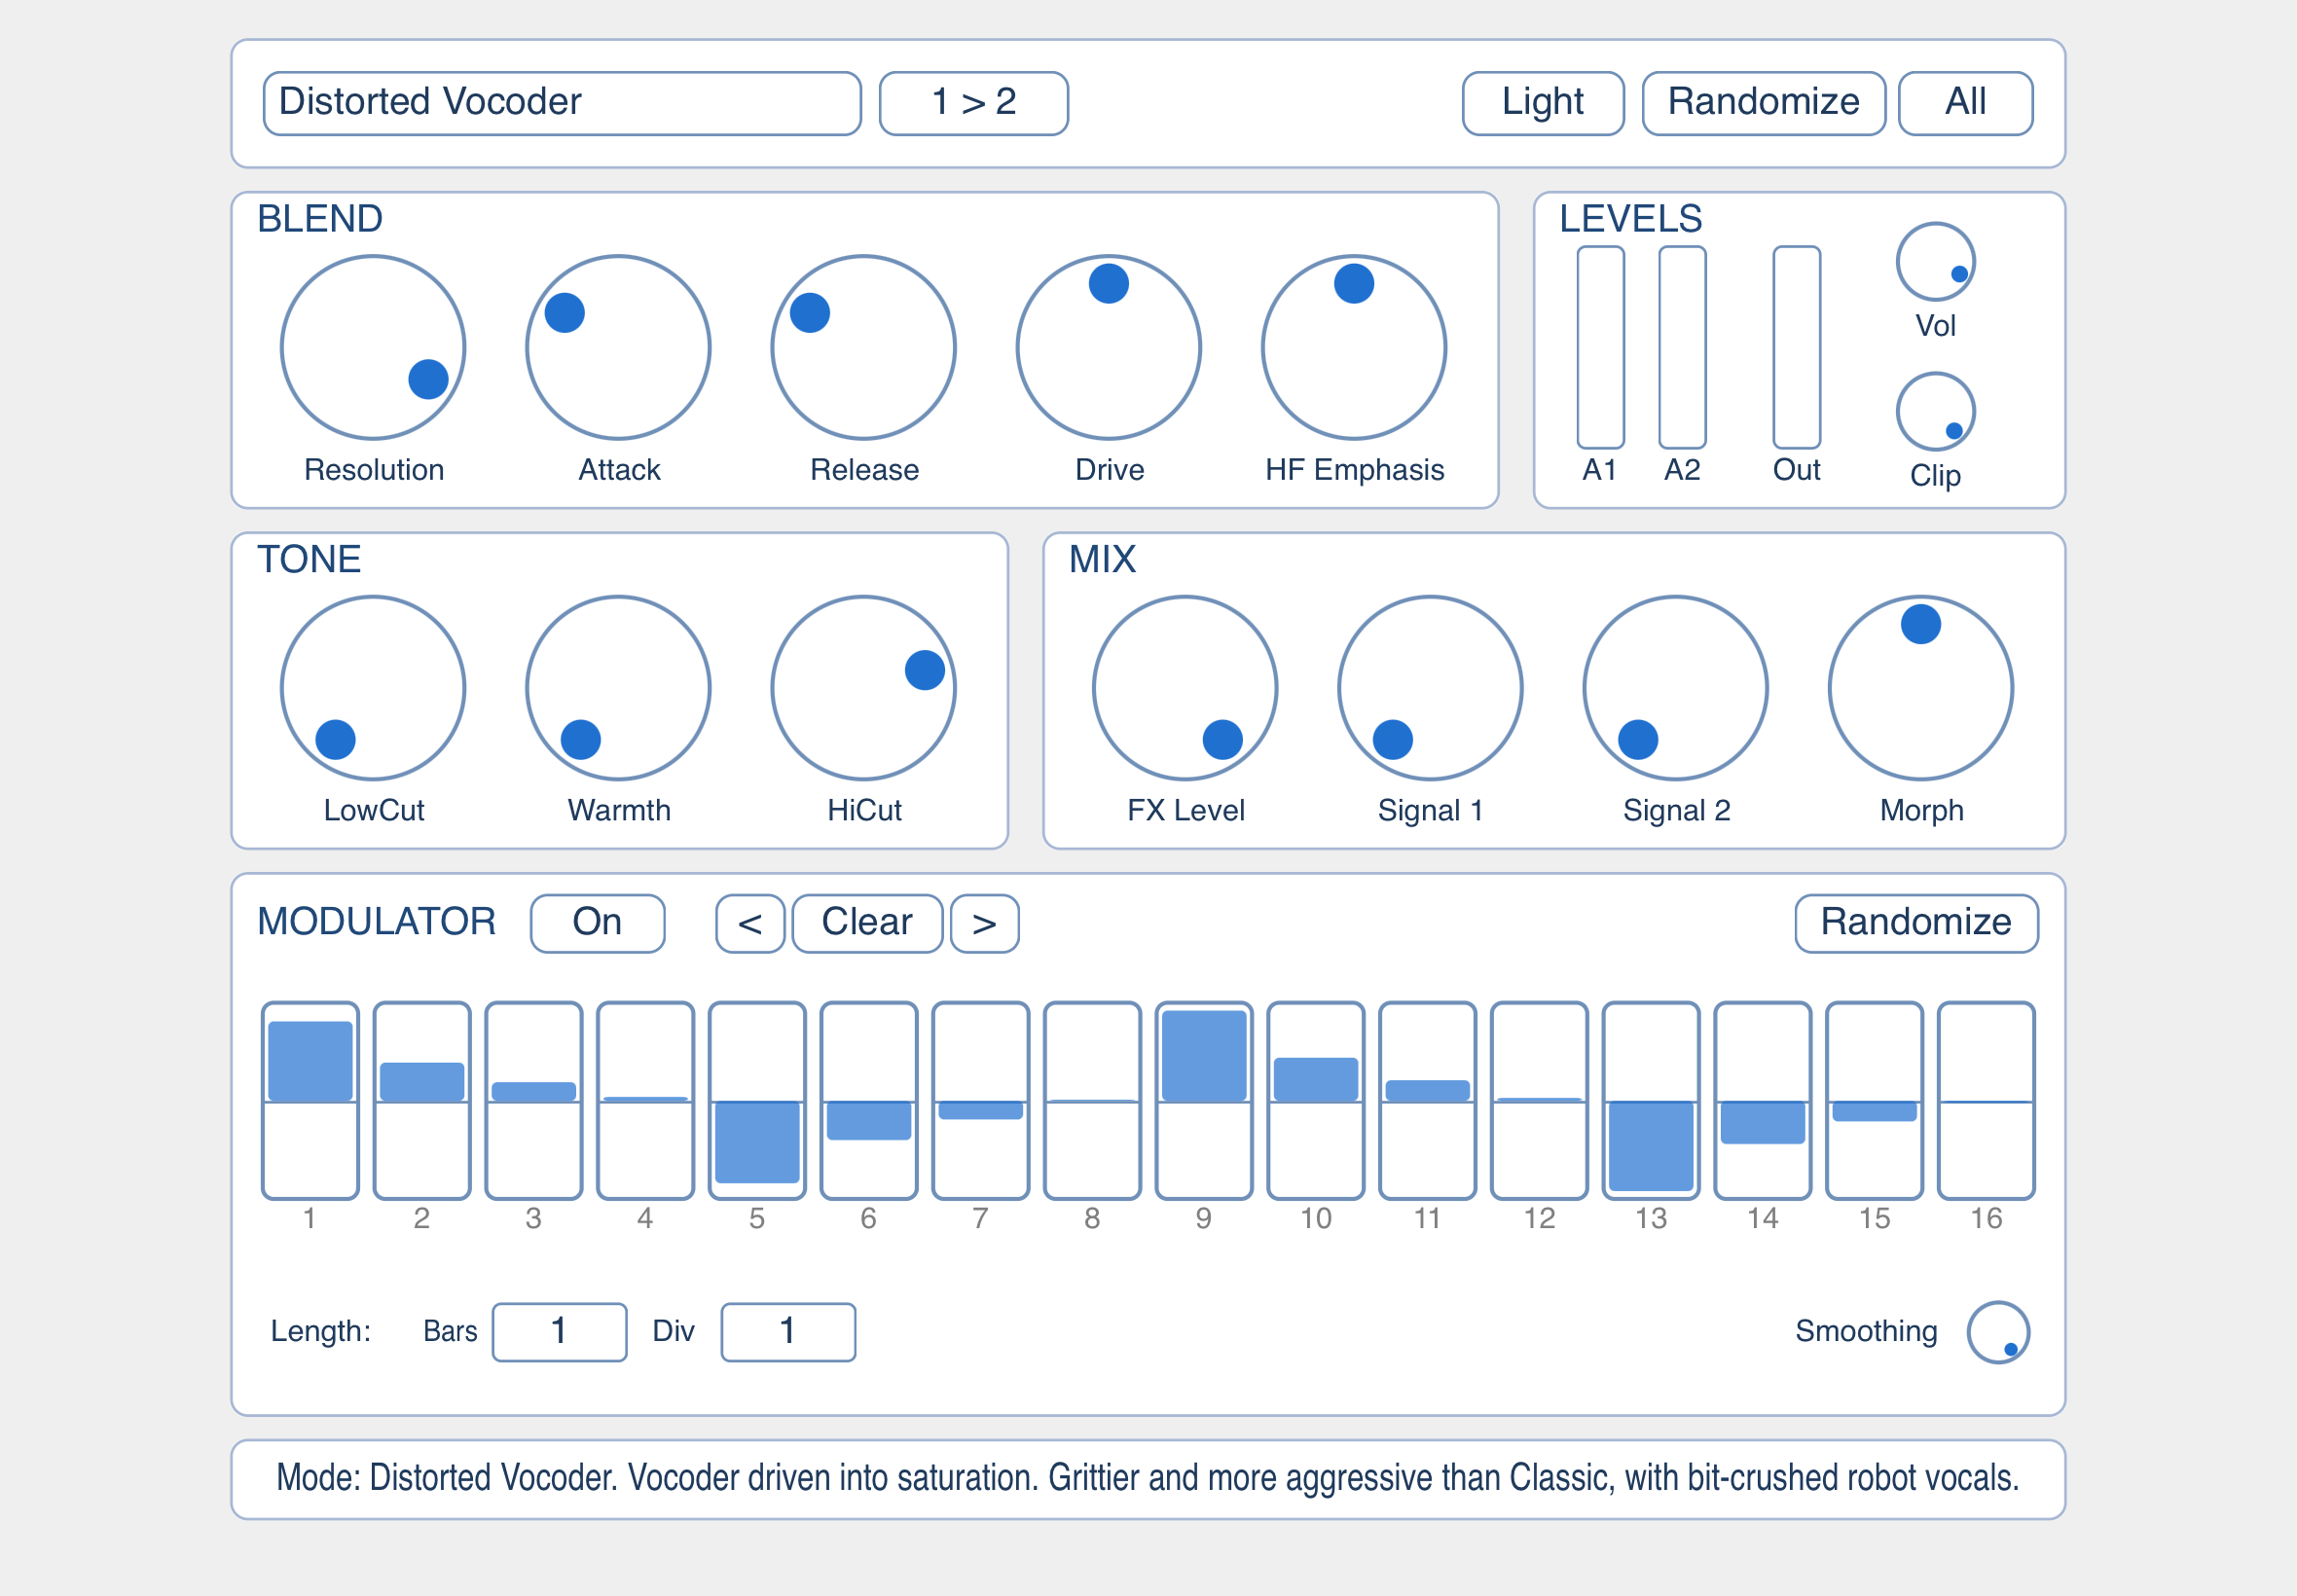
Distorted Vocoder
Same filter-bank topology as the Classic Vocoder, but the summed band output is driven into soft saturation (tanh). The result is grittier and more aggressive: think bit-crushed robot voices rather than smooth synth-pop. Like Classic, it uses bandpass filters rather than an FFT, so it has zero latency. Resolution (number of bands), Attack, Release and HF Emphasis behave the same as on the Classic Vocoder. One additional dial:
- Drive (0 – 100 %): Pre-tanh gain applied to the summed band output. 50 % is unity (the reference "Distorted Vocoder" sound); below that the saturation softens toward a cleaner character; above that more energy is pushed into tanh, raising harmonic density and crunch. The mapping spans roughly ±20 dB end-to-end.
Frequency Splice
Stitches the lows from Audio 1 together with the highs from Audio 2 (or vice versa with Direction reversed). Good for borrowing the bass of one sound and the air of another.
- Crossover (100 Hz – 10 kHz): The split frequency. Below this, Audio 1 is used; above, Audio 2.
- Width (0 – 100 %): Width of the blend zone around the crossover. At 0 % the split is hard; higher values create a smoother transition where both sources mix together.
- Tilt (-100 – +100 %): Skews the spectral balance. Negative values tip the result toward the low side, positive toward the high side, without changing the crossover frequency itself.
- LFO Rate (0 – 20 Hz): Sweeps the crossover frequency up and down by up to an octave. At 0 Hz it is off. Useful for animated, filter-sweep-style effects.
Spectral Gate
Uses Audio 2 as a gate: only the frequency bins where Audio 2 is loud enough are allowed through from Audio 1. A 'you only hear A where B exists' effect. Quieter regions of B carve silent holes in A.
- Threshold (0 – 100 %): How loud a bin in Audio 2 has to be (relative to its loudest bin in the current frame) before the matching bin in Audio 1 is let through. Higher values gate more aggressively.
- Tilt (-100 – +100 %): Makes the threshold frequency-dependent. Positive values make highs harder to pass (more gating up top); negative values make lows harder to pass.
- Resolution (8 – 4096 bins): FFT size. Higher values make the gate more selective per frequency at the cost of time resolution and latency; lower values trade selectivity for sharper transient response. Shared with the FFT Vocoder's Resolution dial.
Phase Swap
Keeps the level (magnitude) of Audio 1 in each frequency bin but rotates each bin's phase toward Audio 2's phase. The result has Audio 1's tonal balance with Audio 2's timing/positioning character: subtle on most material, but can move sounds noticeably in the stereo field or change transient feel.
- Amount (0 – 100 %): How far each bin's phase is shifted toward Audio 2. 0 % leaves Audio 1 untouched; 100 % fully adopts Audio 2's phase.
- Tilt (-100 – +100 %): Frequency-weighted amount. Positive values apply more phase swap to highs; negative values apply more to lows.
- Resolution (8 – 4096 bins): FFT size. Higher values give finer per-bin phase decisions and longer latency; lower values smear less in time. Shared with the FFT Vocoder's Resolution dial.
Bin Interleave
Alternates between Audio 1 and Audio 2 in fixed-size groups of frequency bins. The output's odd groups come from one source and the even groups from the other, producing a comb-like blend.
- Chunk (1 / 2 / 4 / 8 bins): How many bins are taken from one source before switching to the other. Smaller chunks produce a tighter, denser interleave; larger chunks give wider alternating bands. The values shown are bin counts, not Hz.
- Tilt (-100 – +100 %): Frequency-weighted bias on which source wins each chunk. At 0 % the alternation is strict 50/50; positive values push high-frequency chunks toward Audio 2 (and lows toward Audio 1); negative values do the opposite. At ±100 % the interleave collapses into a hard frequency split, effectively a Frequency Splice with the crossover in the middle of the spectrum.
- Resolution (8 – 4096 bins): FFT size. Higher values pack more bands into the spectrum (denser comb at the same Chunk); lower values give wider, fewer bands. Shared with the FFT Vocoder's Resolution dial.
Blend Modes: Modulation
These modes use one signal to modulate a property (amplitude, frequency, or shape) of the other. They run sample-by-sample with no latency, except FM which uses a centred ring buffer and reports a small delay.
Frequency Modulation (FM)
Uses Audio 1 to phase-modulate Audio 2: the read position of Audio 2 is shifted forward or back by an amount proportional to Audio 1's instantaneous value. When Audio 1 is harmonic, Audio 2 sprouts FM-synth-style sidebands; when it's noisy, Audio 2 gets a turbulent vibrato character. (Despite the name, this is the same operator topology DX7-style 'FM' synths use: phase modulation, not true frequency modulation.)
The mode reads Audio 2 from a 2048-sample ring buffer centred around a fixed ~23 ms delay (at 44.1 kHz), giving Audio 1 symmetric headroom to push the read forward or back. That delay is reported to the host so DAW delay compensation keeps everything aligned.
- Window (1 – 50 ms): Caps the total peak-to-peak swing of the read offset; the per-side reach is half this value. Acts as a ceiling on the swing that Depth scales into; longer Windows make Depth's full-scale value larger, allowing more dramatic pitch warping but at the cost of audible smearing on rich material.
- Depth (0 – 100 %): How strongly Audio 1 modulates the read position, expressed as a fraction of the Window cap. At Window's default of 10 ms, 100 % gives roughly ±5 ms phase swing; at a 1 kHz carrier this is modulation index ~5 (dense FM-synth sidebands). Low values are a subtle vibrato; high values are aggressive pitch warping.
- Drive (0 – 200 %): Pre-gain on Audio 1 before it is used as the modulator. Beyond 100 % the modulator clips against Window's per-side cap more often, emphasising the loud peaks of Audio 1 and producing a more aggressive, edge-pinned character.
- Smoothing (0 – 100 %): One-pole lowpass on the read-offset path. At 0 % the offset follows Audio 1 directly, which can sound jittery on short windows or noisy modulators. Higher values calm it down at the cost of high-frequency sideband detail.
- Feedback (0 – 100 %): Routes a portion of the FM output back into the modulator. Adds harmonics and, at higher values, tips the sound into noisier, more aggressive territory.
Amplitude Modulation (AM)
Uses Audio 1 (plus an optional internal LFO) as a level-control signal applied to Audio 2. The DC Offset dial sets a static portion of the gain that is always applied on top of the modulation, so AM can produce anything from classic tremolo at high DC offsets to a ring-mod-like multiplication when DC is dialled to zero.
- Depth (0 – 100 %): How strongly Audio 1 affects Audio 2's level. 0 % leaves Audio 2 unchanged; 100 % is full modulation.
- DC Offset (0 – 100 %): The static portion of the gain that is always applied on top of the modulation. Higher values keep the carrier audible even at high Depth; lower values let the modulator close the gain down to silence in its dips. At 0 % the result is mathematically a multiplication, similar to ring modulation.
- LFO Rate (0 – 20 Hz): Adds an internal sine wave to the modulator. At 0 Hz the LFO is off and only Audio 1 modulates the level. Useful when you want a steady tremolo on top of the audio modulation, or when Audio 1 isn't well-suited as a modulator on its own.
Ring Modulation (RM)
Multiplies Audio 1 by Audio 2 sample-by-sample. The classic metallic / clangorous effect: every frequency in one input combines with every frequency in the other, producing sum and difference frequencies that often have no harmonic relationship to the originals.
- Tilt (-100 – +100 %): Spectrally tilts Audio 1 vs Audio 2 before the multiply (one-pole crossover at 700 Hz). Positive values push Audio 1 toward its highs and Audio 2 toward its lows; negative values do the opposite. At 0 % both inputs pass through unchanged.
- Drive (0 – 100 %): Pre-multiply tanh saturation applied to both inputs before they are multiplied. At 0 % the inputs pass through clean, giving the classic two-tone ring-mod result. Higher values push each input toward a square wave, so the sum/difference content from the multiply gets dense and harmonically rich rather than pure.
- DC Offset (0 – 100 %): Adds a constant to Audio 1 before the multiply, so the output becomes
(Audio 1 + dc) × Audio 2. At 0 % the carrier is fully silenced when Audio 1 is silent (pure ring-mod). Higher values bleed the unmodulated carrier through, smoothly morphing the sound from clangorous ring-mod toward AM-tremolo character with the carrier always audible. - Rectify (0 – 100 %): Blends the result toward its half-wave rectified version (negative samples set to zero). At higher values the sound becomes more buzzy and adds octave-up content.
(Balance is hidden for Ring Modulation because for plain multiplication it would just duplicate FX Level.)
Blend Modes: Time
Scrub
Audio 2's amplitude steers a virtual playhead through a 2048-sample buffer of Audio 1's recent history, a sample-rate-style 'scrub' effect. The playhead writes Audio 1 in continuously and reads from a position offset around a centred delay; Audio 2 (plus the Bias dial) sets how far and how fast that offset walks each sample. The result preserves Audio 1's spectral content but warps its time axis under Audio 2's control. The fixed ~23 ms read delay is reported to the host for delay compensation.
- Scale (0 – 200): How many extra samples the read head moves per output sample at Audio 2's full amplitude. Small values feel like a subtle wobble; larger values can pitch-shift Audio 1 dramatically or smear it into a granular texture.
- Bias (-100 – +100 %): Constant per-sample drift added on top of Audio 2's modulation, layered on the read head's normal forward tracking. At 0 % silent Audio 2 plays Audio 1 unchanged at normal speed; +100 % doubles the playback rate (an octave up); -100 % exactly cancels the forward tracking and freezes the head on a single sample. Reverse playback is not reachable from this dial.
- Smoothing (0 – 100 %): One-pole lowpass on the per-sample step. At 0 % the head responds instantly to Audio 2's amplitude, which can sound jittery; higher values smooth the motion into glides instead of jumps.
Blend Modes: Stochastic
Probabilistic
Each output sample is either Audio 1 or Audio 2, never a continuous mix (apart from a brief equal-power ramp during switches if Crossfade is up). The choice is a coin flip weighted by the relative loudness of the two inputs at that moment, with a hold timer to prevent it from switching too rapidly. The result is a granular, lo-fi crossfade that always plays one source at full level.
- Bias (-100 – +100 %): Skews the coin toward one input regardless of relative loudness. Negative values favour Audio 1; positive values favour Audio 2. At 0 % the choice is purely amplitude-weighted.
- Hold (0 – 100 ms): Minimum time the chosen source is held before another decision is made. Short values produce a fast, noisy texture; longer values produce audible chunks of one source followed by chunks of the other.
- Crossfade (0 – 50 ms): Equal-power ramp at every switch point, softening the abrupt cuts. The effective ramp length is clamped to half the current Hold so a steady-state segment always exists between fades, meaning at very short Hold values, the dial's upper range will silently saturate.
- Stereo (0 – 100 %): How often the right channel rolls its coin flip independently of the left at each decision moment. At 0 % both channels always pick the same source (mono-coherent); at 100 % every decision is rolled independently per channel, producing a granular stereo decorrelation. Intermediate values give a continuous spread.
Blend Modes: Dynamics
Sidechain Duck
Audio 1's level controls the volume of Audio 2: the louder Audio 1 gets, the more Audio 2 is attenuated. This is the standard 'kick ducks the bass' effect.
- Attack (0.5 – 50 ms): How quickly the ducking responds when Audio 1 gets louder. Short attacks catch transients; longer attacks let the start of each hit through before ducking.
- Release (5 – 500 ms): How quickly Audio 2 returns to full level after Audio 1 drops. Long releases give a smooth, breathing pump; short releases sound tighter and more rhythmic.
- Threshold (0 – 100 %): How loud Audio 1 has to be before any ducking happens. At 0 % even quiet content ducks; higher values let Audio 1's quieter moments pass without affecting Audio 2.
- Depth (0 – 100 %): Maximum amount of ducking. At 100 % loud peaks of Audio 1 silence Audio 2 completely; at lower values the ducking is gentler.
Amplitude Follow
The opposite shape to Sidechain Duck: instead of ducking Audio 2, this mode imprints Audio 1's envelope onto Audio 2, so Audio 2 only sounds when Audio 1 sounds, with the same loudness shape. Useful for making one source play 'in the rhythm of' another.
- Attack (0.5 – 50 ms): How quickly the envelope follower rises with Audio 1.
- Release (5 – 500 ms): How quickly the envelope follower falls after Audio 1 drops.
- Threshold (0 – 100 %): Envelope level Audio 1 has to reach before Audio 2 starts coming through. At 0 % any movement in Audio 1 lifts Audio 2; higher values gate out the quieter parts so only louder hits trigger the follow.
- Depth (0 – 100 %): Mix between unchanged Audio 2 (0 %) and Audio 2 fully shaped by Audio 1's envelope (100 %).
Blend Modes: Math
The eight Math modes (Min, Max, Add, Subtract, Absolute Difference, Divide, Sign Multiply, XOR) all share the same first-row parameter set and run per-sample with no latency. Only the operation between the two signals changes:
- Min: smaller of the two samples. Tends to feel quieter and smoother; anything either input lacks at a given moment is missing from the output.
- Max: larger of the two samples. Tends to sound denser; loud content from either input dominates.
- Add:
Audio 1 + Audio 2. A simple sum, just like a regular mix. Drive and Tilt let you pre-shape each input before the sum so it differs from a clean output-mix combine. - Subtract:
Audio 1 − Audio 2. Phase-cancels content the two sources have in common; emphasises what is unique to each. - Absolute Difference:
|Audio 1 − Audio 2|. Like Subtract but always positive; adds a buzzy, octave-up character. - Divide:
Audio 1 / Audio 2. Volatile and crest-heavy; produces extreme peaks where Audio 2 approaches zero (the result is clamped to ±1 to keep it usable). - Sign Multiply: Audio 1's amplitude with Audio 2's sign (positive/negative direction). Audio 2 acts as a polarity flipper for Audio 1.
- XOR: bitwise XOR of the two signals' digital sample values. Crunchy, glitchy, and unpredictable: the most aggressive of the Math operations.
Shared parameters
- Balance (0 – 100 %): Pre-scales Audio 1 versus Audio 2 before the operation. 50 % is equal levels; lower values lean toward Audio 1, higher toward Audio 2. (Hidden for Ring Modulation, where Balance would only duplicate FX Level.)
- Tilt (-100 – +100 %): Spectrally tilts Audio 1 vs Audio 2 before the op (one-pole crossover at 700 Hz). Positive values push Audio 1 toward its highs and Audio 2 toward its lows; negative values do the opposite. Useful for keeping one input's body in its low end while letting the other fight for the highs.
- Drive (0 – 100 %): Pre-op tanh saturation applied to both inputs. At 0 % the inputs pass through clean. Higher values push each input toward a square wave before the math, increasing harmonic density and aggression in the result.
- Tame (0 – 100 %, Divide / XOR / Sign Multiply only): These three operations spike to extreme peaks on transients, so the output runs through a tanh saturator with an adjustable ceiling. 0 % is 'raw' (the saturator only catches genuine clip excursions); higher values pull the ceiling down, compressing the whole signal into a rounder, quieter, more tame sound. Use it to keep these volatile ops musical without reaching for the FX Level dial.
- Rectify (0 – 100 %): Blends the output toward its half-wave rectified version. Adds an octave-up component and a buzzier character at higher values.
Output Mix & Morph
Below the mode-specific row sit four shared dials that control the output mix. They behave the same way regardless of which blend mode is active.
- FX Level (0 – 100 %): Level of the wet (blended) signal in the output.
- Signal 1 (0 – 100 %): Direct passthrough of Audio 1, unaffected by the blend mode or the FX channel strip.
- Signal 2 (0 – 100 %): Direct passthrough of Audio 2, also unaffected.
- Morph (0 – 100 %): A one-knob crossfade macro between Audio 1, the FX result, and Audio 2.
See How Morph Works, FX Channel Strip, Output Stage, and Level Meters below for details.
Output Mix: How Morph Works
Morph drives the three level dials above (FX Level, Signal 1, Signal 2) via a triangular crossfade:
- 0 % → Audio 1 only (Signal 1 = 100 %, FX = 0, Signal 2 = 0).
- 50 % → FX only (FX = 100 %, Signal 1/2 = 0).
- 100 % → Audio 2 only (Signal 2 = 100 %, FX = 0, Signal 1 = 0).
- Intermediate values blend two of the three sources with equal-power-style crossfades.
When you touch any of the three level dials directly, Morph deactivates (the dial fades to 35 % alpha as a visual cue) and the three levels become independent again. Touching Morph re-activates it and snaps the three back onto the macro's curve.
Output Mix: FX Channel Strip
The FX path (everything driven by FX Level) runs through three filters in series, applied after the per-mode makeup gain but before the Sig 1 / Sig 2 dry mix, so dry passthroughs stay clean.
The strip is laid out signal-flow left to right under the FX Level dial: Low Cut → Warmth → Hi Cut.
- Low Cut (20 Hz – ~1 kHz):2-pole Butterworth high-pass, no resonance. Bypassed at the bottom of the dial.
- Warmth (0 – 100 %): A tilt EQ feeding an asymmetric tanh saturator. The EQ shifts spectral energy into a warm 250 Hz / softened 6 kHz region before the non-linearity, so the harmonics generated are 'warm' rather than bright. At 0 % the strip is bypassed; higher values progressively colour the signal.
- Hi Cut (~1 kHz – 20 kHz):2-pole Butterworth low-pass, no resonance. Bypassed at the top of the dial.
Output Mix: Output Stage (Vol & Clip)
The right-hand LEVELS strip holds three vertical meters (A1, A2, Out) plus two small utility dials:
- Clip (-12 – 0 dBFS, default -0.3 dBFS): Soft-clip ceiling. The summed output (FX + Signal 1 + Signal 2) is run through
out = ceiling × tanh(out / ceiling), so peaks above the ceiling are smoothly rounded rather than hard-clipped. At the default -0.3 dBFS the clipper is a near-inert safety net catching the occasional overshoot from a hot blend mode. Pulling the ceiling lower (down to -12 dBFS) turns it into a tone-shaping saturator: the same tanh starts colouring the signal much earlier, adding warmth and density. - Vol (-60 – +6 dB, default 0 dB): Linear output trim, applied after the clipper so the trim cannot push signal back over 0 dBFS.
WaveBlender's per-mode makeup gain table is calibrated for inputs around -18 dBFS RMS. Real-world sources are often 6–12 dB hotter, especially on iPad; the soft-clip stage catches whatever the makeup pushes over the ceiling, which is why the plugin stays robust at any input level.
Output Mix: Level Meters
Three vertical meters in the LEVELS strip show real-time levels with a 30 Hz refresh:
- A1: input level of Audio 1 (post-input, pre-FX).
- A2: input level of Audio 2 (post-input, pre-FX).
- Out: final output level (post-clipper, post-trim).
These are useful both for catching unbalanced inputs and for checking whether the soft-clip stage is doing serious work.
The 16-Step Modulator
Below the BLEND panel sits a 16-step modulator that can sweep the Morph macro in time with the host transport. Every step has a value between -1 and +1; the modulator's output drives Morph from 0 % (-1) to 100 % (+1), with the centre row (0) corresponding to 50 % Morph (FX only). When the sequencer is running, Morph follows the steps and shows a visual handle on its curve.
See Controls for the per-dial reference and Host Sync vs Standalone for how the cycle is driven.
The 16-Step Modulator: Controls
- On/Off toggle: sits above the Bars / Div column. Defaults to off at startup so Morph stays manual until you decide to engage the modulator. When the toggle is off, the entire sequencer column greys out.
- Bars (1, 2, 3, 4, 5, 6, 8, 12, 16): outer length of one full cycle, in bars of the host tempo.
- Div (1 – 8): divider applied to Bars. Cycle length =
Bars / Div. So Bars=2, Div=4 gives a half-bar cycle; Bars=1, Div=8 gives an eighth-note cycle (very short). - Smoothing (0 – 100 %): interpolation between consecutive steps. At 0 % the modulator jumps hard from one step to the next (square waveform); at 100 % it glides smoothly between them (a connect-the-dots curve). Intermediate values cross-fade.
- < and >: rotate all 16 step values left or right by one, with wrap-around. Useful for trying the same pattern starting on a different beat.
- Clear: zeros all 16 step values.
The 16-Step Modulator: Host Sync vs Standalone
- In plugin mode the cycle is driven by host PPQ via the host transport. When the host is stopped, the modulator stops; when it plays, the modulator advances in lock-step.
- In desktop standalone the cycle is derived from the standalone playhead, treating Audio 1 as a 4-bar loop. Press Play in the top bar and the modulator runs along.
The Three Randomize Buttons
WaveBlender has three Randomize buttons, each targeting a different scope. They all sit in the BLEND panel:
- Randomize (top bar of the BLEND panel): picks a new blend mode and randomises every dial currently visible for that mode, then re-rolls Direction (with a 2:1 bias toward
1 > 2). Output mix, smoothing, and the modulator are intentionally not touched, so you can keep a running session stable while exploring sounds. Mode picks are weighted: vocoders and FM are boosted (they tend to be musically rich), Math sub-modes are damped (harsher / niche). The Ring Mod Drive has a low bias because that dial gets very loud and crunchy at the top of its range. - All (sits flush right of Randomize, reads 'Randomize All'): runs the same mode + dials roll, then a coin flip on the modulator. 40 % of the time it disables the sequencer and centres Morph at 50 %, so you audition the new mode at a static FX-only mix; 60 % of the time it rolls a fresh modulator pattern (one of five flavours: walk, pattern, accent, pulse, curve) and forces the sequencer on.
- Randomize in the MODULATOR row (right-aligned in the modulator header): only randomises the modulator. Picks one of the five flavours, rolls all 16 step values, picks a new Bars / Div length (biased toward shorter, danceable cycles, with about half the rolls landing at 1 bar / 1 division), and picks Smoothing (heavily biased toward 100 %). The button also force-enables the sequencer after the roll.
The smoothing-column < / Clear / > buttons are independent of the Randomize button; they edit the existing pattern rather than rolling a new one. All three of them grey out together with the rest of the sequencer column when the On/Off toggle is off.
Automation
Every parameter in WaveBlender, including mode-specific dials, the output mix, Morph, the FX channel strip, the soft-clip ceiling, the output trim, modulator length, smoothing, and the per-step values, is exposed as a host parameter. They can all be MIDI-mapped, automated on the timeline, and recalled from DAW sessions or AUv3 host snapshots.
The blend-mode selector is a choice parameter, so automating mode changes is supported. Be aware that switching between FFT-based modes (FFT Vocoder, Spectral Gate, Phase Swap, Bin Interleave, Frequency Splice) and zero-latency modes mid-stream can produce a brief discontinuity because the FFT output ring is abandoned rather than drained. The same is true for changing the FFT Resolution dial mid-stream.
Known Limitations
- FFT Vocoder latency at maximum Resolution is 85 ms (4096 samples at 44.1 kHz). The host's plugin delay compensation handles this transparently in DAWs; the desktop standalone has no such compensation, so the first ~85 ms of audio after pressing Play will be silent.
- Changing FFT Resolution mid-stream resets the ring buffers and envelope state, producing an audible click. Avoid automating the Resolution dial during a take.
- Switching between FFT-based and zero-latency modes mid-stream can produce a subsample discontinuity for the same reason.
Specifications
- Plugin formats: VST3 + Standalone (macOS, Windows), AUv3 + Standalone container (iPad).
- Manufacturer: Snorkel Audio (
Snkl). - Plugin code:
WvBl. - Bundle ID:
com.SnorkelAudio.WaveBlender. - Sample rates: any (the engine self-adjusts; FM and Scrub ring-buffer reach scales inversely with the sample rate).
- Channel configuration: stereo in / stereo out for both Audio 1 and Audio 2 buses.